
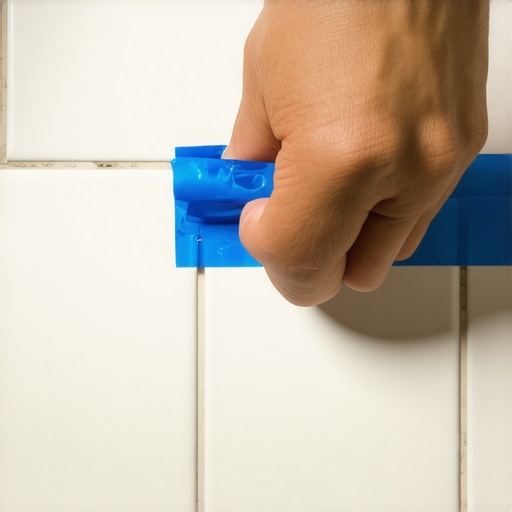
I was knee-deep in a bathroom remodel, staring at a set of subway tiles that looked like a jagged mountain range rather than a sleek, modern wall. My back was screaming, my knees were bruised, and despite using every spacer in the bucket, my grout lines were a disaster. Every time I ran the float over the joints, the grout seemed to smear everywhere except where I actually wanted it. It was a messy, frustrating realization: I was about to ruin a perfectly good weekend because I could not get a clean finish. That is when I grabbed a roll of painters tape and decided to try something that felt, frankly, a bit obsessive. But that little roll of blue tape saved my sanity and my project.
Stop Fighting Your Grout Float
We have all been there—trying to achieve that “perfect” look we see in home magazines while working with materials that seem designed to be messy. I will be honest, my early attempts at installing tiles like a pro were anything but professional. I once spent twelve hours on a small laundry room floor, only to end up with splotchy grout because I over-washed the joints trying to get the edges straight. I learned the hard way that the correct way to mix grout does not matter much if your application technique is sloppy. If you do not have a plan for the excess, you are just pushing mud around and hoping for the best. It is about control, not just coverage.
Is the Extra Taping Step Actually Worth Your Time?
It sounds like a chore, right? Taping off every single edge feels like a fast track to a headache. But here is the reality: according to professional remodeling standards, the most common reason for homeowner dissatisfaction with tile work isn’t the tile itself—it is the grout. In fact, industry data from the National Kitchen & Bath Association suggests that finish quality is the primary factor in perceived project value. By using the blue tape trick for grouting without making a mess, you are not just being extra; you are ensuring that your lines are crisp and that you do not end up wondering why your white grout turned orange due to improper cleaning techniques later on. This method eliminates the haze and the guesswork in one go.
I promise you, once you see how easily the tape peels back to reveal a perfect, surgical line, you will never go back to the smear and pray method. Have you ever stood back from a project and wished you could just hit undo on your grout lines? Let me know in the comments—I have definitely been there. Before we get into the nitty-gritty of the application, we need to talk about the essential prep work that makes this secret actually work.
How to Execute the Surgical Grout Line
Before you touch that roll of tape, you need to clear the field. Think of it like prep work for a high-end paint job; if the walls are dusty, the paint won’t stick. The same goes for your joints. I remember my first big project with 12×24 porcelain tiles. I was so focused on the secret to getting a flat floor for large format tiles that I ignored the excess thinset oozing between the cracks. By the time I went to grout, those hardened grey chunks were peeking through my beautiful silver finish. It looked like the tile was growing mold before I even turned the shower on. You have to ensure those channels are deep and clean.
Get That Excess Thinset Out of the Way
Use a utility knife or a small spacer to scrape out any dried thinset that rose too high during the setting process. If you used the trowel notch secret for getting full thinset coverage, you likely have some squeeze-out. Clear it now, or it will haunt your finish. Once the joints are clear, vacuum the entire area. Any dust left behind will compromise the adhesive on your tape, causing it to peel up right when you start dragging the float across it. You want the tape to be an extension of the tile, not a loose flap that catches the grout.
The Art of Masking Your Tile Edges
This is where the magic happens. Grab your blue painter’s tape—preferably the 1-inch variety—and run it along the edge of every tile, leaving only the grout joint exposed. It is a bit like frosting a cake where the cake is porous and the frosting stains; you are protecting the “cake” surface. Be meticulous. The tape should sit exactly on the edge of the tile without dipping into the joint space. If you overlap into the joint, your grout line will look skinny and uneven. 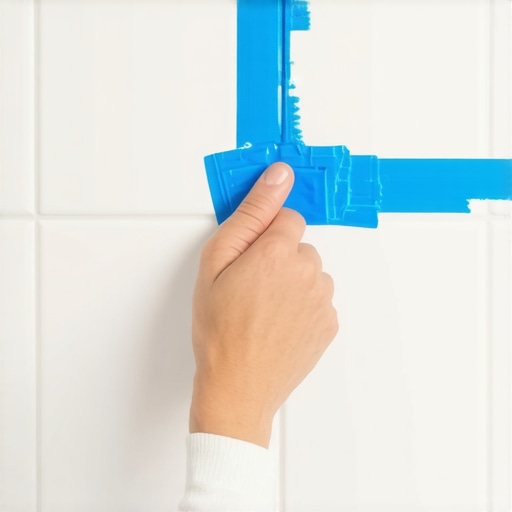 If you are working on a wall, start from the bottom and work your way up so that any drips land on taped surfaces rather than fresh tile. It feels tedious in the moment, but it’s the difference between a DIY look and a high-end installation.
Spread Your Mix Without the Stress
Now, mix your grout. Remember that the correct way to mix grout involves a “slake” period to ensure the chemicals fully activate. Once it’s ready, spread it right over the tape. Don’t be shy. The beauty of this method is that you can be aggressive with your float to ensure the grout is packed tight into the joints. This prevents air pockets that lead to future failures. I’ve seen cases where homeowners wonder why your grout is falling out of the joints in the hallway, and usually, it’s because they were too timid with the float, trying to avoid a mess. With the tape in place, you can shove that grout in with total confidence.
Timing the Tape Pull for a Crisp Finish
The biggest mistake people make is pulling the tape too early or too late. If you pull it while the grout is soupy, it might slump. If you wait until it’s rock hard, the tape might tear or pull the grout out with it. You are looking for that “leathery” stage. Generally, this happens about 10 to 20 minutes after application, depending on the humidity. This is also the exact moment you should pull your tile spacers for the cleanest lines if you haven’t already. When you peel the tape back at a 45-degree angle, it will shear the grout at the tile’s edge, leaving a line so sharp you’d think it was cut with a laser. If there is any slight residue, the wet rag trick for cleaning up wet grout haze will take care of it in seconds, rather than the hours of scrubbing you’d normally face.
Wait! Before you step back to admire those clean lines, let’s dig deeper into the science that actually keeps that grout inside the joint. While the blue tape trick provides a visual shortcut to perfection, there is a technical nuance most people overlook: hydration control. A common myth in the DIY community is that the more you scrub with a soaking wet sponge, the cleaner the finish. In reality, this is the quickest way to ruin your hard work. When you introduce too much water during the cleanup, you are actually washing away the essential polymers and pigments that give the grout its strength and color. This is the reason your grout color looks splotchy and uneven once it dries.
The Hidden Moisture Trap Most DIYers Ignore
In my years of fixing failed bathroom remodels, I have seen a recurring ‘oops’ factor that no amount of tape can fix. It is the temptation to use grout as a structural adhesive rather than a joint filler. If you are working with large pieces, you must remember why your large format tiles need back-buttering every time. If the tile isn’t fully supported, it will shift. According to the Tile Council of North America (TCNA), over-watering during the grout cleanup phase is the leading cause of efflorescence—that annoying white crusty salt—and weak joint structures. By using the tape method, you are actually protecting the grout from that excess water exposure, but you still have to be careful not to ‘drown’ the joints when you do your final light wipe. Have you ever fallen into the ‘too much water’ trap and ended up with chalky grout? Let me know in the comments.
Will This Tape Method Save You on Large Format Tiles?
The short answer is yes, but only if your prep work is flawless. Many advanced installers think they can skip the tape if they have a steady hand, but large format tiles create unique challenges with ‘lippage.’ If your floor isn’t perfectly flat, the tape might catch on the raised edges of the tile, creating a gap where grout can seep under. This is why addressing floor leveling challenges and common mistakes is vital before you even think about opening a bag of grout. If the subfloor moves even a fraction of an inch, your beautiful surgical lines will eventually snap. 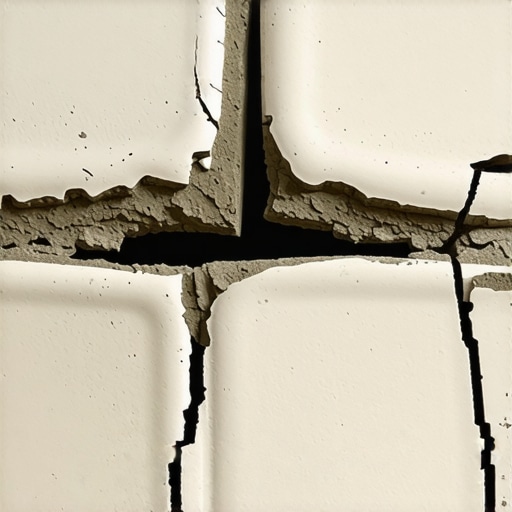 Understanding the real reason your floor joists are making your tile crack is the ultimate pro-level realization. Taping is a finishing move, not a structural fix. You have to ensure you have mastered floor leveling pro secrets to give that blue tape a stable canvas to work on. When you combine a rock-solid subfloor with the precision of masking, you aren’t just tiling; you are building a floor that will look brand new for decades.
Once that tape is peeled back and you see those surgical lines, you might think the job is done. But I have learned that the real test of a pro-level install happens six months later when the house settles or the seasons change. If you want that perfection to last, you have to move from the ‘installation’ mindset into the ‘preservation’ mindset. It is not just about how it looks today; it is about how it handles the weight of your life tomorrow.
Forget the Guesswork With This Precision Gear
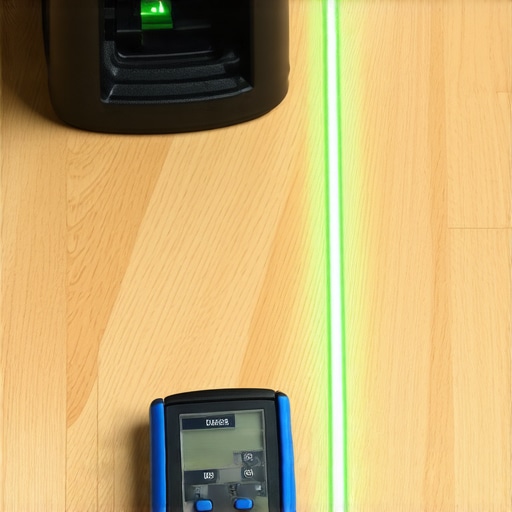
I used to rely on my ‘gut feeling’ to know if a subfloor was ready, and that mistake cost me a whole pallet of white oak. Now, I never start a project without my Wagner Meters moisture detector. According to the National Wood Flooring Association (NWFA) Technical Publication No. C200, failing to verify that wood moisture content is within 4% of the subfloor is the number one cause of floor failure. Knowing how to use a moisture meter before you lay wood floors is the only way to prevent your expensive planks from cupping or gapping by Christmas. I also swear by my 360-degree green beam laser level. It makes precise floor leveling techniques to achieve flawless surfaces actually possible for a solo installer. If you are still using a bubble level, you are basically working in the dark.
How Do I Keep These Floors Looking New for Years?
Maintenance is where most homeowners accidentally destroy their own hard work. I see it constantly—someone spends thousands on a remodel and then ruins it with a $5 bottle of cleaner. You have to understand hardwood floor care secrets to longevity and shine, which starts with throwing away the steam mop. For my tile friends, please avoid the common DIY trap of using ‘natural’ cleaners like vinegar. I’ve written before about the vinegar mistake that eats through your natural stone tiles by dissolving the calcium right out of the stone. Stick to pH-neutral cleaners and a microfiber pad. If you notice a tiny crack, address it immediately; knowing how to fix a chipped tile without replacing the whole piece can save you from a full teardown later.
The High-Tech Future of Your Living Room Floor
Looking ahead to the next five years, I predict we are going to see a massive shift toward Augmented Reality (AR) layout tools. Imagine wearing a pair of glasses that projects your exact tile pattern onto the floor before you even mix the thinset. This will make installing tiles like a pro accessible to everyone, as the software will calculate the cuts and centering for you. We are also seeing ‘smart’ subfloors that can alert your phone if a leak starts under the bathroom tile. While the tech changes, the fundamentals of mastering floor leveling pro secrets remain the bedrock of any good room. I challenge you to try the blue tape trick on your next small backsplash project. Once you experience that clean, surgical pull, you’ll see why precision beats speed every single time.
I was knee-deep in a bathroom remodel, staring at a set of subway tiles that looked like a jagged mountain range rather than a sleek, modern wall. My back was screaming, my knees were bruised, and despite using every spacer in the bucket, my grout lines were a disaster. Every time I ran the float over the joints, the grout seemed to smear everywhere except where I actually wanted it. It was a messy, frustrating realization: I was about to ruin a perfectly good weekend because I could not get a clean finish. That is when I grabbed a roll of painters tape and decided to try something that felt, frankly, a bit obsessive. But that little roll of blue tape saved my sanity and my project.
Stop Fighting Your Grout Float
We have all been there—trying to achieve that “perfect” look we see in home magazines while working with materials that seem designed to be messy. I will be honest, my early attempts at installing tiles like a pro were anything but professional. I once spent twelve hours on a small laundry room floor, only to end up with splotchy grout because I over-washed the joints trying to get the edges straight. I learned the hard way that the correct way to mix grout does not matter much if your application technique is sloppy. If you do not have a plan for the excess, you are just pushing mud around and hoping for the best. It is about control, not just coverage.
Is the Extra Taping Step Actually Worth Your Time?
It sounds like a chore, right? Taping off every single edge feels like a fast track to a headache. But here is the reality: according to professional remodeling standards, the most common reason for homeowner dissatisfaction with tile work isn’t the tile itself—it is the grout. In fact, industry data from the National Kitchen & Bath Association suggests that finish quality is the primary factor in perceived project value. By using the blue tape trick for grouting without making a mess, you are not just being extra; you are ensuring that your lines are crisp and that you do not end up wondering why your white grout turned orange due to improper cleaning techniques later on. This method eliminates the haze and the guesswork in one go.
I promise you, once you see how easily the tape peels back to reveal a perfect, surgical line, you will never go back to the smear and pray method. Have you ever stood back from a project and wished you could just hit undo on your grout lines? Let me know in the comments—I have definitely been there. Before we get into the nitty-gritty of the application, we need to talk about the essential prep work that makes this secret actually work.
How to Execute the Surgical Grout Line
Before you touch that roll of tape, you need to clear the field. Think of it like prep work for a high-end paint job; if the walls are dusty, the paint won’t stick. The same goes for your joints. I remember my first big project with 12×24 porcelain tiles. I was so focused on the secret to getting a flat floor for large format tiles that I ignored the excess thinset oozing between the cracks. By the time I went to grout, those hardened grey chunks were peeking through my beautiful silver finish. It looked like the tile was growing mold before I even turned the shower on. You have to ensure those channels are deep and clean.
Get That Excess Thinset Out of the Way
Use a utility knife or a small spacer to scrape out any dried thinset that rose too high during the setting process. If you used the trowel notch secret for getting full thinset coverage, you likely have some squeeze-out. Clear it now, or it will haunt your finish. Once the joints are clear, vacuum the entire area. Any dust left behind will compromise the adhesive on your tape, causing it to peel up right when you start dragging the float across it. You want the tape to be an extension of the tile, not a loose flap that catches the grout.
The Art of Masking Your Tile Edges
This is where the magic happens. Grab your blue painter’s tape—preferably the 1-inch variety—and run it along the edge of every tile, leaving only the grout joint exposed. It is a bit like frosting a cake where the cake is porous and the frosting stains; you are protecting the “cake” surface. Be meticulous. The tape should sit exactly on the edge of the tile without dipping into the joint space. If you overlap into the joint, your grout line will look skinny and uneven. If you are working on a wall, start from the bottom and work your way up so that any drips land on taped surfaces rather than fresh tile. It feels tedious in the moment, but it’s the difference between a DIY look and a high-end installation.
Spread Your Mix Without the Stress
Now, mix your grout. Remember that the correct way to mix grout involves a “slake” period to ensure the chemicals fully activate. Once it’s ready, spread it right over the tape. Don’t be shy. The beauty of this method is that you can be aggressive with your float to ensure the grout is packed tight into the joints. This prevents air pockets that lead to future failures. I’ve seen cases where homeowners wonder why your grout is falling out of the joints in the hallway, and usually, it’s because they were too timid with the float, trying to avoid a mess. With the tape in place, you can shove that grout in with total confidence.
Timing the Tape Pull for a Crisp Finish
The biggest mistake people make is pulling the tape too early or too late. If you pull it while the grout is soupy, it might slump. If you wait until it’s rock hard, the tape might tear or pull the grout out with it. You are looking for that “leathery” stage. Generally, this happens about 10 to 20 minutes after application, depending on the humidity. This is also the exact moment you should pull your tile spacers for the cleanest lines if you haven’t already. When you peel the tape back at a 45-degree angle, it will shear the grout at the tile’s edge, leaving a line so sharp you’d think it was cut with a laser. If there is any slight residue, the wet rag trick for cleaning up wet grout haze will take care of it in seconds, rather than the hours of scrubbing you’d normally face.
Wait! Before you step back to admire those clean lines, let’s dig deeper into the science that actually keeps that grout inside the joint. While the blue tape trick provides a visual shortcut to perfection, there is a technical nuance most people overlook: hydration control. A common myth in the DIY community is that the more you scrub with a soaking wet sponge, the cleaner the finish. In reality, this is the quickest way to ruin your hard work. When you introduce too much water during the cleanup, you are actually washing away the essential polymers and pigments that give the grout its strength and color. This is the reason your grout color looks splotchy and uneven once it dries.
The Hidden Moisture Trap Most DIYers Ignore
In my years of fixing failed bathroom remodels, I have seen a recurring ‘oops’ factor that no amount of tape can fix. It is the temptation to use grout as a structural adhesive rather than a joint filler. If you are working with large pieces, you must remember why your large format tiles need back-buttering every time. If the tile isn’t fully supported, it will shift. According to the Tile Council of North America (TCNA), over-watering during the grout cleanup phase is the leading cause of efflorescence—that annoying white crusty salt—and weak joint structures. By using the tape method, you are actually protecting the grout from that excess water exposure, but you still have to be careful not to ‘drown’ the joints when you do your final light wipe. Have you ever fallen into the ‘too much water’ trap and ended up with chalky grout? Let me know in the comments.
Will This Tape Method Save You on Large Format Tiles?
The short answer is yes, but only if your prep work is flawless. Many advanced installers think they can skip the tape if they have a steady hand, but large format tiles create unique challenges with ‘lippage.’ If your floor isn’t perfectly flat, the tape might catch on the raised edges of the tile, creating a gap where grout can seep under. This is why addressing floor leveling challenges and common mistakes is vital before you even think about opening a bag of grout. If the subfloor moves even a fraction of an inch, your beautiful surgical lines will eventually snap. Understanding the real reason your floor joists are making your tile crack is the ultimate pro-level realization. Taping is a finishing move, not a structural fix. You have to ensure you have mastered floor leveling pro secrets to give that blue tape a stable canvas to work on. When you combine a rock-solid subfloor with the precision of masking, you aren’t just tiling; you are building a floor that will look brand new for decades.
Once that tape is peeled back and you see those surgical lines, you might think the job is done. But I have learned that the real test of a pro-level install happens six months later when the house settles or the seasons change. If you want that perfection to last, you have to move from the ‘installation’ mindset into the ‘preservation’ mindset. It is not just about how it looks today; it is about how it handles the weight of your life tomorrow.
Forget the Guesswork With This Precision Gear
I used to rely on my ‘gut feeling’ to know if a subfloor was ready, and that mistake cost me a whole pallet of white oak. Now, I never start a project without my Wagner Meters moisture detector. According to the National Wood Flooring Association (NWFA) Technical Publication No. C200, failing to verify that wood moisture content is within 4% of the subfloor is the number one cause of floor failure. Knowing how to use a moisture meter before you lay wood floors is the only way to prevent your expensive planks from cupping or gapping by Christmas. I also swear by my 360-degree green beam laser level. It makes precise floor leveling techniques to achieve flawless surfaces actually possible for a solo installer. If you are still using a bubble level, you are basically working in the dark.
How Do I Keep These Floors Looking New for Years?
Maintenance is where most homeowners accidentally destroy their own hard work. I see it constantly—someone spends thousands on a remodel and then ruins it with a $5 bottle of cleaner. You have to understand hardwood floor care secrets to longevity and shine, which starts with throwing away the steam mop. For my tile friends, please avoid the common DIY trap of using ‘natural’ cleaners like vinegar. I’ve written before about the vinegar mistake that eats through your natural stone tiles by dissolving the calcium right out of the stone. Stick to pH-neutral cleaners and a microfiber pad. If you notice a tiny crack, address it immediately; knowing how to fix a chipped tile without replacing the whole piece can save you from a full teardown later.
The High-Tech Future of Your Living Room Floor
Looking ahead to the next five years, I predict we are going to see a massive shift toward Augmented Reality (AR) layout tools. Imagine wearing a pair of glasses that projects your exact tile pattern onto the floor before you even mix the thinset. This will make installing tiles like a pro accessible to everyone, as the software will calculate the cuts and centering for you. We are also seeing ‘smart’ subfloors that can alert your phone if a leak starts under the bathroom tile. While the tech changes, the fundamentals of mastering floor leveling pro secrets remain the bedrock of any good room. I challenge you to try the blue tape trick on your next small backsplash project. Once you experience that clean, surgical pull, you’ll see why precision beats speed every time.
The Brutal Reality of Skipping the Prep Work
If there is one thing a decade of renovation has taught me, it is that your grout is only as good as the surface beneath it. I used to think I could hide a bad layout with a clean grout line, but that is a myth. One of my biggest lightbulb moments came when I realized that following the dry fit rule that prevents costly cutting mistakes is just as important as the taping itself. If your cuts are jagged, even the blue tape trick won’t make them look straight. Another lesson? Never underestimate the power of a clean bucket. I once ruined a whole bathroom floor because a tiny bit of old, dried thinset from a previous job flaked into my fresh grout, creating ugly gray streaks. Now, I treat my mixing buckets like fine china.
The Only Tools I Carry to Every Job Site
You don’t need a truck full of gadgets, but you do need the right ones. To avoid common flooring installation mistakes to avoid for lasting results, I always keep these three in my kit. First, a high-quality margin trowel for mixing small batches of grout without introducing air bubbles. Second, I swear by a dedicated grout sponge—not the ones from the kitchen—that is dense enough to wipe without digging out the joint. #IMAGE_PLACEHOLDER_E# Finally, for my wood projects, I never skip a moisture check. Mastering hardwood floor care secrets to longevity and shine starts the day you install, and that means knowing your subfloor is dry. These aren’t just recommendations; they are the safeguards that keep me from having to do the job twice.
Go Build Something You Are Proud of Today
Tiling can be intimidating, especially when you are staring at a pile of expensive materials and a messy bucket of mud. But remember, the difference between a DIY project and a professional finish is simply the willingness to take that one extra step. Whether it’s taping your joints or mastering floor leveling pro secrets, your effort will show in the final result. You are not just laying a floor; you are creating a space where your family will live for years. Take your time, use the tape, and enjoy the process of installing tiles like a pro. Have you ever had a grouting disaster that made you want to walk away from the project entirely? Share your story in the comments below—I would love to hear how you handled it!