

I stood there with my coffee in hand, staring at what was supposed to be a perfectly flat masterpiece. Instead, my kitchen subfloor looked like it had been through a heavy artillery barrage. I’d spent all Saturday morning mastering floor leveling techniques, or so I thought. But those tiny, pesky bubbles—technically called pinholes—had ruined the finish. It was a classic rookie mistake. I had skipped the most critical step of preparing the plywood, and the wood simply ‘burped’ air right into my wet leveler as it cured. If you’ve ever seen your hard work turn into a porous mess, you know the sinking feeling in your gut. Today, I’m going to show you exactly why this happens and how you can stop your subfloor from ruining your next flooring installation project. Have you ever walked into your project the morning after a pour only to find a moonscape of bubbles? Drop a comment and tell me I’m not the only one!
Your Subfloor is Breathing and It Needs to Stop
When you pour a cement-based product over wood, you are essentially trying to marry two very different materials. Plywood is incredibly thirsty and full of microscopic voids. As the wet leveler hits the wood, the air inside the plywood wants to get out, and the water in the leveler wants to get in. If you don’t create a solid barrier, you’ll find out exactly why your floor leveler pitted during the drying process. Earlier in my career, I thought I could get away with one thin coat of primer. I was wrong. The leveler soaked right in, and the escaping air created a chain reaction of bubbles that left the surface looking like Swiss cheese. According to the National Wood Flooring Association (NWFA), wood is a hygroscopic material that constantly exchanges moisture and air with its environment, making a sealed barrier essential before applying any cementitious topping. You also need to make sure your structure is solid; I found that using the plywood sandwich trick for fixing bouncy floor joists helped minimize the vibration that can sometimes loosen the bond of the leveler later on.
Do those tiny pinholes actually matter?
I know what you’re thinking because I thought it too: ‘Can’t I just sand it down and move on?’ Well, you can, but those bubbles are often a sign of a much deeper problem—poor adhesion. If air was moving up, it means the leveler wasn’t grabbing the wood properly. Over time, those little craters can become weak spots where your tile or hardwood eventually fails. Plus, if you don’t know how to stop your floor leveler from leaking through the subfloor, you aren’t just dealing with bubbles on top; you’re losing product through the bottom. Getting it right the first time is the only way to ensure your precise floor leveling techniques actually result in a surface you can trust for years to come.I remember a kitchen remodel back in 2019 where I thought I was being incredibly efficient. I swept the floor, slapped on a single coat of primer, and started pouring. Within twenty minutes, the leveler was ‘fizzing’ like a science fair volcano. I hadn’t actually scrubbed the dust out of the wood grain; the primer had bonded to the dust rather than the plywood itself. I ended up spending three grueling days with a floor scraper, which was a painful lesson in flooring installation mistakes to avoid for lasting results. To avoid my fate, you have to treat the prep work like it is the most important part of the job—because it is. Sawdust is your absolute enemy. If there is even a fine layer of debris on that wood, your primer will sit on top of the dust rather than soaking into the fibers. You need to use the best way to remove thinset from a plywood subfloor if you are dealing with a renovation, then follow up with a high-powered vacuum to pull dust out of the pores.
Stop the Bleeding Before the Pour Begins
Once the floor is surgically clean, you need to dam the perimeter. Think of your self-leveler like water; it will find every single crack, knot-hole, or gap in the plywood. If you do not know how to stop your floor leveler from leaking through the subfloor, you will literally watch your money drip into the crawlspace or onto the ceiling below. Use spray foam, weatherstripping, or silicone caulk to seal every single edge where the floor meets the walls or any plumbing penetrations.
Apply the Primer Like You’re Painting a Masterpiece
This is the step where most DIYers fail. You aren’t just wetting the wood; you are creating a plastic-like, non-porous skin. On plywood, I always recommend two coats of a high-quality acrylic primer. The first coat should be diluted—usually one part primer to one part water—so it can sink deep into the thirsty wood fibers. The second coat should be applied at full strength once the first is tacky to build that final air barrier. If you rush this process, you will see exactly why your floor primer is peeling off like a sunburn once the leveler starts its chemical reaction. 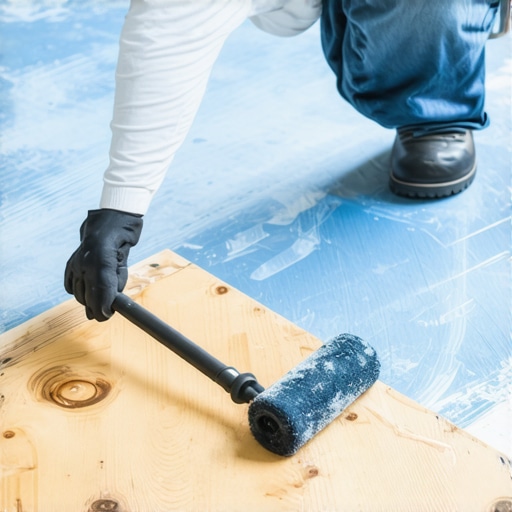
Mix the Leveler Like a Chemist
Water ratios provided by the manufacturer are not suggestions; they are laws. If you add too much water, the leveler becomes weak, chalky, and the aggregate will settle to the bottom. If you add too little water, the reason your leveler is setting up too fast will become painfully obvious as the product hardens before you can even move it to the corners. You can learn the secret to mixing the perfect bucket of self-leveler every time by using a dedicated measuring bucket and a high-torque mixing drill. When you pour, you want the consistency of a thick milkshake. If it looks like watery soup, you have already lost the battle against pinholes and structural integrity. For those planning on mastering hardwood floor refinishing or a high-end tile job later, this flat, bubble-free base is the only foundation that will last.
Self-Leveling is a Massive Marketing Lie
Most homeowners and quite a few contractors fall into the same trap: they believe the word ‘self’ in self-leveler means the product does the work for you. In my experience, the product is more accurately ‘self-smoothing’ than self-leveling. If you simply pour it and walk away, expecting gravity to create a laser-flat surface, you’re in for a rude awakening. You will likely see why your self-leveler didn’t flow into the low spots as it thickens faster than it can migrate. To get a truly professional finish, you have to assist the product with a gauge rake or a spike roller to break the surface tension. Without that manual intervention, the leveler often ‘humps’ where it was poured, leaving you with a floor that is smooth but still not level. I’ve seen countless DIYers struggle with floor leveling challenges simply because they trusted the bag’s marketing over the physics of fluid dynamics.
Can your joists actually handle the extra weight?
This is the nuance that separates the pros from the weekend warriors. A bag of leveler weighs about 50 pounds, and for a large room, you might be adding 500 to 1,000 pounds of dead weight to your structure. If your subfloor was already borderline bouncy, that extra weight will cause the joists to deflect further. According to the Tile Council of North America (TCNA) Handbook, the maximum allowable deflection for a floor to receive tile is L/360 under total load. If you ignore this and pour a heavy, rigid slab of cement over a flexible wood structure, you’ll wake up to why your self-leveler developed spiderweb cracks overnight. It isn’t always a product failure; often, it’s a structural one. I’ve learned the hard way that the real reason your floor joists are making your tile crack is usually linked back to this initial lack of structural reinforcement before the leveler even hit the floor.
The ‘Wet Edge’ Race Against the Clock
The most stressful part of the job is the ‘oops’ factor of timing. Once that powder hits the water, the chemical clock starts ticking. If you are working alone, you are almost guaranteed to fail. By the time you mix the second bucket, the first pour has already started to skin over. When the two pours meet, they won’t blend seamlessly; they’ll create a ‘cold joint’—a visible ridge that ruins your flat surface. To maintain a wet edge, you need a three-person team: one mixing, one carrying, and one spreading. If you try to do it solo, you’ll find why your leveler is setting up before you can finish spreading it. Using precise floor leveling techniques requires speed and coordination that most people underestimate. Have you ever fallen into this trap of thinking you could handle a large pour all by yourself? Let me know in the comments! Even if you are installing tiles like a pro, a bad leveling job will haunt every single piece of thinset you spread afterward. Don’t rush the prep, but when it’s time to pour, you have to move like your project depends on it—because it does.I didn’t realize until my third major renovation that a standard rake is basically a liability when you’re working with high-performance compounds. I switched to a calibrated gauge rake because it allows me to set the exact depth of the pour—usually targetting an 1/8th of an inch—and maintain that consistency across the entire room without guessing. If you are serious about learning how to achieve flawless floor leveling before tile laying, you need to stop relying on a flat trowel for the heavy lifting. The gauge rake does the math for you, ensuring the product is distributed evenly before you even think about smoothing it. Once the leveler is down, I immediately follow up with a spiked roller. This isn’t just an optional accessory; it is the only way to break the surface tension and pop the micro-bubbles that lead to the pinholes we talked about earlier. Using these tile installation pointers that save time and money will keep you from having to grind down high spots later.
How do I keep my leveled floor from failing over the years?
The secret to longevity isn’t in the cement itself, but in how you handle the transition zones. I’ve seen perfectly flat pours crack because the installer forgot to honor the expansion joints. According to the German Industrial Standard DIN 18202, surface regularity is only half the battle; you must also account for the structural movement of the building. If you are prepping for a wood-to-tile transition, you must use the spacing secret for installing tile over plywood to prevent the rigid leveler from snapping under the natural expansion of the wood. For those moving on to the final stages, remember that hardwood floor care secrets to longevity and shine start with that stable, non-moving base. If your subfloor shifts, your finish will eventually suffer. I also recommend checking for any hidden movement before the leveler fully cures; sometimes the hidden reason your floating floor is pinching is actually a slight hump in the leveling job that wasn’t caught with a straightedge.
The Future of Subfloor Tech is Already Here
We are moving away from the ‘guess and pour’ era of flooring. In the next few years, I expect to see residential contractors adopting LiDAR-assisted leveling pumps that map the floor’s topography in real-time. This eliminates the human error inherent in step-by-step guide to flooring installation and leveling success. We are also seeing the rise of carbon-fiber reinforced levelers that allow for much thinner pours over flexible joists without the risk of cracking. For now, my best advice is to treat your prep work as a science. I challenge you on your next project to use a spike roller for at least five minutes longer than you think is necessary. That extra effort in degassing the wet compound is the difference between a floor that lasts a decade and one that starts ‘shelling’ within six months. It is all about the details that you can’t see once the carpet or tile goes down.
The Hardest Lessons Learned from a Moonscape of Bubbles
After a decade of pouring levels, the most profound realization I had was that the subfloor is ‘alive.’ It expands, contracts, and breathes. If you treat it like a static piece of stone, it will rebel. One lightbulb moment for me was realizing that the temperature of the room—and the water—matters more than the brand of the product. If your water is too warm, you are essentially fast-tracking a disaster. I also learned that you can’t be afraid to ‘waste’ primer. If the plywood still looks thirsty after two coats, give it a third. It is much cheaper to buy another gallon of primer than it is to chip up five hundred pounds of cracked cement. Following flooring installation fundamentals means respecting the chemistry of the bond as much as the physics of the level.
The Tools I Refuse to Start a Pour Without
I’ve narrowed my gear down to three non-negotiables that guarantee a professional result every time. First, the TCNA Handbook is my bible for any technical questions regarding deflection and structural limits. Second, I never pour without a dedicated high-torque mixing drill; a standard cordless drill will burn out before you finish the third bucket. Finally, the spiked roller is your best friend. It is the only way to ensure you are truly degassing the mixture and preventing the ‘pitting’ that ruins a finish. For a deeper dive into the specific gear and steps, check out the ultimate guide to floor leveling for a perfect finish. I also highly recommend looking into mastering floor leveling techniques if you are dealing with particularly deep depressions or complex slopes. #IMAGE_PLACEHOLDER_E#
Ready to Create Your Own Masterpiece?
Achieving a perfectly flat floor is not about luck; it is about the discipline of the preparation. When you take the time to seal every gap, prime the surface properly, and mix your product with clinical precision, the actual pour becomes the easiest part of the day. Don’t let the fear of a few bubbles stop you from taking on your next flooring installation. You now have the knowledge to troubleshoot the common pitfalls and the confidence to deliver a surface that would make any pro jealous. Have you ever seen your leveler ‘burp’ air bubbles right as you finished the pour? Let me know how you handled it in the comments below!