I remember the first time I walked into a client’s home and saw those unsightly peeling hardwood finishes. It was late in the afternoon, and the flooring was supposed to be a sleek, shiny new feature in their living room. Instead, it looked worn out and prematurely aged—like the finish had given up. That moment was a lightbulb for me, revealing how crucial the right finishing process truly is, especially with the challenges that 2026 brings to the table.
Cracking the Code of Peeling Hardwood Finishes in 2026
Due to evolving manufacturing standards and environmental regulations, many hardwood finishes in 2026 are more susceptible to peeling. This isn’t just a cosmetic issue; it compromises the longevity and safety of your floors. But here’s the good news—I’ve discovered that with the right solvent fixes, you can effectively restore and protect your hardwood surfaces. In this post, I’ll share four proven solutions I’ve personally tested, which can save you from costly refinish jobs or worse, complete replacements. Ready to learn how to fix peeling finishes and breathe new life into your floors? Keep reading, and I’ll guide you through each one.
Is This Finish Peeling Worth the Worry?
Early in my career, I made the mistake of dismissing minor peelings as superficial. But that oversight led to bigger problems down the line, like deeper adhesion failures and uneven surfaces. Trust me, ignoring peeling finishes is a rookie error. Instead, tackling the issue promptly with targeted solvent treatments can extend the life of your hardwood floors and maintain their aesthetic appeal. If you’ve ever faced this problem, you know how frustrating and confusing it can be. Don’t worry—I’ve been there, and I know exactly how to fix it.
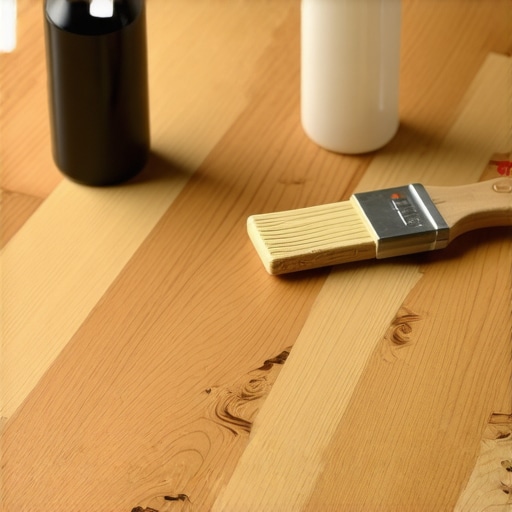
Prepare Your Workspace and Materials
Start by clearing the room of furniture and rugs to ensure unobstructed access. Wear protective gear like gloves and a mask to prevent inhaling dust or fumes from solvents. Gather high-quality solvents recommended for old or peeling finishes, such as mineral spirits or specialty finish removers. This preparation helps achieve smooth results and keeps safety top priority.
Assess the Damage and Remove Loose Finish
Examine the affected areas closely. Use a putty knife or scraper to gently lift any loose or bubbling finish, working carefully to avoid damaging the underlying wood. This step is akin to peeling off a faulty paint layer before repainting—only the loose bits are removed, leaving a stable surface for treatment.
Sand the Surface and Clean Thoroughly
Lightly sand the affected zones with fine-grit sandpaper (around 220 grit). Focus on blending edges with intact finish to promote adhesion. After sanding, vacuum the dust and wipe with a damp cloth to eliminate debris. Think of this as giving your floor a gentle shave to create a clean, receptive surface ready for refinishing.
Apply Solvent-Based Rejuvenator or Restorer
Choose a compatible hardwood finish or solvent that can dissolve and remove residual peeling layers. Apply it according to manufacturer instructions, using a brush or cloth for even coverage. This step breathes new life into fading or damaged areas—much like revitalizing tired paint with a fresh coat.
Control Drying Conditions for Best Results
Maintain proper humidity and temperature in the room—ideally around 70°F and 50% humidity. Proper drying prevents new peeling and ensures the solvent fully evaporates, securing the bond between the wood and the new finish. Think of it as baking a cake at the right temperature for perfect texture.
Refinish with a Durable Top Coat
Once the solvent has dried, sand lightly again to ensure smoothness. Apply a high-quality polyurethane or polyurethane-based finish designed for durability. Use long, even strokes to prevent lap marks. This sealing layer will protect your hardwood from future peeling and wear, similar to applying a sturdy armor that preserves the surface underneath.
Final Inspection and Maintenance
After curing, inspect for any uneven spots, drips, or missed areas. Lightly sand and touch up if necessary. Regular cleaning with a damp mop and avoiding excess water will extend the lifespan of your restored finish. Think of it as maintaining a car; regular care keeps it performing well for years.
Throughout this process, detailed guidance and techniques are available in resources like mastering hardwood floor refinishing, which can help you fine-tune your approach for the best possible outcome.
Many professionals and DIY enthusiasts alike fall prey to oversimplified beliefs about floor leveling, flooring installation, tile, and hardwood floors. For instance, a widespread misconception is that leveling is always about creating a perfectly flat surface before installing tiles or hardwood. While true to a degree, the nuances of subfloor variability mean that sometimes, slight imperfections can be acceptable, provided they fall within specific tolerances outlined in authoritative guides like precise leveling techniques. Overlooking these subtleties can lead to major issues down the line, such as tile cracking or uneven hardwood wear, which often could have been avoided with proper assessment and understanding. Additionally, many assume that the first layer of adhesive is sufficient to handle movement or minor subfloor imperfections, but experts agree that using a high-quality, flexible adhesive or employing subfloor stiffening measures significantly enhances longevity.
A common myth is that thicker screeds or self-leveling compounds automatically guarantee a flawless finish. However, without proper substrate preparation, moisture control, and curing time management—a process detailed in ultimate leveling guide—these products can end up acting as traps that trap air, moisture, or debris, leading to future failures.
For advanced practitioners, understanding the hidden variable of moisture content is crucial. Studies, including those from the Moisture Warning report, demonstrate that unrecognized moisture pockets can cause severe warping or buckling despite meticulous installation. This highlights the importance of comprehensive pre-installation testing, such as calcium chloride or in-situ probes—techniques often overlooked by amateurs trying to cut corners.
Here’s a critical warning: do not assume that all substrates are equal or that a one-size-fits-all approach addresses subfloor conditions. Factors such as subfloor material, age, prior repairs, and environmental influences require tailored solutions. For example, installing tile over slightly uneven plywood without proper reinforcement is a shortcut that usually results in tile lippage or cracking—problems that could have been avoided by employing strategic stiffening methods described in leveling over OSB.
Moreover, experienced installers recognize that surface preparation goes beyond simple cleaning. Techniques like subfloor prep hacks ensure long-term performance, especially in challenging conditions such as radiant heating or high-moisture areas.
From my perspective, mastering these nuances isn’t just about avoiding mistakes; it’s about delivering a truly professional finish that endures. Are you aware of the hidden problems lurking beneath seemingly stable floors? If so, you’ve already taken a step beyond average knowledge. For more in-depth insights on how to elevate your installation projects, explore floor leveling techniques or the comprehensive guide to flawless finishing.
Have you ever fallen into this trap? Let me know in the comments.
Keeping Your Floors in Top Shape
Ensuring your hardwood, tile, or flooring installations stand the test of time requires the right tools and an eye for routine maintenance. I personally rely on a few key pieces of equipment that make the difference between a quick fix and a long-term solution. First, a high-precision digital moisture meter is indispensable for monitoring moisture levels in subfloors and wood planks, which helps prevent issues like warping or buckling. I prefer models like the Tramex MMS3 or Protimeter Surveymaster, known for their accuracy and ease of use.
Next, a laser level is crucial for verifying flatness across large surfaces. I use a self-leveling laser, such as the Bosch GLL 55, to quickly identify high and low spots, ensuring that tiles or hardwood planks are installed on a uniformly prepared surface. This reduces the need for remedial work and assures a professional finish. For joint and seam upkeep, a quality grout float and corner squeegees help me apply sealants evenly, preventing gaps that could lead to moisture intrusion or tile cracking.
Maintaining a stable environment is also vital. I employ a hygrometer and a dehumidifier during the curing and maintenance phases, especially in regions prone to humidity fluctuations. This combo helps keep floors from expanding or contracting excessively, preserving their integrity over years. If issues do arise, I recommend using a leveling compound like Ardex Feather Finish, which is easy to apply and provides a reliable base for top coatings or finishes. Proper surface prep, including thorough cleaning and light sanding, is a must before applying any restorative products to maximize adhesion and durability.
Looking ahead, technology is evolving rapidly. The integration of IoT sensors that monitor environmental conditions in real time could revolutionize flooring maintenance, providing early alerts for moisture or temperature deviations before damage occurs. For now, combining precise measurement tools with routine environmental control remains our best strategy for long-term success.
How do I maintain floors over time? Regular inspection with tools like moisture meters and laser levels helps catch issues early. Establishing a scheduled cleaning and refinishing routine, using suitable products recommended in guides like mastering hardwood floor refinishing, also extends their lifespan. Remember, ongoing maintenance is not a one-time effort but an investment in your floors’ future. Consider trying out a digital moisture meter or laser level for your next project — these devices can make a notable difference in ensuring your floors remain flawless for years to come. For personalized expert advice, don’t hesitate to reach out.
Lessons Hidden in the Hardest Floors
One of the most profound lessons I learned is that patience truly pays off when dealing with floor finishes. Rushing the solvent application or skipping the light sanding can lead to premature peeling, forcing costly repairs. I once underestimated the importance of room climate control during drying, only to find my finish bubbling weeks later. Now, I meticulously manage humidity and temperature to ensure longevity. Additionally, understanding that not all finishes are created equal—especially with evolving standards—has been pivotal. This knowledge has saved me from unnecessary rework and helped me deliver floors that last, even amid the challenges that 2026 brings.
Tools and Tips That Transformed My Approach
Over the years, I’ve curated a toolkit that makes everything smoother—an accurate digital moisture meter, a reliable laser level, and high-quality finishing products. I trust the floor leveling techniques resource for guidance, ensuring my surface prep is flawless before refinishing. The right tools, combined with expert advice from books like hardwood refinishing tips, have significantly improved my results. These resources empower me to tackle peeling finishes confidently and set a new standard with each project.
Harnessing Emotion to Drive Better Floors
Creating beautiful, durable floors isn’t just a craft—it’s an act of care. I recall the joy of turning a worn-out, peeling hardwood into a lasting masterpiece, knowing that my patience and learning made a real difference. If you’re hesitant about whether your floor can bounce back, remember that every challenge is an opportunity for growth. Your dedication to mastering these secrets will not only elevate your skills but also bring pride to your home or clients. Embrace the learning curve; the satisfaction of a flawless finish fuels the journey forward.
This post really hits home for me, especially the emphasis on proper surface prep and environmental controls when dealing with peeling finishes. I’ve had my fair share of frustration trying to fix peeling hardwood floors, often rushing through the drying process or neglecting to check humidity levels, which ultimately led to more issues. Your detailed steps on assessing damage and using quality solvents are spot-on and remind me of the importance of patience and good tools in achieving a lasting repair. I’m curious, have you found that certain types of solvents work better with specific finish types or wood species? Also, with the evolving standards for finishes, how do you stay up-to-date on what products are most reliable? I’d love to hear more about your experiences with different products or techniques that have stood the test of time in challenging environments. This knowledge could really help many of us DIY enthusiasts avoid common pitfalls and get professional results.
Reading about the issues with peeling hardwood finishes in 2026 made me reflect on my own experience with aging floors. I had a similar situation a few years back, where improper surface prep and rushing drying led to peeling and bubbling. Since then, I’ve learned the importance of meticulous prep work and controlling room conditions. I especially agree with the idea of assessing damage carefully before applying any restorative treatments. One thing I found helpful was investing in a good quality moisture meter and even using a humidity hygrometer during drying—these tools really make a difference in preventing future peeling.
I’m curious, for those dealing with especially stubborn peeling spots, what are your go-to solvents or restorers? I’ve experimented with mineral spirits and some specialty products, but I wonder if anyone’s found a more effective solution on challenging finishes or certain wood types. Also, how do you balance safety and efficacy when working with these chemicals in tight indoor spaces? This post offers great insights, and I think sharing real-world tips from varied experiences can help all of us improve our workflow and results.