I remember the moment vividly—my frustration reached a boiling point when I laid new tiles only to notice tiny cracks forming by the week’s end. It was a harsh reminder that beneath beautiful surfaces lies a foundation that either makes or breaks the entire project. That lightbulb moment led me down a rabbit hole of research and trial-and-error, revealing some critical missteps that many DIYers and pros alike often overlook. If you’ve ever experienced tiles cracking prematurely or uneven finishes, you’re not alone. And trust me, the fix isn’t just about choosing better tiles or applying more adhesive—it’s about understanding and preparing your subfloor properly.
Why Subfloor Preparation Can Make or Break Your Tile Project
Here’s the truth: even the most stunning tile designs can fall apart without a solid base. I used to think that subfloor issues were something I could ‘fix’ later, or worse, ignore. But early on, I learned that neglecting proper subfloor prep is a quick path to mistakes like tile cracking, lippage, or uneven surfaces. A study by the Tile Council of North America emphasizes that proper substrate preparation is essential for long-lasting, professional-looking results. In my experience, addressing subfloor problems upfront saves headaches—and money—in the long run.
Is Subfloor Prep Really That Important, or Just a Trend?
I’ll admit, I once thought skipping or rushing subfloor prep was no big deal. That was until I faced the inconvenience of uneven tiles cracking within months. My mistake? Underestimating how much the foundation influences everything above. Proper subfloor leveling and stabilization aren’t just suggestions—they’re the backbone of a durable tile installation. If you’re skeptical, remember that skipping these crucial steps might seem time-consuming, but it’s far cheaper than fixing cracked tiles after the fact. To learn more about effective floor leveling, check out my detailed guide on floor leveling with a flawless finish.
Now that we’ve acknowledged the importance of solid subfloor prep, let’s dig into the four critical hacks to ensure your 2026 project stands the test of time—and traffic. Are you ready to stop cracking tiles before they start? Good, because these tips could be the game-changer for your next project.
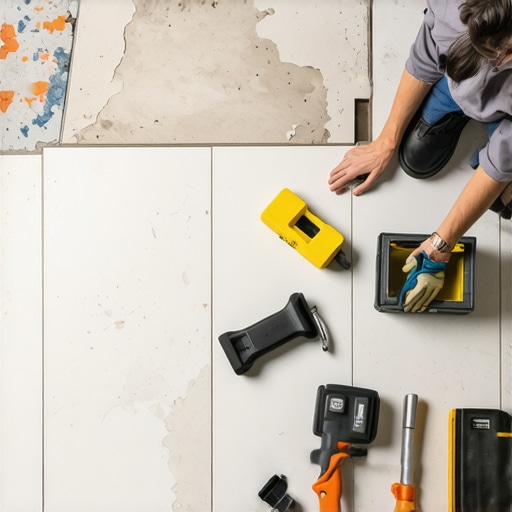
Level the Surface Like a Pro
Think of your subfloor as the foundation of a house—if it’s tilted or uneven, everything built on top will suffer. I once skipped meticulous leveling when renovating my kitchen, resulting in tiles that lipped after just a few weeks. To prevent this, first identify dips or humps with a long straightedge or a level, and mark problem spots. Use a self-leveling compound to fill dips, ensuring a flat surface. Mix the compound thoroughly and pour it over the low spots, spreading evenly with a trowel. Let it cure fully before proceeding. For larger spaces, I recommend using a laser level to verify that the entire area is flush, which is the key to avoiding lippage and cracked tiles. Consistent leveling enhances both durability and aesthetics, making installation look professional and lasting longer. For comprehensive guidance, check out this floor leveling guide.
[Placeholder for Image]
Secure and Reinforce the Subfloor
A loose or weak subfloor shifts under weight, leading to cracks or uneven tiles. I learned this the hard way when my floating hardwood started creaking—a sign that my subfloor wasn’t secured well enough. To strengthen it, start by checking for squeaks or giving it a gentle shake in different spots; these are signs of loose panels. Tighten screws or bolts at the joists, not just the panels themselves, to anchor the subfloor securely. For plywood subfloors, stagger your screws in a grid pattern, spacing them about 8 inches apart. When reinforcing large or weak areas, consider adding additional support beneath, like sistering joists or installing bridging for lateral stability. Remember, a firm foundation translates into a tile or hardwood surface free of future dings, cracks, or squeaks. For expert advice, see my flooring reinforcement tips.
Control Moisture to Prevent Future Issues
Moisture is the sneaky enemy—causing the subfloor to warp, swell, or rot, which spells disaster for tile or hardwood. I once installed a new tile floor in an area without checking moisture levels, only to find tiles lifting after a rainy season. To avoid this, perform a moisture test with a calcium chloride or in-situ probe meter in several spots. If levels are high, install a vapor barrier or moisture-resistant underlayment. For concrete slabs, applying a sealant or primer designed for moisture mitigation forms an effective barrier. Ensuring proper humidity levels in the space also helps maintain the integrity of your flooring. This extra step might seem simple, but it saves you from extensive repairs down the line. Learn more about moisture control at this moisture management article.
Prepare for the Flooring Itself
After securing a flawless subfloor, prepping the space for the actual installation is critical. Use a vacuum or broom to clear dust and debris, as particles can interfere with adhesive bond or create uneven surfaces. Acclimate tiles or hardwood planks in the room for several days—this prevents expansion or contraction after installation, which can crack tiles or cause gaps. For tiles, lay them out in a dry run to decide on the pattern and make adjustments. When you’re ready, follow manufacturer instructions meticulously: apply thin, consistent layers of adhesive for tiles or spread hardwood glue in manageable sections. For precise placement, use spacers to maintain joints evenly, and double-check the level frequently. This hands-on approach helps avoid common pitfalls like lippage or uneven gaps, ensuring a smooth, professional finish. For additional tips, consult my flooring installation techniques.
Many homeowners and even seasoned DIY enthusiasts believe that choosing quality materials and following basic installation steps guarantee success. However, the real pitfalls often lie in nuanced details that most overlook. For example, it’s a common misconception that floor leveling is a simple task that can be rushed or skipped altogether, but neglecting this crucial step can lead to uneven surfaces, tiles cracking, or hardwood gaps. Experts agree that precise floor leveling isn’t just about using leveling compounds; it requires understanding the substrate’s specific properties and applying techniques tailored to your material. According to a study by the Building Science Corporation, improperly leveled floors are among the top factors contributing to premature flooring failures.
Another misunderstood aspect involves subfloor reinforcement. Many assume that once the subfloor feels stable, it’s ready for installation. In reality, subtle movements due to moisture, shifting joists, or weak adhesion can cause long-term damage. Reinforcing the subfloor with appropriate fasteners and support structures ensures longevity, something I learned through personal experience and expert advisement.
A particularly sneaky mistake is underestimating moisture’s role. Homeowners often overlook moisture testing, risking tiles lifting or hardwood cupping when humidity fluctuates. Implementing moisture barriers and performing thorough testing can prevent costly repairs. The importance of moisture management is backed by research from the National Wood Flooring Association, emphasizing that moisture-related issues are a leading contributor to flooring failure.
For advanced installers, the question of material compatibility and detailed installation techniques becomes vital. For instance, understanding the expansion joints in hardwood can prevent buckling, while knowing the correct thin-set mortar type for tiles ensures proper adhesion. Checking manufacturer guidelines and applying expert strategies from guides like the ultimate guide to floor leveling can elevate your results.
Lastly, many get caught in the trap of rushing or improvising during installation, believing that experience alone will suffice. But even seasoned pros benefit from adhering to proven standards and continuously updating their knowledge through reliable resources. I encourage you to reflect on your projects—have you ever fallen into this trap? Let me know in the comments. Delving into these nuances ensures your flooring not only looks great but endures the test of time, saving you money and headaches in the long run.
What Equipment Keeps Your Flooring in Prime Condition
Maintaining your tile and hardwood floors requires the right arsenal of tools to ensure longevity and performance. One of my most trusted devices is a high-quality, calibrated moisture meter. I use the Pin-type Moisture Meter because it provides precise readings on subfloor moisture levels, preventing future issues like cupping or grout cracking. For leveling, I rely on a professional-grade self-leveling compound, which I select based on the manufacturer’s specifications for floor type—this ensures the surface remains perfectly smooth and ready for tile or hardwood installation.
Proper tools extend beyond application. I also recommend investing in a laser level, particularly the rotating kind, for large areas. It allows me to verify that the floor remains even after installation or after any repair work. Pair this with high-quality spacers and trowels, which help prevent uneven joints and ensure adhesive is applied uniformly. These tools might seem minor, but they make a big difference in maintaining a professional finish over time.
Predicting How Tools Will Evolve
Looking ahead, I believe smart technology integration will revolutionize floor maintenance. Imagine moisture meters and leveling devices that sync with smartphone apps, providing real-time updates and reminders for regular checks. Enhanced durability sensors embedded in flooring could monitor stress points and alert homeowners before cracks appear, much like the systems used in advanced building management. Staying ahead of these trends can save you time and money long-term, enabling proactive instead of reactive maintenance.
How do I keep my floors looking great for years?
Routine maintenance is key. Regularly check moisture levels, especially in humid climates, using reliable devices — this prevents warping and swelling. Keep surfaces clean with gentle cleaning solutions suitable for your flooring material; avoid harsh chemicals that can degrade finishes. Hardwood floor care secrets suggest sweeping daily and deep cleaning weekly with appropriate products. Additionally, inspecting your floor periodically for signs of movement or damage allows early intervention, restoring aesthetics before issues worsen.
Implementing a Maintenance Routine with Expert Guidance
Developing a schedule for inspections and care routines is essential. Use digital logs or apps to track moisture levels, cleaning sessions, and repairs. When fixing issues, trust in proven techniques—like reapplying sealants or adjusting uneven joints—can prolong the life of your investment. Remember, consistent care often involves targeted tools; for example, a specialized grout cleaning brush can restore cracked or stained grout, keeping your tiles looking fresh and preventing water seepage that can cause subfloor damage. For detailed strategies, explore my recommended practices in expert flooring tips.
Start small—try calibrating your moisture meter once a month or inspecting for floor movement quarterly. These proactive steps can catch issues early and make maintenance more manageable. Remember, investing in high-quality tools and establishing a routine is the best way to ensure your floors remain beautiful and functional for decades.

Lessons That Changed How I Approach Floor Leveling
- I realized that rushing the subfloor preparation almost always led to regrets—cracked tiles or squeaks. Taking the time to assess and level meticulously saves so much future headache.
- One lightbulb moment was understanding that moisture testing isn’t optional—it’s a must. Embedded sensors and moisture barriers have become game-changers for my projects.
- Working with professionals early on showed me that investing in the right tools, like laser levels and quality moisture meters, can turn a good project into a professional-grade finish.
- I learned that every floor is unique; applying a one-size-fits-all approach without understanding substrate specifics almost always leads to failure.
- Finally, adopting a mindset of continuous learning and staying updated with the latest installation techniques ensures my floors look great today and remain durable tomorrow.
Tools and Guides That Have Elevated My Flooring Game
- Precision Moisture Meters: I trust brands like the Pin-type Moisture Meter for their accuracy, helping me prevent issues caused by unseen moisture.
- Floor Leveling Guides: The Ultimate Floor Leveling Guide has been invaluable in mastering proper techniques and understanding substrate nuances.
- Professional-Grade Trowels and Spacers: Using quality tools ensures even adhesive application and joint spacing, resulting in seamless finishes.
- Online Resources and Communities: Staying connected with forums and expert blogs has kept me informed about emerging trends and troubleshooting tips.
Your Next Move Starts Now
Transforming your floors with confidence begins with embracing the details, and with the right knowledge and tools, you’re well on your way to durable, stunning results. Don’t let misconceptions hold you back—every well-prepared subfloor is a step towards a long-lasting masterpiece. Are you ready to make your next flooring project the best one yet? Share your plans or questions below, and let’s build a solid foundation together.
‘}#END#}# }#END#}#}#}#}#}#}#}#}#}#}#}#}#}#}#}#}#}#}#}#}#}#}#}#}#}#}#}#}#}#}#}#}#}#}#}#}#}#}#}#}#}#}#}#}#}#}#}#}#}#}#}#}#}#}#}#}#}#}#}#}#}#}#}#}#}#}#}#}#}#}#}#}#}#}#}#}#}#}#}#}#}#}#}#}#}#}#}#}#}#}#}#}#}#}#}#}#}#}#}#}#}#}#}#}#}#}#}#}#}#}#}#}#}#}#}#}#}#}#}#}#}#}#}#}#}#}#}#}#}#}#}#}#}#}#}#}#}#}#}#}#}#}#}#}#}#}#}#}#}#}#}#}#}#}#}#}#}#}#}#}#}#}#}#}#}#}#}#}#}#}#}#}#}#}#}#}#}#}#}#}#}#}#}#}#}#}#}#}#}#}#}#}#}#}#}#}#}#}#}#}#}#}#}#}#}#}#}#}#}#}#}#}#}#}#}#}#}#}#}#}#}#}#}#}#}#}#}#}#}#}#}#}#}#}#}#}#}#}#}#}#}#}#}#}#}#}#}#}#}#}#}#}#}#}#}#}#}#}#}#}#}#}#}#}#}#}#}#}#}#}#}#}#}#}#}#}#}#}#}#}#}#}#}#}#}#}#}#}#}#}#}#}#}#}#}#}#}#}#}#}#}#}#}#}#}#}#}#}#}#}#}#}#}#}#}#}#}#}#}#}#}#}#}#}#}#}#}#}#}#}#}#}#}#}#}#}#}#}#}#}#}#}#}#}#}#}#}#}#}#}#}#}#}#}#}#}#}#}#}#}#}#}#}#}#}#}#}#}#}#}#}#}#}#}#}#}#}#}#}#}#}#}#}#}#}#}#}#}#}#}#}#}#}#}#}#}#}#}#}#}#}#}#}#}#}#}#}#}#}#}#}#}#}#}#}#}#}#}#}#}#}#}#}#}#}#}#}#}#}#}#}#}#}#}#}#}#}#}#}#}#}#}#}#}#}#}#}#}#}#}#}#}#}#}#}#}#}#}#}#}#}#}#}#}#}#}#}#}#}#}#}#}#}#}#}#}#}#}#}#}#}#}#}#}#}#}#}#}#}#}#}#}#}#}#}#}#}#}#}#}#}#}#}#}#}#}#}#}#}#}#}#}#}#}#}#}#}#}#}#}#}#}#}#}#}#}#}#}#}#}#}#}#}#}#}#}#}#}#}#}#}#}#}#}#}#}#}#}#}#}#}#}#}#}#}#}#}#}#}#}#}#}#}#}#}#}#}#}#}#}#}#}#}#}#}#}#}#}#}#}#}#}#}#}#}#}#}#}#}#}#}#}#}#}#}#}#}#}#}#}#}#}#}#}#}#}#}#}#}#}#}#}#}#}#}#}#}#}#}#}#}#}#}#}#}#}#}#}#}#}#}#}#}#}#}#}#}#}#}#}#}#}#}#}#}#}#}#}#}#}#}#}#}#}#}#}#}#}#}#}#}#}#}#}#}#}#}#}#}#}#}#}#}#}#}#}#}#}#}#}#}#}#}#}#}#}#}#}#}#}#}#}#}#}#}#}#}#}#}#}#}#}#}#}#}#}#}#}#}#}#}#}#}#}#}#}#}#}#}#}#}#}#}#}#}#}#}#}#}#}#}#}#}#}#}#}#}#}#}#}#}#}#}#}#}#}#}#}#}#}#}#}#}#}#}#}#}#}#}#}#}#}#}#}#}#}#}#}#}#}#}#}#}#}#}#}#}#}#}#}#}#}#}#}#}#}#}#}#}#}#}#}#}#}#}#}#}#}#}#}#}#}#}#}#}#}#}#}#}#}#}#}#}#}#}#}#}#}#}#}#}#}#}#}#}#}#}#}#}#}#}#}#}#}#}#}#}#}#}#}#}#}#}#}#}#}#}#}#}#}#}#}#}#}#}#}#}#}#}#}#}#}#}#}#}#}#}#}#}#}#}#}#}#}#}#}#}#}#}#}#}#}#}#}#}#}#}#}#}#}#}#}#}#}#}#}#}#}#}#}#}#}#}#}#}#}#}#}#}#}#}#}#}#}#}#}#}#}#}#}#}#}#}#}#}#}#}#}#}#}#}#}#}#}#}#}#}#}#}#}#}#}#}#}#}#}#}#}#}#}#}#}#}#}#}#}#}#}#}#}#}#}#}#}#}#}#}#}#}#}#}#}#}#}#}#}#}#}#}#}#}#}#}#}#}#}#}#}#}#}#}#}#}#}#}#}#}#}#}#}#}#}#}#}#}#}#}#}#}#}#}#}#}#}#}#}#}#}#}#}#}#}#}#}#}#}#}#}#}#}#}#}#}#}#}#}#}#}#}#}#}#}#}#}#}#}#}#}#}#}#}#}#}#}#}#}#}#}#}#}#}#}#}#}#}#}#}#}#}#}#}#}#}#}#}#}#}#}#}#}#}#}#}#}#}#}#}#}#}#}#}#}#}#}#}#}#}#}#}#}#}#}#}#}#}#}#}#}#}#}#}#}#}#}#}#}#}#}#}#}#}#}#}#}#}#}#}#}#}#}#}#}#}#}#}#}#}#}#}#}#}#}#}#}#}#}#}#}#}#}#}#}#}#}#}#}#}#}#}#}#}#}#}#}#}#}#}#}#}#}#}#}#}#}#}#}#}#}#}#}#}#}#}#}#}#}#}#}#}#}#}#}#}#}#}#}#}#}#}#}#}#}#}#}#}#}#}#}#}#}#}#}#}#}#}#}#}#}#}#}#}#}#}#}#}#}#}#}#}#}#}#}#}#}#}#}#}#}#}#}#}#}#}#}#}#}#}#}#}#}#}#}#}#}#}#}#}#}#}#}#}#}#}#}#}#}#}#}#}#}#}#}#}#}#}#}#}#}#}#}#}#}#}#}#}#}#}#}#}#}#}#}#}#}#}#}#}#}#}#}#}#}#}#}#}#}#}#}#}#}#}#}#}#}#}#}#}#}#}#}#}#}#}#}#}#}#}#}#}#}#}#}#}#}#}#}#}#}#}#}#}#}#}#}#}#}#}#}#}#}#}#}#}#}#}#}#}#}#}#}#}#}#}#}#}#}#}#}#}#}#}#}#}#}#}#}#}#}#}#}#}#}#}#}#}#}#}#}#}#}#}#}#}#}#}#}#}#}#}#}#}#}#}#}#}#}#}#}#}#}#}#}#}#}#}#}#}#}#}#}#}#}#}#}#}#}#}#}#}#}#}#}#}#}#}#}#}#}#}#}#}#}#}#}#}#}#}#}#}#}#}#}#}#}#}#}#}#}#}#}#}#}#}#}#}#}#}#}#}#}#}#}#}#}#}#}#}#}#}#}#}#}#}#}#}#}#}#}#}#}#}#}#}#}#}#}#}#}#}#}#}#}#}#}#}#}#}#}#}#}#}#}#}#}#}#}#}#}#}#}#}#}#}#}#}#}#}#}#}#}#}#}#}#}#}#}#}#}#}#}#}#}#}#}#}#}#}#}#}#}#}#}#}#}#}#}#}#}#}#}#}#}#}#}#}#}#}#}#}#}#}#}#}#}#}#}#}#}#}#}#}#}#}#}#}#}#}#}#}#}#}#}#}#}#}#}#}#}#}#}#}#}#}#}#}#}#}#}#}#}#}#}#}#}#}#}#}#}#}#}#}#}#}#}#}#}#}#}#}#}#}#}#}#}#}#}#}#}#}#}#}#}#}#}#}#}#}#}#}#}#}#}#}#}#}#}#}#}#}#}#}#}#}#}#}#}#}#}#}#}#}#}#}#}#}#}#}#}#}#}#}#}#}#}#}#}#}#}#}#}#}#}#}#}#}#}#}#}#}#}#}#}#}#}#}#}#}#}#}#}#}#}#}#}#}#}#}#}#}#}#}#}#}#}#}#}#}#}#}#}#}#}#}#}#}#}#}#}#}#}#}#}#}#}#}#}#}#}#}#}#}#}#}#}#}#}#}#}#}#}#}#}#}#}#}#}#}#}#}#}#}#}#}#}#}#}#}#}#}#}#}#}#}#}#}#}#}#}#}#}#}#}#}#}#}#}#}#}#}#}#}#}#}#}#}#}#}#}#}#}#}#}#}#}#}#}#}#}#}#}#}#}#}#}#}#}#}#}#}#}#}#}#}#}#}#}#}#}#}#}#}#}#}#}#}#}#}#}#}#}#}#}#}#}#}#}#}#}#}#}#}#}#}#}#}#}#}#}#}#}#}#}#}#}#}#}#}#}#}#}#}#}#}#}#}#}#}#}#}#}#}#}#}#}#}#}#}#}#}#}#}#}#}#}#}#}#}#}#}#}#}#}#}#}#}#}#}#}#}#}#}#}#}#}#}#}#}#}#}#}#}#}#}#}#}#}#}#}#}#}#}#}#}#}#}#}#}#}#}#}#}#}#}#}#}#}#}#}#}#}#}#}#}#}#}#}#}#}#}#}#}#}#}#}#}#}#}#}#}#}#}#}#}#}#}#}#}#}#}#}#}#}#}#}#}#}#}#}#}#}#}#}#}#}#}#}#}#}#}#}#}#}#}#}#}#}#}#}#}#}#}#}#}#}#}#}#}#}#}#}#}#}#}#}#}#}#}#}#}#}#}#}#}#}#}#}#}#}#}#}#}#}#}#}#}#}#}#}#}#}#}#}#}#}#}#}#}#}#}#}#}#}#}#}#}#}#}#}#}#}#}#}#}#}#}#}#}#}#}#}#}#}#}#}#}#}#}#}#}#}#}#}#}#}#}#}#}#}#}#}#}#}#}#}#}#}#}#}#}#}#}#}#}#}#}#}#}#}#}#}#}#}#}#}#}#}#}#}#}#}#}#}#}#}#}#}#}#}#}#}#}#}#}#}#}#}#}#}#}#}#}#}#}#}#}#}#}#}#}#}#}#}#}#}#}#}#}#}#}#}#}#}#}#}#}#}#}#}#}#}#}#}#}#}#}#}#}#}#}#}#}#}#}#}#}#}#}#}#}#}#}#}#}#}#}#}#}#}#}#}#}#}#}#}#}#}#}#}#}#}#}#}#}#}#}#}#}#}#}#}#}#}#}#}#}#}#}#}#}#}#}#}#}#}#}#}#}#}#}#}#}#}#}#}#}#}#}#}#}#}#}#}#}#}#}#}#}#}#}#}#}#}#}#}#}#}#}#}#}#}#}#}#}#}#}#}#}#}#}#}#}#}#}#}#}#}#}#}#}#}#}#}#}#}#}#}#}#}#}#}#}#}#}#}#}#}#}#}#}#}#}#}#}#}#}#}#}#}#}#}#}#}#}#}#}#}#}#}#}#}#}#}#}#}#}#}#}#}#}#}#}#}#}#}#}#}#}#}#}#}#}#}#}#}#}#}#}#}#}#}#}#}#}#}#}#}#}#}#}#}#}#}#}#}#}#}#}#}#}#}#}#}#}#}#}#}#}#}#}#}#}#}#}#}#}#}#}#}#}#}#}#}#}#}#}#}#}#}#}#}#}#}#}#}#}#}#}#}#}#}#}#}#}#}#}#}#}#}#}#}#}#}#}#}#}#}#}#}#}#}#}#}#}#}#}#}#}#}#}#}#}#}#}#}#}#}#}#}#}#}#}#}#}#}#}#}#}#}#}#}#}#}#}#}#}#}#}#}#}#}#}#}#}#}#}#}#}#}#}#}#}#}#}#}#}#}#}#}#}#}#}#}#}#}#}#}#}#}#}#}#}#}#}#}#}#}#}#}#}#}#}#}#}#}#}#}#}#}#}#}#}#}#}#}#}#}#}#}#}#}#}#}#}#}#}#}#}#}#}#}#}#}#}#}#}#}#}#}#}#}#}#}#}#}#}#}#}#}#}#}#}#}#}#}#}#}#}#}#}#}#}#}#}#}#}#}#}#}#}#}#}#}#}#}#}#}#}#}#}#}#}#}#}#}#}#}#}#}#}#}#}#}#}#}#}#}#}#}#}#}#}#}#}#}#}#}#}#}#}#}#}#}#}#}#}#}#}#}#}#}#}#}#}#}