

I’ll never forget the morning I walked into my sunroom and felt like the floor was playing a cruel joke on me. Just six months prior, I had finished a DIY installation that looked like a million bucks. But there it was: a gap big enough to swallow a nickel between two of the center planks. I felt like a failure. I’d followed the YouTube videos and bought the ‘premium’ stuff, yet my floor was literally pulling itself apart. If you’ve ever noticed your beautiful bamboo planks retreating toward the walls, believe me, I know that sinking feeling in your gut. We’re told bamboo is this indestructible, eco-friendly miracle, but the reality underfoot is often much more temperamental. Today, I’m going to share exactly why this happens and how you can stop your investment from shrinking into a memory.
My Bamboo Floor Gapped and It Was Entirely My Fault
When I first started, I treated bamboo exactly like the oak in my hallway. That was my first mistake. Bamboo isn’t actually wood; it’s a grass that has been sliced, boiled, and glued back together under immense pressure. Because of this unique anatomy, it reacts to humidity like a sponge. I completely skipped the part where I should have used a moisture meter before installing wood floors, assuming my house ‘felt’ dry enough. It wasn’t. I learned the hard way that keeping your hardwood floors from gapping in the winter requires more than just hope; it requires an obsession with your home’s relative humidity. If you don’t respect the material’s need to acclimate, it will humiliate you later.
Does Bamboo Actually Live Up to the Hype?
I get this question all the time from neighbors who see the ‘Janka Hardness’ stickers at the big-box stores. They see a high number and think the floor is bulletproof. But hardness does not equal stability. In fact, according to the National Wood Flooring Association (NWFA), bamboo can be up to 50% more prone to dimensional changes than traditional engineered hardwoods if the environment isn’t strictly controlled. So, is it worth it? Yes, but only if you are prepared to manage your indoor climate like a laboratory. Have you ever looked down at your floor and wondered if the planks were actually trying to escape the room? Let me know, because you aren’t alone in that struggle.
The Science of Why Your Planks Are Moving
Most of the time, the shrinkage is a direct result of ‘thermal shock’ or extreme humidity swings. If you have a modern heating system, you might unknowingly be cooking your floor from the bottom up. I’ve seen countless cases where radiant heat is making bamboo floors shrink because the dry heat saps every ounce of moisture from the fibers. It’s also vital to remember that a floor is only as stable as what it sits on. I once ignored the flooring installation fundamentals by failing to level a subfloor properly, and the resulting vertical movement only made the gapping look twice as bad. We have to address the environment first if we want the aesthetic to last.
Fix the Foundation Before the First Plank
Think of your subfloor as the skeleton of your room. If the bones are crooked, the skin—your beautiful bamboo—will never sit right. I remember a humid July in a client’s basement where I ignored a slight dip in the concrete, thinking the underlayment would mask it. By October, when the furnace kicked on, those planks didn’t just gap; they started to ‘telegraph’ every single imperfection of the slab through the surface. To prevent this, you must learn how to measure subfloor flatness before you start installing using a 10-foot straightedge. If you find a dip deeper than 3/16 of an inch, you aren’t ready to lay flooring. You need to master flooring installation fundamentals by using a self-leveling compound or sanding down the high spots. Ignoring this foundation is the fastest way to guarantee gaps that no amount of wood filler can ever hide.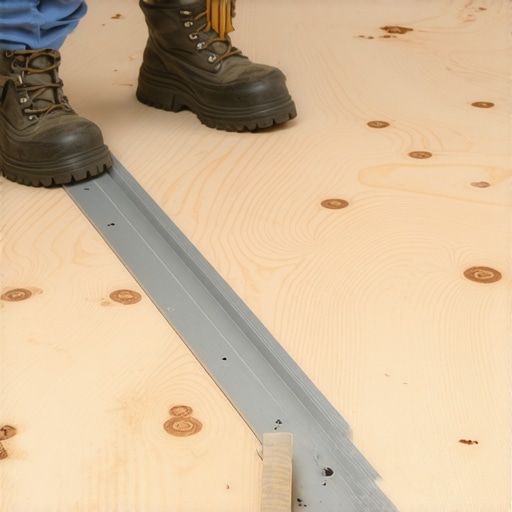
Your Moisture Meter is the Most Important Tool You Own
Bamboo is essentially a giant bundle of straws. It absorbs water from the air and the subfloor with terrifying efficiency. Before a single box is opened, you must use a moisture meter before installing wood floors to check both the material and the subfloor. I keep a digital log of these readings now because I’ve learned that memory is a liar when thousands of dollars are at stake. If the difference between the bamboo and the subfloor is more than 2%, you are walking into a trap. This is why how to keep your hardwood floors from gapping in the winter starts with a rigorous acclimation period. You have to let the planks sit in the room for at least 72 hours, though I personally prefer seven days for dense strand-woven bamboo.
Leave Enough Room for the Floor to Breathe
The most common of all flooring installation mistakes to avoid for lasting results is crowding the walls. I once did a small powder room where I thought a 1/8-inch gap was plenty because the square footage was so small. By the peak of summer, the floor expanded, hit the baseboard, and buckled right in the center like a tectonic plate shift. You need a solid 1/2-inch expansion gap around the entire perimeter. Use dedicated plastic spacers to keep this gap consistent while you work. This gap is ultimately hidden by your baseboards, so don’t be afraid to give the floor room to move. Following a step-by-step guide to flooring installation and leveling success ensures your layout is planned with these thermal shifts in mind.
The Right Blade Prevents a Jagged Mess
Cutting bamboo is not the same as cutting pine or even oak. It is incredibly dense and prone to splintering, which can weaken the edges where the planks meet. I’ve seen DIYers ruin expensive rows by using a dull, general-purpose blade that leaves ‘hairy’ edges. You absolutely why you need a specific blade for cutting bamboo planks—typically a high-tooth-count carbide blade. A clean cut ensures the locking mechanism remains intact and strong. When the edges are crisp and the tongue-and-groove joints are undamaged, the planks lock together with a precision that resists the tension of seasonal shrinkage.Most DIYers and even some professionals get ‘level’ and ‘flat’ confused, and that’s where the disaster begins. Everyone says you need a level floor, but in my experience, a floor can be sloped like a subtle hill and still be perfectly functional as long as it is flat. If your subfloor isn’t flat, those bamboo tongues will snap under the pressure of your footsteps as the planks bridge over the low spots. The National Wood Flooring Association (NWFA) is very specific about this: they require a subfloor to be flat within 3/16 of an inch over a 10-foot radius. If you skip the step of learning how to check for high spots with a 10-foot straightedge, no amount of ‘premium’ flooring will save you from the eventual creaks and gaps. Let’s dig deeper into why we often fail here.
Stop Treating Your Self-Leveler Like a Miracle in a Bucket
The biggest lie in the industry is the word ‘self.’ It doesn’t actually level itself; it’s more like a ‘highly-viscous-liquid-that-requires-significant-help.’ If you don’t use a spiked roller or a gauge rake, you’ll end up with ‘birdbaths’—shallow depressions—instead of a glass-like surface. I’ve seen so many homeowners fail because they didn’t realize the secret to mixing leveler for a glass smooth finish involves the exact water-to-powder ratio, down to the ounce. Too much water and the polymers separate, leading to a powdery finish; too little and it sets up before it can flow. Self-leveler is essentially a race against the clock. Most products have a working time of only 15 to 20 minutes. If you aren’t prepared with multiple buckets and a dedicated mixer, you’ll end up with ‘cold joints’ where the first batch starts to skin over before the second batch hits it. This creates a ridge that defeats the entire purpose of the ultimate guide to floor leveling for a perfect finish. I always recommend a two-person team: one person mixing and one person pouring and spreading. It’s the only way to maintain the ‘wet edge’ necessary for a seamless transition. #IMAGE_PLACE_HOLDER_C#
Why did my self-leveler pit and bubble during the drying process?
This is the advanced ‘trap’ that ruins perfectly good pours. Usually, it’s caused by ‘outgassing.’ When you pour a wet compound over a porous subfloor like plywood or old concrete without a high-quality primer, air is trapped in the substrate and forced upward by the weight of the liquid. If you’ve wondered why your self-leveler is bubbling over plywood, it’s because you didn’t seal the pores first. This creates tiny craters—pits—that can actually telegraph through thin flooring like LVP or bamboo. To avoid this, always use the best primer for installing leveler over plywood and give it the full recommended dry time. Another hidden nuance is the ‘leak’ factor. I once watched a contractor pour five bags of leveler into a second-story bedroom, only to hear a scream from the kitchen below. He hadn’t bothered to learn how to stop your floor leveler from leaking through the subfloor by caulking every seam and damming the doorways. The ‘Oops’ factor also happens when we underestimate the mechanical bond. If you’re pouring over old concrete that’s as smooth as glass, the leveler won’t ‘bite.’ You might need to grind the surface first. Neglecting this is one of those flooring installation mistakes to avoid for lasting results that doesn’t show up immediately, but within a year, the leveler starts to delaminate and ‘crunch’ under your floor. Have you ever fallen into this trap or had a ‘self-leveler’ nightmare? Let me know in the comments—I’d love to hear how you fixed it.Once you have conquered the chaos of self-leveling and the planks are finally snapped into place, you might think the battle is over. I certainly did. But the real work—the kind that keeps your floor looking like a professional showroom for a decade—actually starts the moment you put your tools away. Over the years, I’ve realized that the most expensive flooring installation is the one you have to do twice. To prevent that, I’ve moved away from generic ‘cleaning’ and toward a strategy of ‘environmental management.’ If you want to master hardwood floor care secrets to longevity and shine, you have to stop thinking about your floor as a static surface and start seeing it as a living, breathing part of your home.
The Tools That Saved My Sanity (and My Bamboo)
I don’t care how much you spent on your vacuum; if it has a beater bar, keep it away from your bamboo. I personally use a dedicated canister vacuum with a soft-bristle head that I’ve checked for debris before every single use. Even a tiny pebble caught in the bristles can leave a micro-scratch that haunts you forever. But the real ‘secret weapon’ in my kit isn’t even a cleaning tool—it’s a $15 digital hygrometer. The National Wood Flooring Association (NWFA) emphasizes that bamboo performs best when the relative humidity (RH) is kept between 35% and 55%. I keep a hygrometer in the sunroom and one in the main hallway. If I see the numbers dip below 30% in February, I turn up the humidifier immediately. This is the only proactive way to ensure you are keeping your hardwood floors from gapping in the winter. 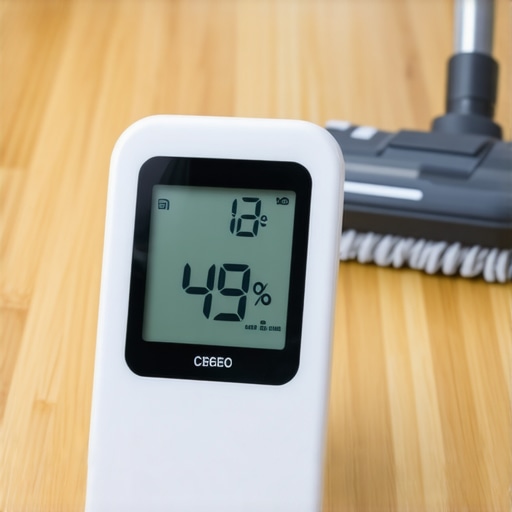
Why Steam is the Ultimate Enemy of Your New Floor
The biggest mistake I see homeowners make—and I’ve had to break this news to a lot of heartbroken clients—is using a steam mop. I know the commercials make it look satisfying, but you should why you should never use a steam mop on click-lock floors. That high-pressure steam is literally injected into the joints of your bamboo, causing the core to swell and the edges to peel. I prefer a slightly damp (never dripping) microfiber pad with a pH-neutral cleaner. And remember, if you just finished a fresh install, why you should never mop new hardwood for at least two weeks is a rule you must respect to let the adhesives and finishes fully stabilize.
How do I maintain my bamboo floor’s luster over time?
Consistency is more important than intensity. I recommend a quick dust-mop every two days to remove abrasive grit and a deep clean only once a month. As we look toward the future of flooring, I predict we’ll see ‘smart floors’ with integrated moisture sensors embedded in the underlayment that sync directly to your HVAC system. Until then, we have to be the sensors. If you’ve been mastering hardwood floor refinishing expert tips for 2025, you know that the best finish is the one you never have to sand because you protected it from the start. My advice? Go buy a hygrometer today. It is the single most important investment you can make for your floor’s future.
The Hardest Lesson I Learned While Chasing a Flat Floor
Looking back at that first gapping disaster, I realize I was trying to fight physics rather than work with it. Bamboo is a beautiful, stubborn material that demands respect. One of the biggest floor leveling challenges common mistakes and how to avoid them is assuming your subfloor is ‘flat enough’ because you can’t see a dip with the naked eye. I now know that if a marble rolls toward a certain spot, my planks will eventually separate there. Another lightbulb moment was realizing that ‘acclimation’ doesn’t just mean letting boxes sit in a room; it means the moisture levels of the floor and the subfloor must be in a specific, narrow range before the first click happens. Finally, I’ve learned that moisture control is a year-round job. You can’t just set it and forget it; you have to be the steward of your home’s air quality.
#IMAGE_WRAPUP#
My Essential Kit for a Lifetime of Stable Planks
If you’re serious about avoiding a remodel in five years, you need more than a hammer and a saw. First, I never start a job without a 10-foot aluminum straightedge to check for high spots. It’s the only way to achieve precise floor leveling techniques to achieve flawless surfaces. Second, I swear by a dual-hygrometer setup—one for the room and one for the subfloor—to monitor conditions in real-time. Third, always have a dedicated spiked roller when pouring compound. I’ve found that the secret to mixing leveler for a glass smooth finish isn’t just the water ratio, but how you agitate the mixture to remove air. Lastly, keep a high-tooth-count carbide blade specifically for bamboo to prevent the splintering that leads to weak joints.
Start Your Project with Confidence, Not Just Hope
You don’t have to be a master carpenter to get professional results, but you do have to be a master of the details. By respecting the flooring installation fundamentals and treating your bamboo like the living grass it is, you can create a space that stays stunning through every season. Don’t let the fear of gapping stop you—let it motivate you to prep your subfloor better than anyone else on your block. Have you ever battled a floor that just wouldn’t stay flat, or had a self-leveler disaster that taught you a lesson? Let me know in the comments below!