I’ll never forget the morning I faced my biggest flooring headache—standing in a sea of mismatched tiles and uneven hardwood planks, feeling like I might have bitten off more than I could chew. The frustration was real, and honestly, a bit overwhelming. That’s when I had my lightbulb moment: there’s got to be a smarter way to keep those pesky floor levelers in check during pours, especially with the new 2026 standards.
Discovering the Power of Foam Dams for a Cleaner, Flatter Finish
Since that day, I’ve been digging into the best ways to make my floor leveling projects smoother and less stressful. One secret I’ve uncovered is using foam dams—these simple yet effective barriers that keep your concrete or self-leveling compounds exactly where they need to be. Not only do they prevent messes and overflows, but they also make the cleanup a breeze and help you achieve a professional-quality finish every time. Today, I want to share my journey and how foam dams can transform your flooring install, especially with the challenges the 2026 requirements are bringing.
Will Foam Dams Actually Make My Job Easier?
Initial skepticism is totally normal, especially when you’re used to traditional methods. I remember thinking, “Is this just a gimmick?” but my early mistake was underestimating how much control these barriers could offer. Trust me, the right tools can make or break your project, and foam dams are a game-changer. They helped me avoid messy overflows and uneven pours, saving me time and money. For a deeper dive into smart installation tricks and to steer clear of common mistakes, I recommend checking out this guide on avoiding flooring installation blunders. Now, let’s get into how to choose and use foam dams like a pro, so your floor will look perfect for years to come.
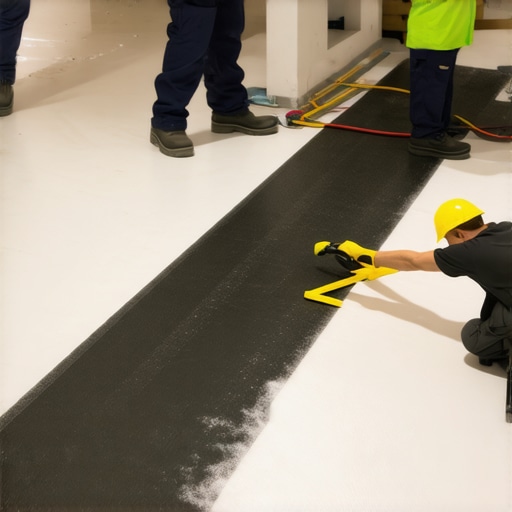
Selecting the Right Foam Dams for Your Project
Start by measuring your floor to determine the length and height of foam dams needed. Opt for flexible, waterproof foam that adheres well to your subfloor. I once cut a foam dam too short for a bathroom renovation, causing overspill; measuring carefully prevents this mistake. Place the foam dams along the edges of your pour area to contain the leveling compound effectively.
Preparing the Subfloor and Surface
Ensure the subfloor is clean, dry, and free of debris. Any loose particles can compromise adhesion, leading to unevenness. Use a vacuum and a damp cloth to wipe down the surface. When I prepared my garage floor, I removed loose dirt and small cracks, which resulted in a smoother pour. Proper prep establishes a solid foundation for a perfectly leveled surface.
Applying the Foam Dams Securely
Attach the foam dams to the floor using a waterproof adhesive, pressing firmly to create a seal. Be cautious not to trap air underneath; a flat, tight seal is essential. During one project, I temporarily used duct tape to hold the dams in place before applying adhesive, ensuring they didn’t shift during pour. Proper attachment prevents leaks and maintains control over the leveling process.
Pouring and Spreading the Leveling Compound
Mix your leveling compound according to manufacturer instructions. Pour it into the enclosed area, starting from one corner and working your way across. Use a trowel or smoothing tool to spread evenly. I recall a time when I poured too quickly, causing air bubbles; pouring slowly and steadily minimizes this. Keep a consistent flow to avoid thin spots or ridges.
Monitoring and Adjusting During the Cure
Observe the pour as it sets. If you notice minor unevenness, gently re-level with a trowel before it hardens. Do not disturb the foam dams during this time. In my experience, checking the level with a straightedge after the initial set helps identify spots needing minor adjustments, ensuring a flat surface.
Removing Foam Dams and Final Checks
Once the compound has fully cured, carefully detach the foam dams using a utility knife or thin pry bar. Inspect the edges for any overspill or imperfections. I once left a foam dam in too long, causing some adhesion issues when removing; timely removal avoids damage. Final inspection and light sanding leave your surface ready for flooring installation, saving you time and ensuring quality results.
Implementing these steps can drastically improve your leveling accuracy, especially important under the new standards for 2026 flooring projects. For more tips on avoiding common pitfalls, visit this comprehensive guide, which covers essential techniques to ensure your project stands the test of time.
When it comes to flooring installation, many homeowners and even some professionals tend to cling to outdated beliefs that can lead to costly mistakes. One of the most persistent myths is that a perfectly flat subfloor isn’t crucial; in reality, uneven subfloors are the root of many issues like squeaks, cracks, and uneven surfaces. Believe it or not, neglecting proper subfloor prep can compromise the entire project, making advanced techniques like precise floor leveling essential—more on that in our comprehensive guide to leveling. Many assume that hardwood floors naturally conform to minor imperfections, but this misconception can result in buckling or early wear. To avoid this, using specialized underlayments and correct installation methods is key—discover more in choosing the right hardwoods. A common mistake is underestimating the importance of moisture testing; excess moisture is the silent destroyer of both tile and wood floors, often causing curling or mold. Regular moisture assessments and proper acclimation practices, outlined in subfloor moisture testing techniques, can save you from these pitfalls. So, what’s the secret to avoiding these costly errors? It boils down to understanding the nuances—like the critical importance of material compatibility and environmental conditions—that only seasoned professionals truly grasp. For instance, misconceptions about the durability of certain tile adhesives can lead to early failure, especially with 2026 standards emphasizing longevity. Always stay updated with the latest industry insights and avoid shortcuts, which are often tempting but risky. Remember, proper preparation and using advanced, tailored techniques are your best allies in achieving a flawless, durable finish. Want to ensure your project aligns with current best practices? Check out our tile installation tips to learn how to optimize your workflow. Have you ever fallen into this trap? Let me know in the comments!
Keeping your flooring projects seamlessly operational over time requires the right combination of tools, consistent maintenance, and strategic planning. As someone deeply involved in flooring installation and restoration, I can attest that choosing the correct equipment and implementing proper upkeep routines not only extends the life of your floors but also ensures they remain beautiful and functional for years to come.
Investing in Quality Tools for Durability and Precision
First and foremost, I recommend using a high-precision laser level, such as the Leica Disto series, for floor leveling tasks. Unlike traditional bubble levels, laser levels project a bright, straight reference line across the floor, making it easier to identify uneven sections and ensure a flat surface. This tool has revolutionized my approach to subfloor preparation, saving me hours and preventing costly errors like uneven tile lippage or hardwood cupping. Additionally, an oscillating multi-tool equipped with a carbide grout blade is invaluable for detailed repairs and cleaning gaps between tiles; its versatility allows for quick removal of old grout or adhesive residues without damaging surrounding materials.
For ongoing maintenance, a commercial-grade floor buffer with adjustable pads helps in cleaning and restoring the shine of hardwoods and tiles alike. When paired with appropriate cleaning solutions—like pH-neutral cleaners—I can remove embedded dirt and minor scratches without harsh abrasives, preserving the finish integrity. These investments in quality, purpose-built equipment are vital, especially as standards evolve towards longer-lasting materials and finishes, such as those outlined in testings for subfloor porosity.
Perpetual Maintenance: Securing Long-Term Results
Routine inspections are my secret weapon. I check for signs of moisture damage, which is often overlooked but can severely compromise both tile and hardwood installations. Using a moisture meter like the Tramex CM-700 helps me detect hidden issues before they escalate into costly repairs or replacements. Regularly sweeping and damp-mopping hardwood floors with microfiber mops prevents debris buildup that shortens finish life, while applying protective pads under furniture minimizes scratches.
Another critical maintenance aspect is controlling humidity levels within the recommended range of 35-55%. Installing a dehumidifier or humidifier as needed keeps moisture fluctuations in check, aligning with the latest standards for durable finishes. Consistent care combined with reliable tools forms the backbone of long-lasting flooring, making your investment resilient against everyday wear and environmental stressors.
Planning for Growth: Scaling Flooring Projects Effectively
As your expertise and projects expand, so does the need for scalable solutions. Modular tools, like adjustable leveling ramps and expansion joint spacers, allow you to handle varying floor sizes and complex layouts efficiently. Embracing software solutions such as design planning apps streamlines the process from concept to execution, reducing material waste and avoiding costly corrections. Staying updated with industry innovations, such as rapid-curing self-leveling compounds or laser-guided installation systems, prepares you to meet future standards like the upcoming 2026 regulations seamlessly.
To truly excel, I challenge you to integrate a laser level into your next floor leveling project. Its precision can dramatically improve your results and reduce subsequent maintenance issues. Be proactive—your floors will thank you over the long term!
How do I maintain my flooring investments over time?
Consistent, targeted care is key. Focus on regular inspections for moisture, surface wear, and structural integrity. Use specialized equipment like moisture meters and quality buffers, and ensure environmental conditions remain within recommended parameters. Combining these practices with the right tools and planning sets the stage for floors that withstand the test of time, even as standards and materials evolve. For detailed guidance, explore these advanced leveling techniques and elevate your craftsmanship today.
What I Wish I Knew When I Started Lining Floors
The first time I attempted a floor leveling project, I underestimated the importance of precise measurements and the right tools—leading to costly reworks. That experience taught me that mastery isn’t just about technique but about detailed preparation and choosing the tools that match the project’s evolving standards. Embracing innovations, like laser-guided leveling, suddenly made everything fall into place. Remember, every misstep is a stepping stone toward expertise, especially as standards evolve toward perfection in 2026.
Fresh Tools and Resources That Elevate Your Craft
One game-changing resource I rely on is the latest guide on 2026 floor leveling fixes, packed with practical tips tailored for upcoming standards. For measuring subfloor flatness, I swear by a high-precision laser level, which provides accuracy beyond traditional bubble levels. If you’re serious about long-lasting results, consider the recommended leveling compounds designed for 2026. These tools and resources have helped me turn difficult projects into showcase pieces.
Take Action and Set New Standards
The key to successful flooring in 2026 is proactive learning and application. Don’t wait until standards change to refine your skills—invest now in the latest techniques and tools, and you’ll be miles ahead. Use quality equipment like laser levels and test your subfloor thoroughly before pouring. Every project you undertake is an opportunity to improve, impress, and build confidence. What’s the one step you’re going to take today to elevate your flooring craftsmanship? Share your plan below and let’s grow together!