
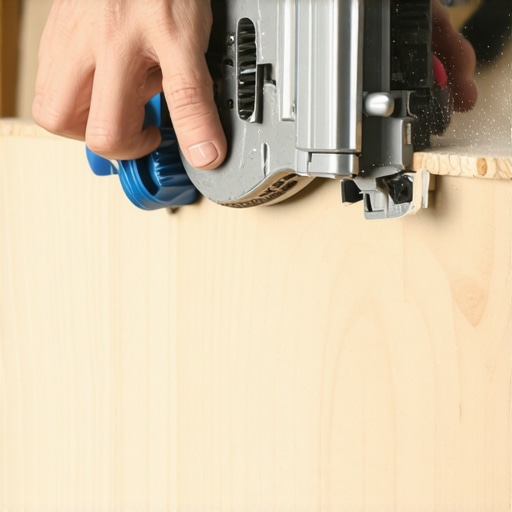
I stood there in my half-finished guest room, staring at a sixty-dollar plank of ‘hand-scraped’ laminate that now looked like it had been chewed by a caffeinated beaver. Every time the jigsaw blade came up, it snatched a tiny chunk of the decorative top layer with it. It was heartbreaking. I’d spent hours studying the ultimate guide to floor leveling for a perfect finish to make sure my subfloor was flat, only to ruin the actual aesthetic part in seconds. I almost threw my saw out the window. But then, an old contractor friend saw my pile of ‘oops’ boards and handed me a roll of blue painter’s tape. He told me that most flooring installation mistakes to avoid for lasting results happen because we ignore the simple physics of the blade. Today, I’m going to show you how a simple 99-cent roll of masking tape can be the difference between a jagged mess and a professional, seamless edge. We’re going to fix your ‘chip-out’ problems once and for all.
Why Your Saw Is Tearing Up Your Expensive Planks
[IMAGE_PLACEHOLDER] I’ll be honest with you: when I first started, I thought I just needed a more expensive blade. I bought the ‘fine-tooth’ ones, the ‘laminate-specific’ ones, and even tried cutting from the back. Nothing worked consistently. The real issue is the way the teeth exit the material. As the blade spins, it pulls the decorative laminate layer away from the core, causing those tiny, ugly splinters. Even if you are already careful and have read about the tape trick for cutting LVP without the mess, laminate is a different beast because of its incredibly brittle wear layer. Interestingly, industry data from Fine Homebuilding suggests that the vibration of the material during the cut is often more destructive than the actual sharpness of the blade itself. By applying masking tape directly over your cut line, you are essentially ‘clamping’ those fibers down, giving the blade a sacrificial surface to exit through. This prevents the teeth from ‘lifting’ the finish as they pass. Have you ever felt that sinking feeling when you realize you’ve just ruined your last ‘good’ board in the box? Or perhaps you’ve struggled with how to achieve flawless floor level before tile laying and felt like giving up? Trust me, we have all been there.
Is a little piece of tape really enough to stop the splintering?
It sounds like a ‘hack’ that’s too good to be true, doesn’t it? I was skeptical too. I thought, ‘There’s no way paper tape can stop a steel blade moving at 4,000 RPM.’ But the physics are sound. The tape provides the necessary tension to hold the decorative layer against the HDF core. It’s similar to how you’d use a backer board for drilling holes. Before you dive into the actual cutting process, make sure you aren’t ignoring other prep steps like why you should not rely on waterproof labels for laminate, because a clean cut on a bad board still won’t save your floor in the long run. I once made the mistake of ignoring the subfloor entirely, thinking I could just ‘float’ it over anything, but mastering floor leveling pro secrets for perfect installations taught me that the prep work is half the battle. Now, let’s get into the nitty-gritty of how to apply this move perfectly every single time so your neighbors think you hired a pro.
Stick It Before You Rip It
I learned the hard way that you can’t just slap tape on and hope for the best. Once, in a rush to finish a hallway, I used some old, dusty masking tape that didn’t really adhere to the textured surface of the laminate. Halfway through the cut, the vibration shook the tape loose, and the jigsaw blade went to town on the edges. It looked like a shark had bitten my transition piece. To avoid that, you need to press the tape down firmly—really burnish it with your thumb—over your cut line. This creates a solid bond that holds the decorative layer in place against the core material. This is very similar to the tape trick for preventing splinters when cutting lvp planks, though laminate is even more prone to shattering if the tape isn’t tight.
First, measure your piece and mark your cut line with a pencil. Then, center a piece of high-quality painter’s tape over that line. Don’t use the cheap, generic tan masking tape; it leaves a sticky residue that’s a nightmare to clean later. Once the tape is down, draw your mark again on top of the tape. This double-marking ensures you are being precise. If you follow a step-by-step guide to flooring installation and leveling success, you know that accuracy at the saw saves you from having to pull up boards later because of a bad fit.
Switch to a Down-Stroke Blade for Extra Safety
Most standard jigsaw blades cut on the up-stroke, which is exactly why they rip the finish off the top of your board. If you want a cleaner edge, look for a ‘reverse-tooth’ or ‘down-stroke’ blade. These blades push the material down toward the subfloor rather than pulling it up. It’s a game changer. Think of it like the difference between a clean surgical incision and a jagged tear. Just be aware that a down-stroke blade will try to push the saw up away from the wood, so you have to hold the saw base down firmly. This technique is just as vital as knowing why your porcelain tiles are chipping during the cut—it’s all about managing the direction of the force.
Keep the Vibration Under Control
Even with tape and the right blade, vibration is your enemy. If your plank is bouncing around on your sawhorses, it’s going to chip. I always use a sacrificial piece of scrap plywood underneath the area I’m cutting. This supports the laminate and prevents it from flexing as the blade passes through. This focus on stability is what separates a DIY job from a professional result. It’s the same level of care you’d use when figuring out the right way to undercut baseboards for a clean flooring finish. When the board stays still, the cut stays clean. If you are aiming for the secret to seamless flooring transitions between kitchen and living rooms, those perfectly square, chip-free cuts are what make the transition strips sit flush and look intentional rather than like an afterthought.
I’ve seen it a thousand times: a DIYer masters the perfect cut, gets the tape trick down, and then watches their beautiful new floor fail within six months. While getting a clean edge is satisfying, it’s often a distraction from the invisible forces working against your installation. We focus on the aesthetic because it’s what we see, but the ‘physics’ of a floor goes much deeper than the surface of the plank.
Your Self-Leveler Won’t Actually Level Itself
Here is a hard truth that many manufacturers gloss over: ‘self-leveling’ compound is a bit of a marketing lie. Most people think they can just pour it out and it will magically find its own level like water in a bathtub. In reality, the surface tension of the mix and the temperature of your room will cause it to settle in ways you didn’t expect. If you don’t use the best way to mix self-leveler for a perfectly smooth surface, you’ll end up with ‘islands’ and ridges that are harder to fix than the original dip. I once thought I could skip the spiked roller and just ‘let it flow,’ only to find a series of tiny craters the next morning. It was a nightmare. Have you ever fallen into this trap of trusting the product name too much? Let me know in the comments.
Beyond the pour, the biggest ‘oops’ factor I see with advanced students is neglecting the bond. If you are working on concrete, you absolutely cannot skip the primer. Without it, the dry concrete sucks the moisture out of your leveler too fast, leading to a weak bond and eventual delamination. This is exactly why your self-leveling compound is cracking like a dry lake bed. You need that chemical bridge to keep the two layers together. If you’re struggling with a dusty slab, you have to address why your concrete subfloor is dusting and how to stop it before a single drop of compound hits the floor. It’s about the foundation, not just the finish.
Can You Really Trust Your Subfloor Just Because It Looks Dry?
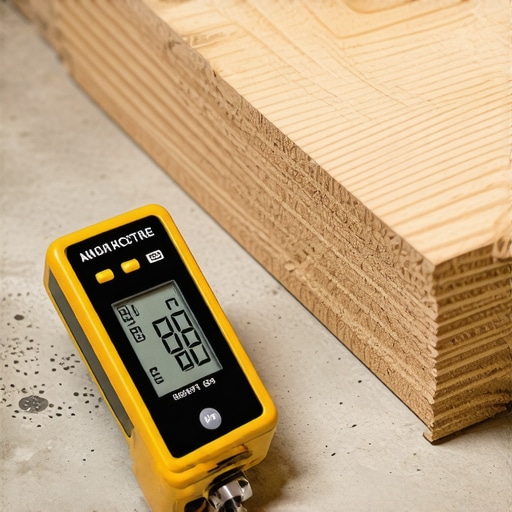
This is where the real experts separate themselves from the weekend warriors. A slab can look bone-dry on the surface while holding a reservoir of moisture underneath. According to the National Wood Flooring Association (NWFA), moisture-related failures are the leading cause of insurance claims in the flooring industry. They suggest that testing is the only way to be sure. This is why you must learn how to use a moisture meter to prevent floor failure. If that moisture moves up into your laminate or hardwood, your perfectly taped edges won’t matter; the boards will cup and warp until the joints snap. Even if you’ve followed a the ultimate guide to floor leveling for a perfect finish, ignoring the RH (relative humidity) of the slab is like building a house on a swamp. Always check your levels, prime your surfaces, and never trust a ‘self-leveling’ label to do the hard work for you. Precision in the prep is what makes the final plank look as good in five years as it does the day you click it into place.
Forget the Fancy Gimmicks and Get These Instead
If you’re serious about this, stop relying on the cheap plastic spacers and the $10 ‘all-in-one’ install kits from the big-box stores. I personally swear by a Lignomat moisture meter because it’s the only way to be 100% sure your wood has acclimated properly. According to the National Wood Flooring Association (NWFA) Technical Manual, wood is a hygroscopic material that will always expand or contract to reach equilibrium with its environment. If you don’t track that, you’re just guessing. I’ve seen beautiful installs ruined because someone didn’t realize 7 tools you actually need for a professional diy hardwood install includes more than just a hammer. You also need to look at how to use a moisture meter to prevent floor failure before you even open the boxes. For those of you working with tile, having a high-end wet saw makes all the difference, but even then, you must know how to cut thick porcelain tiles without chipping the glaze to avoid wasting expensive material.
How do I keep my new floor looking brand new?
The maintenance phase is where most people drop the ball. They spend thousands on materials and then use a $40 steam mop that slowly melts the glue and warps the veneer. It’s painful to watch. I always tell my clients to dive into hardwood floor care secrets to longevity and shine. The golden rule? Never, ever use a steam mop on engineered wood or laminate. The heat and pressurized moisture are the fastest ways to cause delamination and edge swelling. Instead, stick to a microfiber mop and a pH-neutral cleaner specifically designed for your finish type. If you went with a modern finish, you should understand the natural oil vs polyurethane debate for busy homes because the maintenance routines are completely different. Natural oils require periodic re-oiling, while poly is a ‘set and forget’ coating until it’s time for a full refinish.
Stop Using a Steam Mop Immediately
Looking ahead, I see a huge shift toward sustainable, ‘breathable’ flooring systems in the next few years. We are moving away from sealing wood in a thick plastic-like layer of polyurethane and moving toward hard-wax oils that allow for easy spot repairs without sanding the whole room. This means mastering hardwood floor refinishing expert tips for 2025 will be less about the heavy machinery and more about precision maintenance. If you want to elevate your home aesthetic today, I highly recommend checking out tile selection tips for elegant hardwood floors in 2025 to see how hybrid designs are taking over. My best advice? Take a scrap piece of your flooring and try the ‘tape and burnish’ technique we discussed earlier right now. Mastering that one physical skill on a test board will build the confidence you need before you fire up the saw for the real deal. It is time to stop worrying about the ‘what-ifs’ and start building the floor you deserve.
The Hard-Won Secrets from My Pile of Ruined Planks
- Tape is more than a shield; it acts as a mechanical stabilizer for the brittle wear layer of laminate. If you don’t burnish it down firmly, the microscopic vibrations of the blade will still find a way to tear the finish.
- Always look out for 7 signs your tile contractor is cutting corners on prep work if you decide to hire out the labor, as a poorly prepared subfloor can cause planks to shift and chip long after the job is done.
- I found out the hard way that if you skip the primer and don’t understand why you must prime concrete before applying leveler, the moisture loss makes the surface brittle, leading to those annoying clicking sounds when you walk.
- Sometimes a tiny adjustment, like knowing how to fix a bouncy floor with a few well-placed screws, eliminates the subfloor movement that causes your jigsaw cuts to go crooked in the first place.
The Tools I Won’t Step Onto a Job Site Without
I’ve wasted hundreds of dollars on budget alternatives before realizing that these three items are non-negotiable for a professional flooring installation. First, a high-quality Lignomat moisture meter is vital because you simply cannot guess if a subfloor is dry enough to receive wood. Second, a dedicated down-stroke blade for your jigsaw is a game changer; it is the only way to keep the cutting force directed safely downward. Finally, I always keep a bottle of pH-neutral cleaner ready for the client, because you should never use a steam mop on engineered wood floors or laminate if you want the edges to stay tight and beautiful for years.
Take the Leap and Build a Floor That Lasts
The transition from a frustrated DIYer to a confident home renovator happens the moment you stop rushing and start respecting the physics of your materials. Flooring installation is as much about patience and preparation as it is about clicking boards together. By mastering the tape trick and the leveling basics, you are not just laying a floor; you are building a lasting foundation for your home. Don’t be afraid of the saw—just be prepared for it. Have you ever had a board splinter right at the very last second of a cut? Let me know your biggest flooring oops in the comments!