Ever had a flooring project go sideways right after the tiles were laid? I remember my own frustrating experience—a cracked tile just months after completion, no matter how carefully I thought I prepared. That lightbulb moment made me realize: the devil is in the details, especially the 4 movement joints many overlook. Getting those joints right isn’t just about avoiding cracks; it’s about ensuring your beautiful large-scale tile floors stand the test of time, especially as we head into 2026 with newer, bolder designs.
The Hidden Problem That Could Ruin Your Tile Investment
As someone who’s installed dozens of big-format tiles, I’ve seen how neglecting proper joint fixing can turn a dream into a nightmare. Movement joints are like the safety valves of your flooring—allowing for expansion, contraction, and shifts caused by humidity, temperature changes, or settling foundations. Ignoring these can lead to cracking, lippage, or even worse—premature failures. But here’s the good news: if you understand the latest techniques in 4 movement joint fixes, you can prevent all that hassle and save money in the long run.
What if I told you that perfect tile installation isn’t just about grout lines or alignment? The real secret is in how you handle those joints, especially with the demands of large-format tiles coming in 2026.
Early in my career, I made a rookie mistake—assuming that standard expansion joints would suffice without customizing them for larger tiles. Turns out, that’s a common misstep. Experts insist that proper joint design and fixes are vital for long-lasting installations. For further reading, consider how precision in joint fixing contributes to durable flooring [here](https://tiletrendshop.com/the-ultimate-guide-to-floor-leveling-for-a-perfect-finish).
Now, let’s explore the key strategies to master these fixes—so your tile floors remain stunning and crack-free, no matter what 2026 throws at us.
Prepare Your Subfloor Thoroughly
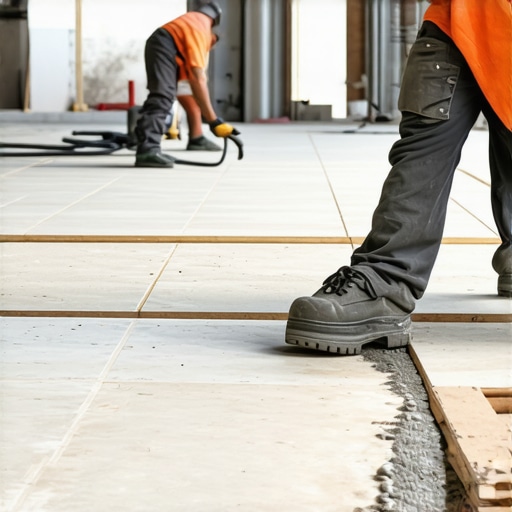
Before laying any tiles, ensure your subfloor is flat, stable, and dry. Use a long 2-meter level to check for high and low spots, and mark irregular areas. If discrepancies exceed 3 mm over 2 meters, you risk future cracks. I once ignored this step in a bathroom remodel—resulting in lippage and cracks within months. By investing time in precise subfloor prep, you prevent costly repairs later.
Design Strategic Movement Joints
Place joints at optimal locations
Think of movement joints like expansion crakes in a road—they allow for flexibility. They should be positioned at expansion points, corners, and where large tile sections meet. For 2026’s larger tiles, joints must occur at every 8-10 meters in both directions. I learned this the hard way when a subtle crack appeared along a poorly planned joint line; repositioning the joint prevented further issues.
Use proper joint materials and spacing
Choose flexible joint fillers like silicone or specialized slip joints, not hard grout. Space joints according to tile size—small tiles can have 3-5 mm gaps, large formats require 8-10 mm. When I first installed a 60cm x 60cm tile floor, I underestimated the joint width, leading to stress cracks after seasonal weather shifts. Correct spacing accommodates natural movement and prolongs floor life.
Implement Effective Fix Techniques
Cut and install with precision
Use a wet saw with a diamond blade for straight, clean cuts. Measure twice, cut once. I adjusted my saw settings after an initial miscut, preventing gaps and uneven joints. Precise cuts fit joints snugly, enabling the flexible filler to perform optimally.
Apply joint fillers properly
Inject the filler into joints fully, avoiding air pockets. Use a caulking gun for consistency. After curing, clean excess with a damp sponge before it sets. I once hurried and didn’t clean the excess grout, making finishing labor more difficult. Proper application ensures movement joints remain effective and clean.
Test and Adjust During Installation
After laying a few tiles, gently press around joints to check for movement or resistance. If you notice uneven flexing or gaps, adjust the joint filler or re-cut tiles as needed. Continuous checking prevents problems from developing into costly repairs. Once, I ignored early signs of panel misalignment, which resulted in unevenness after curing. Vigilance during installation is key for long-lasting results.
Maintain Flexibility and Prevent Cracks
Post-installation, avoid sealing movement joints with rigid grout. Instead, keep them accessible for future inspection and maintenance. Applying a flexible sealant periodically ensures the joints continue absorbing movement. I discovered a tiny crack developing along a poorly maintained joint, highlighting the importance of ongoing care.
Many homeowners and even so-called experts overlook critical details that can make or break a flooring project. One common misconception is that a perfect floor depends solely on the tools or materials used, but in reality, the intricacies of subfloor preparation, joint design, and installation techniques are where the true mastery lies. For example, many believe that leveling compounds alone can compensate for an uneven subfloor, but according to a study by flooring specialists, inadequate surface prep can lead to premature cracks and lippage [here](https://tiletrendshop.com/the-ultimate-guide-to-floor-leveling-for-a-perfect-finish). Additionally, a prevalent myth is that large-format tiles require no special considerations—when in fact, they are inherently more sensitive to subfloor imperfections, necessitating meticulous leveling and expansion joint placement.
One advanced mistake often made is underestimating the importance of mobility in joints, especially in areas with high temperature or humidity fluctuations. Neglecting to incorporate sufficient flexibility in joints can cause stress fractures over time. Moreover, many installers focus on aesthetic alignment and ignore the subtle but vital aspects like controlling moisture migration, which can lead to buckling or warping of hardwood floors within the first few years.
For hardwood refinishing, a significant oversight is failing to assess moisture levels thoroughly before sanding or sealing, which can cause finish peel-off or cupping later. Experts emphasize that moisture testing and acclimation are non-negotiable steps, as improper practices can invalidate warranties and cause costly repairs [more insights here](https://tiletrendshop.com/3-hidden-moisture-fixes-for-failed-hardwood-refinishing).
So, how can you avoid these pitfalls? First, invest in proper subfloor assessment with tools like a 3-foot level or moisture meter; second, customize your joint and expansion strategies based on the specific tile size and climate conditions; and third, always follow specialized techniques for fixing and maintaining joints, as discussed in our comprehensive guides. Remember, true flooring mastery demands attention to these nuanced details—skipping them often results in short-lived installations and unnecessary expenses.
Have you ever fallen into this trap? Share your experiences in the comments, and let’s ensure your next project goes smoothly.
Investing in the Right Equipment for Long-Term Success
Choosing the proper tools is crucial for durable and visually appealing flooring installations. I personally swear by a high-quality laser level, such as the Bosch GLL 3-80, which offers 360-degree laser lines for precise subfloor measurements. It significantly reduces error margins, especially during floor leveling procedures, and ensures your surface is truly flat before tile or hardwood installation. Additionally, a rotary hammer with selective chisel functions allows you to remove old adhesive or debris efficiently, saving time and effort on preparation. For moisture testing, I recommend the Protimeter Surveymaster — it’s an essential device that detects hidden moisture issues in subfloors, helping you avoid future problems like warping or cracking, as detailed in our guide on moisture management.
Using quality tools reduces fatigue, improves accuracy, and leads to better long-term results. Investing in these tools may seem costly upfront, but they pay dividends through fewer repairs and rework, especially when scaling projects or working with complex surfaces. As we look forward to 2026, automation and smart equipment—like Bluetooth-enabled moisture meters and app-connected leveling systems—are becoming more prevalent, promising to elevate industry standards further. Embracing these innovations now positions you ahead of the curve and readies your workflow for future demands.
How do I maintain my tools over time?
Proper maintenance is essential. Clean tools after each use, store them in dry environments, and calibrate devices regularly according to manufacturer instructions. For example, the laser level’s self-leveling system needs periodic calibration to maintain accuracy, as outlined in the user manual. Keep batteries charged or replaced to prevent inaccuracies or malfunctions. Regularly inspecting your tools helps identify wear or damage early, ensuring their longevity. For more detailed maintenance tips on essential flooring tools, visit our privacy policy page. Remember, well-maintained tools not only last longer but also deliver consistently reliable results, safeguarding your investment and reputation.
Use Software to Enhance Precision and Planning
Beyond physical tools, digital solutions can streamline your workflow. Software like AutoCAD or specialized flooring design apps allow you to plan layouts meticulously, simulate expansion joints, and visualize stress points before breaking ground. I personally utilize FloorOS, which provides interface modules for acoustic considerations, moisture barriers, and material calculations. These programs are invaluable for scaling projects efficiently, predicting potential issues, and reducing material waste. With proper planning software, you can ensure your flooring will perform optimally over the long term, especially as design trends evolve towards larger tiles and complex layouts in 2026.
To maximize your results, pair these digital plans with precise measurement tools and experienced techniques. The synergy of high-grade equipment, detailed planning, and diligent maintenance sets the foundation for durable, beautiful floors that stand the test of time and shifting conditions. Implementing these practices today prepares your projects for the innovations and challenges of 2026.
Ready to take your flooring projects to the next level? Try integrating a high-accuracy moisture meter into your next job to prevent costly issues later. Addressing subfloor moisture early is one of those advanced tactics that can save you headaches down the road, as discussed in our detailed moisture management guide. Maintaining your tools and leveraging smart software are the cornerstones of lasting success in flooring installation and maintenance.
Lessons That Changed My Approach to Flooring Projects
- Never Cut Corners on Subfloor Prep: Skipping detailed inspection and leveling can lead to cracks and lippage. I learned this after a costly redo caused by overlooked imperfections. Investing in thorough preparation pays off instantly.
- Embrace the Power of Flexibility: Rigid joints invite cracks; flexible joint fillers save your floors from seasonal movements. Realizing this early helped me prevent numerous issues down the line.
- Think Ahead with Expansion Joints: Carefully planned joints can make or break large-format tile longevity. My lightbulb moment was understanding their strategic placement in high-movement areas.
- Why Certain Tools Are Game-Changers: Using a high-quality laser level or moisture meter has transformed the accuracy of my installs. These tools provide insights you can’t get with rough estimates, making every project smoother.
- Planning with Digital Precision: Leveraging design software allows for pinpoint accuracy, reducing waste and rework. It’s like having a blueprint for success before you lay the first tile or hardwood plank.
My Go-To Resources for Flooring Success
- The Ultimate Guide to Floor Leveling: This comprehensive resource has saved me countless headaches by detailing pre-installation necessities.
- Moisture Management Guide: Moisture issues are silent killers for floors. Trust me, investing in quality testing devices like the Protimeter Surveymaster reduces surprises.
- Avoiding Common Leveling Scams: Protects you from shady practices that compromise flooring integrity — a must-read for both DIYers and pros.
- Installation Do’s and Don’ts: A quick checklist that keeps your project on track, avoiding costly pitfalls.
Your Next Steps in Flooring Mastery
Take charge of your flooring projects by focusing on the details that matter: thorough subfloor prep, strategic joint placement, and investing in quality tools. The difference they make over time is remarkable, ensuring your floors not only look stunning but last decades into the future. Remember, the most durable floors are born from attention to nuance and a proactive mindset. The 2026 trends will elevate larger tiles and complex layouts, but mastering these basics ensures you stay ahead.
Are you ready to refine your skills and elevate your flooring game? Implement one new technique or tool from this guide today, and you’ll see your projects transform from good to extraordinary.