
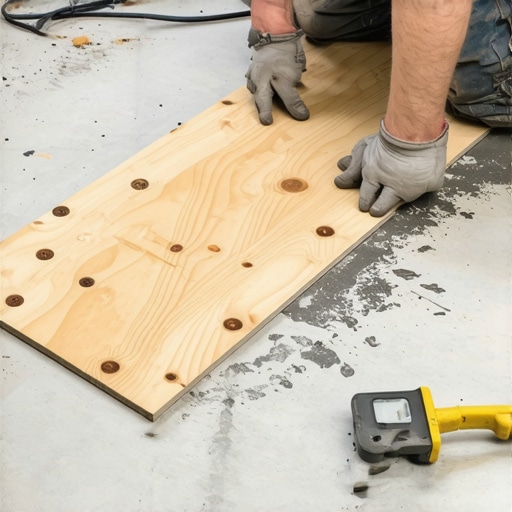
I remember the moment during my first hardwood floor installation when I stepped back and noticed a tiny dip right in the middle of the room—so subtle that I almost ignored it, until I realized how much it distracted from the seamless surface I was aiming for. That lightbulb moment made me dig into solutions beyond the conventional full subfloor pour, leading me to discover the surprisingly simple yet effective technique known as the Plywood Trick. Since then, I’ve used this method countless times, and it’s never failed me in restoring that perfect flatness without the hassle of major renovations.
Why Small Dips Can Turn Into Big Problems
Sometimes, the tiniest uneven spot on a floor can cause more trouble than a visible crack or a large hump. They’re sneaky—hard to detect at first glance, but they can lead to cracked tiles, squeaky hardwood, or uneven wear over time. If your subfloor isn’t perfectly flat, even with meticulous installation, small dips—less than an inch deep—can weaken the overall integrity and aesthetic of your flooring.
The key to a long-lasting, professional-looking finish starts with an even base. But tearing up the entire floor to fix minor dips can be prohibitively expensive and disruptive. That’s where the Plywood Trick comes into play—a cost-effective, practical solution I wish I had known earlier in my DIY journey.
This technique involves using a piece of plywood cut precisely to fill in and level those small depressions. Not only does it save time and money, but it also reduces the mess and stress associated with extensive floor repair. I’ve found it to be especially handy in situations where the dip doesn’t justify a full subfloor replacement, but still needs addressing to achieve that flawless finish.
Have you dealt with stubborn dips or uneven spots in your flooring projects? If so, you’re not alone. Many DIYers and pros alike stumble upon this issue and wonder if there’s an easier way to handle it without tearing everything apart.
For a comprehensive understanding of floor leveling and to avoid common mistakes, check out this detailed guide on floor leveling for a perfect finish. It’s packed with insights to make your project smoother and more successful.
Now that we’ve set the stage for why small dips are a problem—and how this simple trick can save your project—let’s explore the step-by-step process to master the plywood technique, ensuring your floor is flawlessly level without the chaos of full-on renovation.
Measure and Identify the Dip
Begin by thoroughly inspecting your floor with a straightedge or 2-foot level, checking for dips or humps. In my recent project, I placed a long level across multiple points, noticing a slight sag in the middle of the room. This step is crucial to determine the exact size and location of the depression, ensuring your fix is precise and effective.
Cut the Plywood Precisely
Using the measurements, cut a piece of ¼-inch plywood that matches the size of the dip. Avoid overly thick plywood, as it can complicate fitting and leveling. I used a circular saw with a guide, carefully trimming a section that fit snugly into the low spot without impeding door clearance or adjacent flooring. Tip: Sand the edges lightly to prevent splinters or uneven contact.
Sand and Prepare the Surface
Before installing the plywood, ensure the subfloor is clean and free of debris. A vacuum or a tack cloth works well. Clean surfaces improve adhesion of leveling compounds and prevent air pockets which can cause unevenness. In my experience, a clean surface results in a smoother finish and reduces the risk of future squeaks or dips.
Apply a Quality Adhesive
Spread a generous layer of high-quality construction adhesive or floor-leveler under the plywood. Use a notched trowel to ensure even coverage, which helps prevent air bubbles and ensures the plywood bonds firmly to the existing subfloor. I personally prefer a rapid-setting adhesive to speed up the process, especially when working on tight schedules. Learn more about precise leveling to avoid common mistakes.
Press and Clamp the Plywood
Position the plywood into the dip, pressing firmly to eliminate air gaps. Place weight or clamps over the plywood to ensure good adhesion as the glue cures. For stubborn dips, I used shims temporarily to hold the patch at the correct height before clamping. This step is vital for achieving a level surface and preventing future settling.
Check Your Work
After the adhesive has set according to the manufacturer’s instructions, recheck the levelness with your straightedge or level. Minor adjustments can be made by sanding or adding a thin layer of leveling compound if needed. This meticulous verification ensures your flooring will be flat and visually appealing, saving time down the line.
Finish and Protect
Once satisfied, the patched area can be sanded smooth and prepared for your flooring type—whether hardwood, tile, or laminate. Proper preparation at this stage avoids uneven wear or cracking. Remember, if you’re considering refinishing hardwoods, mastering refinishing techniques can preserve your investment.
Applying the plywood patch might seem simple, but executing each step meticulously ensures your floor remains perfectly level and durable. This method has saved me from complete tear-outs and has become a go-to solution for small dips and imperfections.
Many homeowners and DIY enthusiasts fall prey to misconceptions about tile, hardwood floors, and floor leveling, which can lead to costly mistakes. Contrary to popular belief, not all flooring needs to be perfectly level before installation; in fact, some modern flooring systems are designed to accommodate minor subfloor imperfections, provided you understand the nuances involved. Over-Sanding Hardwood Can Be Harmful: While smoothing out surface scratches is beneficial, excessive sanding can thin hardwood planks, weakening their structural integrity and making them more susceptible to water damage and warping. Advanced techniques like precise floor leveling emphasize that understanding when and how much to sand is crucial for long-term durability.
A common myth is that all leveling compounds are created equal. In reality, choosing the right type of self-leveling underlayment depends on your subfloor material and environmental conditions. Using an overly thick layer of floor leveler might seem like a quick fix, but it can cause pooling, cracking, or delaminating if the substrate isn’t prepared correctly. Experts recommend following manufacturer guidance meticulously and considering moisture content, which can significantly impact adhesion and longevity.
Another misconception is that tile installation is purely about aesthetics—how it looks when finished. However, ignoring substrate imperfections or failing to use proper underlayment can lead to issues like tile cracking, lippage, or uneven grout lines later on. For instance, self-leveler cracking is often the result of improper mixing, application, or incompatible substrate, which many overlook.
What advanced installers know that beginners often miss?
The subtle difference between minimal joint spacing and excessive gaps can impact not just appearance but also the floor’s resilience to movement and expansion. Using specific spacers or techniques ensures that flooring accommodates seasonal shifts without buckling. Moreover, awareness that external factors like radiant heating, humidity, and subfloor moisture levels influence adhesion and expansion is vital. For example, referencing studies like those from the a0[Hardwood Floor Institute](https://tiletrendshop.com/why-hardwood-floor-care-secrets-to-longevity-and-shine)a0 reveals that meticulous acclimation and moisture control are paramount to prevent warping or buckling.
Many underestimate the importance of proper floor preparation, which is often underappreciated. Preparing the subfloor isn’t just about cleanliness; it involves confirming flatness, moisture levels, and structural stability. Installing on a poorly prepared subfloor can undermine even the best materials and techniques, leading to premature damage.
Have you ever fallen into this trap? Let me know in the comments. Understanding these hidden nuances can save you time, money, and frustration, turning your flooring project into a lasting upgrade rather than an ongoing headache.Maintaining your floors’s longevity requires more than just initial installation skills; it demands the right tools and a proactive approach to care. One of my go-to pieces of equipment is a high-quality moisture meter, which I use meticulously before installation to assess subfloor conditions. This device prevents future issues like warping or buckling by ensuring proper moisture levels, a step often overlooked but critical for durable results. Additionally, I swear by a laser level for checking flatness during setup and ongoing inspections—precision here saves hours of troubleshooting later. For cleaning, I avoid generic mops and opt for microfiber cleaning pads combined with essential cleaning solutions tailored for hardwood or tile, like those recommended in [hardwood floor care secrets](https://tiletrendshop.com/hardwood-floor-care-secrets-to-longevity-and-shine). As dust and debris are major enemies of floors, I ensure daily sweeping with a soft-bristled broom and periodic deep cleaning using machines designed specifically for high-traffic areas. Investing in quality underlayment and sealants is also worthwhile; they act as the first line of defense against moisture ingress and wear, extending your flooring’s lifespan considerably. In my experience, scheduled maintenance involving these tools and practices keeps floors looking pristine and functioning flawlessly for decades. I predict that as flooring technology advances, we’ll see smart sensors integrated into subfloor systems, providing real-time data on moisture and support levels—making proactive maintenance even easier. So, I challenge you to pick up a moisture meter today and run a quick assessment of your current subfloor; small investments like this truly pay off in the long run. How do I keep my flooring performing over the years? Regular inspections, timely repairs, and using the right tools, like the moisture meter, ensure your investment lasts. Remember, a well-maintained floor adds value and comfort—start with the right equipment, and your floors will thank you in years to come.
The Hardest Lesson I Learned About tile,hardwood floors,floor leveling,flooring installation
Early in my flooring journey, I underestimated the importance of meticulous prep work, thinking that good materials alone would do the job. It wasn’t until I faced uneven tiles and respots that I discovered that even tiny imperfections can cascade into major issues, reminding me that patience and attention to detail are irreplaceable.
The Surprising Power of Small Fixes
I used to believe that only large dips deserved attention, but I realized that addressing minor dips with simple plywood patches can save endless headaches later. This lightbulb moment taught me that sometimes, the smallest adjustments can uphold the integrity of your entire project, making the effort truly worthwhile.
Why DIY Enthusiasts Should Trust Proven Resources
Over the years, I’ve relied on trusted tools and guides, like the ultimate guide to floor leveling, to refine my skills. These resources distill complex techniques into actionable steps, helping me avoid common pitfalls and enhance my craftsmanship with confidence.
Don’t Just Do the Work—Love the Process
Achieving a level, beautiful floor isn’t just about the end result; it’s about embracing the learning journey. When you approach your project with patience and curiosity, every step becomes an opportunity for growth. So go ahead—grab that tool, start your next flooring adventure, and transform your space with pride—and remember, the key to perfection is persistence and passion.