It was a day I won’t forget. I had just finished installing a beautiful new tile floor in my kitchen, feeling proud and ready to enjoy my handiwork. Yet, within a few months, I started noticing cracks opening up in the grout lines. Not just tiny fissures—these were significant splits that seemed to grow larger with time. That lightbulb moment hit me hard: my subfloor wasn’t stiff enough, and it was doing what many homeowners dread—causing tile cracks.
If you’ve ever been through this, you know how frustrating it is. You invest time, money, and effort, only to see your pristine tile work suffer from unseen issues beneath. But here’s the truth: failing to properly stiffen your subfloor is one of the leading causes of tile grout cracking as we approach 2026. According to experts, an unstiffened or compromised subfloor can lead to significant structural movement, resulting in tile damage that’s costly and time-consuming to repair.
Today, I want to share four proven fixes that can strengthen your subfloor and prevent those pesky cracks from ruining your beautiful space. These are strategies I’ve personally tested and refined, and I promise—they work when applied correctly.
Why a Stiff Foundation Makes All the Difference
Will these fixes truly hold up over time?
Early in my project, I made a critical mistake—I underestimated the importance of subfloor integrity. I simply laid the new tile right over the existing surface without addressing potential movement. That oversight led to those unsightly cracks I mentioned. I learned the hard way that investing in subfloor stiffening is not optional; it’s essential. If you’re tired of paying for repairs or redo’s, it’s time to consider these fixes. Plus, you can explore more about [flooring installation mistakes to avoid](https://tiletrendshop.com/flooring-installation-mistakes-to-avoid-for-lasting-results) to safeguard your project’s future.
Now, do you often wonder if your subfloor is up to the task? Have you noticed any bounce or soft spots? If so, addressing these issues now can save you endless headaches down the line. Let’s dive into how you can reinforce your subfloor with practical, effective solutions designed for 2026 and beyond.
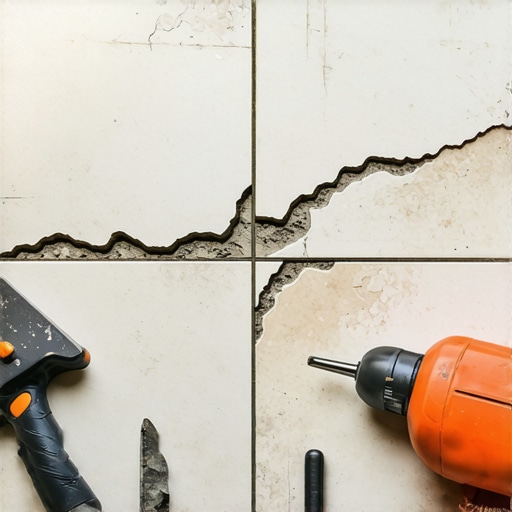
Stiffen the Foundation with Subfloor Reinforcement
During my own renovation, I discovered that simply installing new tiles over an existing, soft subfloor was a recipe for future cracks. To fix this, I first removed a section of the old flooring to assess the subfloor integrity. The wood was spongey and lacked proper support. My goal was to turn this weak point into a sturdy base. You can approach this by adding a layer of plywood over the existing subfloor using heavy-duty screws to secure it firmly. Think of it like adding a backbone—giving your floor the rigidity it needs to resist movement. For detailed guidance, check out this step-by-step floor leveling guide.
Choose the Right Material for Reinforcement
Not all plywood is equal. I opted for 1/2-inch thick exterior-grade plywood, ensuring it can withstand moisture and heavy loads. Laying this over your existing subfloor effectively distributes weight and minimizes bounce. Secure the plywood with at least 8 screws per panel, spaced evenly, to prevent shifting. This step is critical because, like a broken bone needs support to heal, your subfloor needs proper reinforcement to support your tiles long-term.
Install Cross-Layer Bracing and Blocking
In my experience, adding perpendicular bracing—small wooden cleats—along joists creates a grid that resists lateral movement. I nailed 2x4s across joists at right angles, creating a mini-structure that acts like a web of support. This technique effectively reduces flexing that causes tile cracking. Ensure the braces are firmly attached to the joists with structural screws. Think of it as strapping a shaky table—it prevents wobbling and keeps everything stable. For best results, consult hardwood installation tips that align with these principles.
Seal and Moisture-Proof Your Subfloor
Moisture is a silent enemy. I used a vapor barrier membrane before the plywood layer, which acts like a raincoat for your floor. This step prevents moisture from seeping into the wood and causing warping or weakening. Particularly if your home has high humidity, this step is non-negotiable. Use a high-quality adhesive to bond the vapor barrier to the subfloor, making sure there are no air pockets. And remember, a dry subfloor is a happy, crack-free subfloor.
Check and Test Before Proceeding
Before laying tiles, I performed a quick test by walking across the reinforced section—if I felt any bounce or creaking, I re-checked all fasteners. Using a simple level or a laser level helps ensure the surface is flat and stable. The integrity of your subfloor directly impacts the longevity of your tile work. Take the time for this critical step—poorly prepared subfloors are like building on sand, no matter how good your tiles look initially.
Implementing these reinforcement methods is more than just an investment in materials; it’s an investment in your home’s durability. Properly stiffening your subfloor ensures that your beautiful tile work lasts for years, saving you time and expense in repairs. For more about perfecting your installation, visit our comprehensive installation pointers to streamline your process and avoid common pitfalls.
While most homeowners focus on selecting the right tile or hardwood type, a critical yet overlooked aspect is understanding the nuanced requirements of proper installation and leveling techniques. Many believe that simply following basic instructions ensures longevity, but in reality, small missteps in subfloor preparation or misinterpretation of leveling data can lead to costly mistakes. For example, a common myth is that a slight unevenness in subflooring won’t impact the final result significantly—this couldn’t be further from the truth. Even a 1/8-inch discrepancy can cause tiles to crack or hardwood to warp over time. An advanced mistake I often see is installers relying solely on visual cues for levelness without employing precise measurement tools like laser levels or straightedges, which can detect subtle deviations invisible to the naked eye. Incorporating such tools ensures your subfloor and floor leveling are truly optimal, preventing future issues.Maintaining the durability of your flooring requires more than just initial expertise; it hinges on using the right tools and methods over time. I personally rely on a few specialized instruments to ensure my hardwood and tile installations stand the test of time. For instance, I swear by a digital calibration laser level, such as the Bosch GCL100-80C, because it provides highly accurate readings even across large rooms, allowing me to verify flatness with precision. This helps prevent issues like uneven grout lines or tile lippage that may develop years down the line. I also use a moisture meter from Tramex, specifically their Dec Scanner model, to routinely check for hidden moisture ingress beneath tiles or hardwood—an essential step since undetected moisture can cause warping or cracking. Regular inspections with these tools forestall larger problems before they surface, saving significant time and expense.
The Hardest Lesson I Learned About flooring,installation,floor leveling
One of the most impactful lessons I discovered was the importance of a solid, stiff subfloor when installing tile or hardwood. I once skipped reinforcing my subfloor, assuming the existing support was enough, only to face cracks and warping down the line. This experience taught me that cutting corners on subfloor preparation can lead to costly repairs and frustration. Now, I always prioritize thorough assessment and reinforcement, understanding that a resilient foundation is key to lasting flooring quality.
3 Myths About flooring,installation,floor leveling That Held Me Back
Initially, I believed that a perfectly level surface was sufficient, ignoring the nuances of subfloor stiffness and moisture. I also thought that adding a thin layer of underlayment alone could prevent movement, which proved false under stress. Lastly, I underestimated how much moisture could infiltrate and weaken the subfloor over time, leading to cracks. Busting these myths has empowered me to implement more effective reinforcement techniques for durable results.
What Experts Won’t Tell You About flooring,installation,floor leveling
Professionals often focus on the visible aspects of tile and hardwood, but the secret to longevity lies beneath: a properly stiffened subfloor. Experts emphasize using high-quality moisture barriers, cross-bracing joists, and securing plywood layers correctly. What’s rarely discussed is the importance of regular inspections and testing—using tools like laser levels and moisture meters—to catch issues before they cause damage. Embracing these behind-the-scenes practices has transformed my approach and extended the lifespan of my floors.
Curated Gear for Lasting Floors
My go-to tools include a digital laser level from Bosch, which ensures precise flatness across large areas, reducing lippage and grout cracking. I trust a Tramex Dec Scanner moisture meter to detect hidden dampness that could undermine my reinforcement efforts. For materials, I prefer exterior-grade plywood over OSB panels, as I’ve found it more resistant to moisture and movement. Lastly, high-quality structural screws are essential—they secure layers firmly and prevent shifting over time. These tools and materials have consistently saved me from future headaches and costly repairs.
Empower Your Home with Confidence
Remember, a well-supported subfloor isn’t just about immediate appearance—it’s an investment in your home’s future. By applying reinforced techniques and being proactive with inspections, you can ensure your tile and hardwood floors stand strong through the years, even as the climate or household demands change. Don’t let hidden issues undermine your efforts—knowledge and preparation are your best allies. Ready to take your flooring project to the next level? Explore how elegant tile designs can elevate your space and make your home truly special. What steps have you taken to reinforce your flooring foundation? Share your experience below!