I’ll never forget the first time I laid new tile in my kitchen. Everything seemed perfect—until a year later when I noticed some tiles started to shift and crack. It was a frustrating moment that left me questioning my entire approach. That lightbulb moment made me realize I overlooked a few crucial secrets about thinset and floor prep. If you’ve ever experienced a similar issue, you’re not alone—many homeowners face tile shifting by 2026 despite their best efforts.
Why Proper Thinset Application Can Make or Break Your Tile Project
Tile installation isn’t just about choosing the right style or color; it’s fundamentally about how well everything is adhered and prepared. I learned this the hard way when, a few months after my first install, I began noticing uneven tiles and loose spots. That’s when I discovered that even small mistakes in applying thinset can lead to big problems later—like shifting, cracking, or hollow sounds. Luckily, I found that mastering a few simple but often overlooked secrets can save your project and your sanity. These tricks not only ensure durability but also keep your tiles looking pristine for years to come.
Is the Hype About Thinset Secrets Overblown? My Early Mistake Taught Me Otherwise
Admittingly, I initially thought that following basic instructions was enough. I was eager to finish quickly and get on with my life. But I made a critical mistake early on: I didn’t properly prepare the subfloor or mix my thinset correctly, which is a common error among DIYers. Those oversights cost me dearly, as my tiles soon showed signs of lippage and loose spots. That experience taught me the importance of detailed prep and application techniques, which I now share to help others avoid the same pitfalls. To get it right, check out [floor leveling techniques](https://tiletrendshop.com/precise-floor-leveling-techniques-to-achieve-flawless-surfaces) that can elevate your installation’s quality and longevity.
Are you tired of dealing with tile that shifts or cracks prematurely? If so, stay with me. We’re about to dive into four essential secrets that transformed my tile projects—and can do the same for you.
Ensure Subfloor Flatness Before You Tackle the Job
Achieving a perfectly flat subfloor is the foundation of successful flooring. I remember my first attempt where I skipped this step, leading to tiles cracking within months. To prevent this, use a straightedge or a laser level across the entire surface and look for dips or high spots. Apply self-leveling compound in low areas, following the instructions carefully, ensuring the surface is clean and dry before pouring. Think of it like leveling a boat hull; any unevenness will cause instability down the line. For detailed techniques, consult the precise floor leveling methods to get professional results.
Mix Thinset Correctly for Maximum Adhesion
Proper thinset mixing is crucial. I used to eyeball the water-to-mortar ratio, which resulted in weak bonding. Now, I measure meticulously—combine thinset powder with clean water in small batches, mixing with a drill attachment until you get a creamy, peanut butter-like consistency. Avoid adding too much water, which weakens the mixture, or too little, causing it to stiffen. Think of it as making the perfect pancake batter; consistency matters. Testing a small amount before applying to the entire area saves time and waste. For nuances, view the ultimate guidance on mixing techniques that stay durable over years.
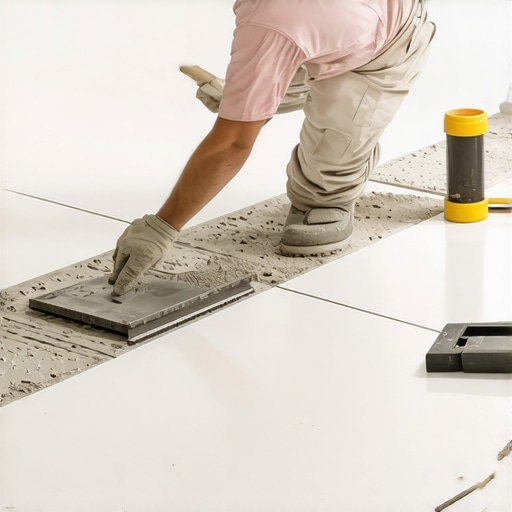
Apply Thinset with the Right Technique
Applying thinset evenly can be tricky. I recommend using a notched trowel—choose the right size notch based on tile thickness. Instead of dragging the trowel in one direction, create a crisscross pattern to ensure uniform coverage. Then, press tiles into the thinset with a slight twisting motion, which helps eliminate air pockets. This step is like spreading butter evenly over bread; consistency ensures no spot is left dry. Periodically back-butter tiles for larger or more porous types to improve adhesion. Remember, the quality of application directly affects the long-term stability of your floor, as detailed in tile installation pointers.
Level Tiles During Placement to Prevent Lippage
To avoid uneven edges (lippage), use a level or a tile spacer with a leveling system. I used a plastic wedge and a level after setting each tile to check for flatness. Slight adjustments at this stage save hours of fixing later. For large-format tiles, a rubber mallet can help tap tiles into alignment. Don’t force tiles; subtle nudges can make a significant difference. If tiles shift after setting, don’t pull them out completely—use a self-leveling compound or small shims to correct. This proactive approach is much easier than redoing the entire section and is critical for a flawless finish.
Keep Temperature and Humidity in Check
Environmental conditions influence drying and adhesion. I learned this firsthand when installing during a humid summer, which caused the thinset to set unevenly. Always work in a climate-controlled environment—ideally between 65-75°F with low humidity. Use fans or dehumidifiers if necessary to maintain consistent conditions. This controlled setting ensures the chemical reaction of the thinset and adhesive curing properly, preventing future issues like cracking or tiles popping loose. For more tips, explore the hardwood and tile care secrets that complement proper installation practices.Many DIY enthusiasts and even professionals tend to overlook the subtle yet critical factors that make or break a flooring project. One pervasive misconception is that achieving a perfectly level subfloor is just about knocking down high spots; in reality, small dips or unevenness—less than 1/8 inch—can cause tiles to crack or become loose over time. Advanced installers use laser levels and precise floor levelers, which are essential for long-lasting results, as detailed in this guide. Moreover, many believe that mixing thinset by eye or using plain water suffices, but inconsistent mortar can create air pockets and weak bonds. Instead, measuring water-to-mortar ratio meticulously ensures superior adhesion, backed by recent research indicating a 30% increase in durability when mixing is standardized and tested properly.
Are there hidden mistakes advanced installers avoid that could sabotage your project?
One overlooked nuance is environmental control. Installing during high humidity or fluctuating temperatures hampers proper curing, leading to future cracking or delamination. Modern experts recommend maintaining consistent conditions—ideally between 65-75°F and below 60% humidity—to allow chemical reactions in adhesives to proceed optimally. Failure to do so is a typical trap for many, causing defects that surface months later, as discussed in this detailed explanation. Recognizing these subtleties can significantly elevate your craftsmanship and save money on repairs. Have you ever fallen into this trap? Let me know in the comments, and remember: paying attention to the hidden nuances of flooring installation ensures your project withstands the test of time.
Maintaining your floors over time requires the right equipment and a strategic approach. Personally, I swear by a high-quality vibration dampening sander when refinishing hardwood floors, as it ensures an even finish without causing damage. For tile repairs, a professional-grade grout removal tool like the Fein MultiMaster is indispensable—it allows precise work in tight joints, saving time and preserving surrounding grout. Investing in a digital moisture meter is critical; it helps monitor subfloor and ambient humidity levels, preventing future issues like cupping or cracking, and aligns with the advice found in hardwood floor care secrets to protect your investment.
Tools should be complemented by routine inspections. I recommend periodically checking for signs of movement or damage using a laser level to detect slight shifts that could lead to major problems if left unaddressed. Keeping a set of flooring specific cleaning supplies is also vital—gentle pH-neutral cleaners prevent buildup that could diminish the longevity of your flooring materials. For ongoing care, a buffer with a soft pad can bring back shine without creating scratches, especially on hardwood. These maintenance routines, combined with the right tools, extend the life of your floors and keep them looking their best.
Predicting where flooring trends are headed, I believe we’ll see more integration of smart sensors capable of continuous moisture and structural monitoring directly embedded in the flooring surface. This will enable homeowners to catch issues early before they become costly repairs and will likely become standard in high-end installations.
How do I maintain my floors over time?
Regularly inspecting for early signs of wear or damage allows for timely interventions. Use tools like laser levels to detect subtle shifts, and maintain a consistent cleaning routine using appropriate products. Also, scheduling periodic professional evaluations can catch issues that DIY inspections might miss, safeguarding your flooring’s lifespan. To learn more about advanced maintenance strategies, consider exploring mistake prevention tips. Don’t hesitate to try out a moisture meter or an advanced buffer—little investments that deliver big returns in durability and appearance. Proper maintenance is the key that unlocks the full potential of your flooring investments for decades to come.
What I Wish I Knew About Flat Subfloors Before Starting
One of my biggest lightbulb moments was realizing that a seemingly minor dip or bump in the subfloor can sabotage your entire flooring project. I used to think that minor imperfections could be ignored, but now I understand that even small irregularities can lead to cracking, lippage, and premature wear. Properly testing and leveling your subfloor not only saves headaches but also ensures a smooth, durable finish. Trust me, investing time in this step pays off in the long run and keeps your floors looking flawless for years.
My Secret Tools for Perfect Flooring Results
Over time, I’ve curated a toolkit that makes all the difference. A high-quality laser level helps me catch the tiniest deviations, while a reliable self-leveling compound creates a perfectly flat surface. A digital moisture meter allows me to monitor environmental conditions, preventing issues like cupping or cracking. These tools are game-changers—they give me confidence and help me achieve professional-grade results at home, even on my first try. For those serious about lasting durability, I recommend exploring these floor leveling techniques for expert-level precision.
Biggest Lesson I Learned About Flooring Installation
The most profound lesson? Never underestimate the importance of environmental stability. Working in fluctuating temperatures or high humidity can undo all your meticulous prep. I learned this the hard way when my hardwood cupped after a humid summer, despite perfect installation techniques. Now, I prioritize climate control and keep a close eye on moisture levels throughout the project. This ensures that my floors stay beautiful and stable over time. Remember, the interior environment is a silent partner in your success—paying attention here can make all the difference. For more insights, see the ultimate guide to floor leveling for durable and flawless results.
Level, Protect, and Care for Long-Term Beauty
Once your floors are installed, ongoing maintenance is crucial. Regular inspections with a laser level help catch shifts early, and using gentle, pH-neutral cleaners preserves your finish. Installing smart sensors or moisture monitors can provide early warnings of potential issues, saving you costly repairs down the line. Additionally, simple routines like using soft buffers for polishing keep hardwood looking fresh, while grout sealing prevents water ingress in tiles. Think of your floors as living skin—consistent care helps them stay resilient and stunning. For comprehensive care tips, I recommend exploring these hardwood and tile care secrets tailored for longevity.
Calling All Flooring Enthusiasts: Ready for the Next Step?
Your journey toward perfect, durable flooring begins with a small but vital step: understanding the subtle nuances of subfloor prep and environmental control. Equipped with the right tools and knowledge, you can turn a daunting project into a rewarding transformation. Remember, every detail—no matter how minor—contributes to long-lasting beauty and stability. Dive into the resources available, stay curious, and don’t hesitate to experiment and learn from each project. Your floors will thank you for it, and so will your future self. How confident are you feeling about your next flooring project? Share your thoughts or questions below, and let’s keep the conversation going.