I remember standing in a client’s living room, staring at a floor that seemed more like a roller coaster than a surface ready for those beautiful hardwood planks. I had just finished a seemingly perfect tile installation, only to realize it wobbled when walked upon. That moment, that uneasy feeling in my gut, was a wake-up call. I knew then that if I wanted flawless floors—whether tile or hardwood—I needed to conquer the art of floor leveling. The truth is, a level floor isn’t just about aesthetics; it’s the foundation of durability and longevity for your entire flooring project.
Why Floor Leveling Matters More Than You Think
A common mistake many beginners make is underestimating the importance of proper floor leveling. It’s easy to think that knocking down high spots or filling low spots is enough. But, let me tell you from experience, skipping or rushing this step can lead to cracking tiles, squeaking hardwood, or even costly repairs down the line. And those are frustrations no one wants. Achieving that perfect, even surface is crucial because it sets the stage for a successful installation that lasts for decades.
Did you know that uneven floors can reduce the lifespan of your flooring by up to 50%, according to flooring experts? Proper leveling ensures your floors not only look stunning when first installed but also stay that way over time. Plus, mastering this technique saves you money and time. No more redoing a job that could have been done right the first time.
If you’ve ever faced the nightmare of uneven floors, you’re not alone. I’ve been there, too. And I learned the hard way that rushing through floor levelin g or relying solely on temporary fixes can turn a dream project into a headache. That’s why I’m here—to share the proven methods that turn a tricky surface into a perfectly flat canvas, ready for beautiful tile or hardwood.
In the next sections, we’ll dive into the practical steps and insider tips to level your floors like a pro. Whether you’re tackling a small home renovation or a large commercial space, these techniques will help you avoid the common pitfalls and achieve that flawless finish you’re after. Ready to get started? Let’s make your floors level and your installation flawless.
Start with Precise Surface Assessment
Begin by thoroughly inspecting the existing floor. Use a long straightedge or a level to identify high and low spots. Imagine your floor as the surface of a boat; even minor dips can cause major problems later. I once used a 4-foot straightedge across an uneven basement floor, revealing a variation of up to 1/2 inch that wasn’t visible to the naked eye. Document these discrepancies to plan your leveling process effectively.
Prepare Your Tools and Materials for Success
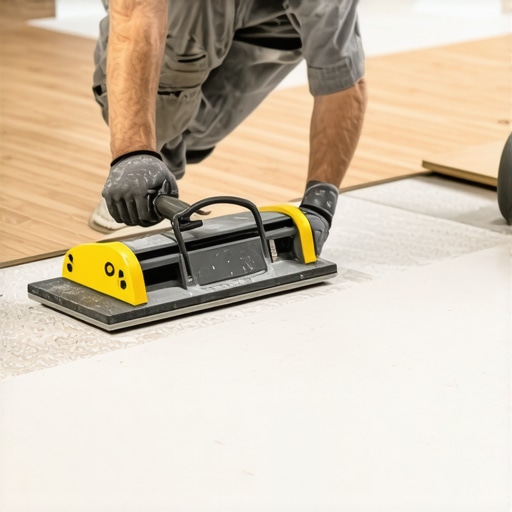
Ensure you have the right equipment: self-leveling compounds, patching mortars, trowels, a drill with a mixing paddle, and a gauge rake. For concrete subfloors, epoxy bonding agents improve adhesion. The right tools make the difference between a smooth process and a frustrating experience. When I installed new hardwood over a concrete slab, I prepped with a bonding primer which helped prevent future cracking, setting the stage for a lasting finish.
Address High and Low Spots Methodically
Tackle High Areas First
Use a sander or a floor grinder for concrete; for wood subfloors, sand down high spots or cut back protrusions. Think of it as shaving down a mountain to level the terrain. During one job, I used an angle grinder with a diamond cup wheel to smooth out high ridges on a concrete slab, which significantly improved the subsequent leveling process.
Fill Low Spots and Crevices
Apply patching compounds or self-leveling underlayment for low areas. Mix the compound as per instructions, ensuring no lumps. Pour or trowel it into depressions, working quickly before it sets. For a large subfloor, I poured a self-leveling compound over a 10×10 foot area, watching it naturally find its level—a process akin to pouring syrup over toast. The result was an even surface that saved me hours of additional work.
Lay Down the Self-Leveling Compound Correctly
Follow manufacturer instructions meticulously. Begin pouring in the lowest corners, allowing the fluid to flow outward and fill the voids. Use a gauge rake to spread the compound uniformly. During a recent project, I poured the self-leveler and used a long broom handle to help guide and pop air bubbles, ensuring a flat, consistent surface. Visualize the process as akin to smoothing out a rippling pond—gentle but firm strokes create the perfect surface.
Allow Adequate Curing Time Before Installation
Patience is critical. Most compounds require at least 24 hours, sometimes longer, to cure fully. Rushing this step can compromise the entire floor. I once hurried a project and paid the price—cracks appeared in the tile due to movement in the uncured self-leveling underlay. Delay the installation, and your floors will thank you with durability and aesthetic appeal. For expert tips on maintaining your floors post-installation, visit this guide.
When it comes to installing hardwood or tile floors, many professionals and DIY enthusiasts alike fall into common traps that compromise durability and aesthetic appeal. While most focus on surface preparation and sealing, the real subtlety lies beneath the surface—literally. One of the most underestimated aspects is understanding how slight discrepancies in subfloor variability can dramatically affect the longevity of your flooring. Contrary to popular belief, simply achieving a level surface isn’t enough; mastering the precise techniques of floor leveling is essential for long-term success.
Is Your Floor Actually Level or Just Appearing So?
Many assume that a quick visual check suffices, but in my experience, using a long straightedge or laser level reveals hidden dips and peaks that can throw off your entire installation. Fluctuations as small as 1/8 inch can cause tiles to crack or hardwood planks to squeak over time. Studies by flooring experts, such as those cited in the Ultimate Guide to Floor Leveling, emphasize that precision in leveling directly correlates with the durability of the finished surface.
Furthermore, many installers rely on quick fixes like thin layers of patching compounds, which may conceal the imperfections temporarily but fail to address the root problem—the inconsistency of the subfloor. These shortcuts often result in uneven wear and premature failure, undermining your entire effort. Instead, adopting a meticulous approach to identify and correct high and low spots before laying the final flooring is essential. Remember, a flawlessly leveled surface doesn’t just look better; it performs better for decades.
Why Do Experts Advocate for Proper Surface Tension?
Another nuanced mistake is neglecting to consider the surface tension of the materials involved. For instance, installing hardwood directly over a concrete slab without a proper moisture barrier or bonding agent can lead to warping and delamination over time. Similarly, in tile installation, failing to use a suitable primer or bonding compound can cause tiles to loosen or crack as the subfloor expands and contracts with temperature changes. These issues highlight that understanding material interactions on a microscopic level is vital for a lasting installation. For advanced techniques and material selection tips, exploring Hardwood Floor Care Secrets can provide valuable insights.
Flooring myths, such as the idea that a quick self-leveling compound application is enough for complex subfloor issues, are widespread. In reality, some situations demand a combination of rigid reinforcement, moisture management, and precise leveling. Overlooking these details can turn your project into a costly repair or re-installation down the line. Always measure, test, and adapt your approach based on the specific conditions of your space, rather than relying solely on standard procedures.
Remember, meticulousness in floor leveling isn’t just for perfectionists; it’s a cornerstone of durability. To elevate your skills further, visit the precise leveling techniques page for expert tips that prevent these common mistakes. Have you ever fallen into this trap? Let me know in the comments.Maintaining your hardwood, tile, or other flooring surfaces isn’t just about cleaning—it’s about consistently ensuring that your tools and techniques keep your floors in top condition over time. A common mistake I see is neglecting proper upkeep of the equipment used for installation and maintenance, which can lead to uneven wear and premature damage. Investing in high-quality tools and understanding their maintenance can dramatically extend the life of your floors. For example, my go-to for floor leveling is a Bosch floor grinder, which provides precise removal of high spots and keeps edges clean—this precision not only saves time but also prevents uneven stress on your flooring. Regularly calibrate your laser levels and straightedges, too, because even small inaccuracies can lead to uneven surfaces. For cleaning, I recommend using pH-neutral cleaners designed for your specific flooring type; harsh chemicals can degrade finishes over time, which is why I favor products recommended in experts’ guides, such as those found on Hardwood Floor Care Secrets. Looking ahead, I predict that smart tools integrated with Bluetooth and apps will become more prevalent, making it easier to monitor and maintain flooring health remotely. Looking for a practical step? Try regularly inspecting and recalibrating your leveling tools to maintain their accuracy—this small habit can prevent big issues down the line. Remember, the long-term beauty and durability of your floors greatly depend on how well you care for your tools today, so take the time to maintain them properly.
The Greatest Lesson Behind Flawless Floors
One of my most profound realizations is that meticulous floor leveling isn’t just a step—it’s the secret ingredient to truly durable and beautiful floors. Rushing this process or ignoring subtle imperfections can turn a promising project into a nightmare, with cracks, squeaks, and premature wear as unwelcome surprises. Investing time and care in precise leveling means you’re building a foundation that stands the test of time—something I learned the hard way in my early days. Every uneven patch represents a potential weak spot, so treating it with the respect it deserves transforms your work from good to legendary.
Tools and tricks that turn good into great
A reliable toolkit makes all the difference. I swear by a laser level and a gauge rake—these tools give me confidence that each layer of compound finds its perfect place. Picking quality tools like a Bosch floor grinder or a high-grit sander can save hours on corrections later, and understanding their maintenance is equally critical. Remember, the right tools paired with diligent preparation elevate your craftsmanship, giving your floors that professional, lasting finish that homeowners crave. Dive into these expert techniques to refine your skills further.
Listen to what the floor whispers
Sometimes, the subtle dips and ridges tell stories. I learned to trust my straightedge and feel for inconsistencies—these tiny indicators reveal issues that a quick glance can miss. Overconfidence in superficial fixes like thin patch coats often backfires, causing problems down the line. Instead, I embrace patience, layering compounds properly and waiting for full curing—because quality floors are built on quality preparation. This attentive approach prevents the costly do-overs that no one wants to face, proving that patience truly pays off in craftsmanship.
What catching early can teach you about longevity
Addressing imperfections early keeps your project on track. When I spot a low spot during surface assessment, I tackle it immediately—filling or grinding it down before moving on. Ignoring these signs leads to compounded issues, like tiles cracking or boards buckling. Remember: flawless flooring starts with a vigilant eye and a commitment to correction. This relentless pursuit of precision is what turns a simple installation into a durable masterpiece, ensuring your hard work pays off in years to come.
Ready to elevate your flooring game?
Achieving a flawlessly leveled floor isn’t just about tools or techniques; it’s about cultivating an instinct for perfection. When you treat each step as a craft, your floors will not only look stunning but also endure the rigors of time. Whether you’re a DIY enthusiast or a seasoned pro, embracing these insights can revolutionize your projects. If you’re eager to see more expert advice or get inspired by real-world success stories, explore resources like the ultimate guide to floor leveling and stay motivated to create resilient, beautiful floors.