It was a weekend like any other, until I stepped into my living room and noticed that my beautiful new tile floor had started to develop unsightly cracks and uneven spots. Frustration crept in as I remembered the countless hours I spent choosing the perfect tiles and planning my renovation. The realization hit me: I had underestimated the importance of proper floor leveling and installation techniques. That lightbulb moment sparked a journey to understand how to achieve a durable, flawless finish that would stand the test of time.
The Secret to a Long-Lasting Floor
In my experience, the difference between a floor that lasts for decades and one that needs frequent repairs often boils down to meticulous leveling and installation. When I initially ignored the subtle unevenness in my subfloor, I quickly learned how small mistakes could lead to big problems later—like cracked tiles and squeaky floors. Today, I want to share the insights I’ve gathered, so you can avoid the same pitfalls and enjoy a stunning, durable surface.
Is Rushing the Installation Worth the Risk
Early on, I made the mistake of rushing through the floor prep, thinking that any unevenness would be insignificant. As it turned out, even minor imperfections can compromise the integrity of your flooring. According to industry experts at [Tile Trend Shop](https://tiletrendshop.com/precise-floor-leveling-techniques-to-achieve-flawless-surfaces), precise leveling is crucial for lasting durability. So ask yourself: have you ever skipped steps or underestimated the importance of proper surface preparation?
Let’s face it—every project has its challenges, but with the right knowledge and tools, you can turn a potentially messy job into a masterpiece. In the upcoming sections, I’ll guide you through the essential strategies for achieving a perfectly level surface, selecting the right materials, and ensuring your tile or hardwood floors not only look great but also last for years to come. Ready to start transforming your space? I thought so. Let’s dive in.
Set the Foundation with Precise Subfloor Preparation
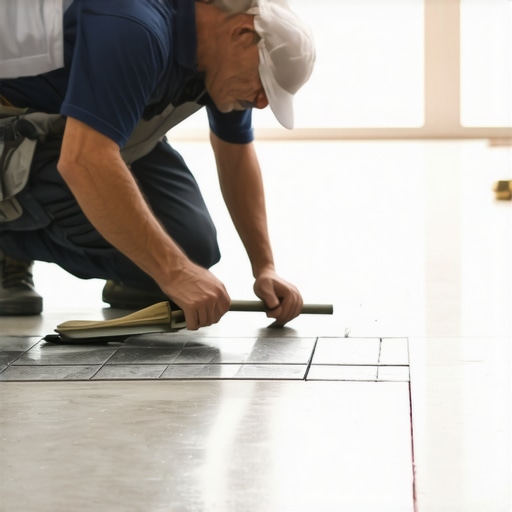
Begin by thoroughly inspecting your subfloor for any bumps, dips, or debris. Use a long spirit level or a laser level for accuracy, aiming to identify high and low spots. I once spent an entire morning sitting on the floor, gently pressing a straightedge along it, feeling for unevenness. This tactile approach helped me spot subtle imperfections that a quick visual check missed. Remember, the quality of your final finish depends on your initial prep—think of it as laying a solid base for a skyscraper.
Clear and Clean the Surface
Remove all dust, grease, or loose materials. A clean surface ensures a proper bond with leveling compounds or underlayment materials. I used a vacuum and a damp cloth, which proved surprisingly effective. Skipping this step can cause leveling compounds to fail or tiles to shift later on, leading to costly repairs. Think of it as preparing a canvas before painting—cleanliness is key to smooth, durable results.
Master the Art of Leveling
Applying leveling compounds correctly transforms a bumpy surface into a smooth canvas. Mix the compound following manufacturer instructions; consistency should be like thick pancake batter—pourable but not runny. When I first attempted this, I poured too quickly, causing air bubbles and uneven spots. Using a trowel or a smoothing blade, spread the compound evenly, starting from the highest point and working toward the low areas. The goal is a seamless surface that requires no sanding afterward—this step demands attention to detail but pays off with a surface ready for flooring.
Check and Recheck Your Work
After applying leveling compounds, wait the recommended time, then re-assess with your level. Small imperfections can be corrected by touch-ups. I remember returning to my floor after a few hours, only to find a slight dip – a quick second layer fixed the issue. This iterative process ensures your foundation is truly flat, preventing future issues like cracked tiles or squeaks. Patience here saves headaches later.
Choose the Right Flooring Material and Techniques
Selecting between tile, hardwood, or laminate affects your installation technique. For tiles, a proper substrate and thin-set mortar are crucial—see tile design tips. Hardwood requires a stable, level subfloor to avoid gaps or buckling; visit hardwood selection guide. I once installed a hardwood floor over uneven grounds, which resulted in creaks and gaps, emphasizing the importance of compatibility and precision in your choice and execution.
Prepare Your Surface for Final Installation
For tiles, lay out your pattern and dry-fit to confirm spacing. Use spacers for consistent grout lines, and double-check levelness at every stage. For hardwood, acclimate your planks in the room for at least 48 hours, as per hardwood care tips. I inspected and adjusted the placement multiple times, which was tedious but ultimately rewarded me with a uniform, professional-looking floor. Remember, patience and attention to detail here are as vital as in the leveling process.
Seal and Protect for Longevity
Finish with appropriate sealing—grout, finish coats, or sealers—as recommended. Proper sealing preserves the floor’s appearance and structural integrity. I learned this lesson the hard way when I neglected to seal the grout properly, leading to staining and deterioration within months. Regular maintenance, like cleaning with suitable products (floor care secrets), extends your investment and keeps your surface looking stunning for years.
Many homeowners believe that achieving a perfect, durable floor is as simple as following basic instructions, but the reality is far more nuanced. A frequent mistake is assuming that minor surface imperfections can be overlooked; however, even small unevenness can lead to significant issues down the line—like cracking tiles or squeaky hardwood. Contrary to popular belief, using standard leveling techniques without considering the specific demands of your flooring material often results in less-than-ideal outcomes. For instance, rigid floors like tile or engineered hardwood require meticulous subfloor preparation, or else you’ll face costly repairs later, as highlighted in expert guides. One hidden nuance many miss is the impact of moisture and subfloor stability during installation; these factors are often overlooked by DIYers, leading to structural issues. An advanced mistake is neglecting to use the right type of leveling compound or underlayment tailored to your specific flooring material, which can compromise the entire surface. Have you ever fallen into this trap? Let me know in the comments. Additionally, there’s a myth that flooring material alone guarantees longevity—actually, proper installation and leveling are crucial to maximize durability, whether you’re installing tile, hardwood, or laminate. For more insights on choosing the best floor types and installation practices, visit this comprehensive resource.Maintaining your freshly installed floors is as crucial as the installation process itself. Investing in the right tools and adopting disciplined routines can dramatically extend the lifespan of your tile or hardwood surfaces. Starting with routine cleaning, I recommend using a microfiber mop and pH-neutral cleaner—these prevent dirt buildup without damaging the finish. For hardwood floors, I swear by a soft-bristle broom combined with a gentle vacuum, like the Dyson V11, which effectively removes debris from crevices without scratching the surface. These tools allow me to keep my floors spotless and free from grains of sand or grit that can cause micro-scratches over time.
Investing in Quality Maintenance Equipment
While cheap cleaning supplies may seem tempting, they often contain harsh chemicals that can dull the finish or cause discoloration. I personally use a steam mop on my tile floors for a quick, chemical-free refresh, but I prefer a damp microfiber cloth for hardwoods to avoid excess moisture. As floors age, tiny scratches and grime can accumulate, affecting appearance and durability. Regular polishing with suitable products, like these hardwood floor repair kits, can restore their luster and provide an added layer of protection.
Long-Term Results Through Proper Care
Consistent maintenance pays off in longevity. For example, periodic sealing of grout lines or applying a hardwood floor polish every six months keeps surfaces sealed against moisture and wear. I suggest setting reminders to check grout for cracks or areas where the finish wears thin; early intervention here prevents costly repairs later. When caring for tile or hardwood floors, avoiding abrasive scrubbing tools is key—use soft cloths or non-scratch pads instead. These small habits, combined with quality tools, ensure your floors stay beautiful for years to come.
Preparing Your Floors for Large-Scale Projects
If you plan a significant upgrade, like deep cleaning or refinishing, having the right equipment is vital. For hardwood refinishing, I recommend renting a high-quality floor sander from a reputable supplier, and don’t forget to use appropriate dust containment tools—this minimizes mess and health hazards. For tiles, a professional-grade grinder with diamond blades helps correct uneven grout lines or remove old sealers efficiently. Embracing these tools elevates your DIY game and guarantees professional-like results, especially when combined with expertise found in resources such as comprehensive leveling guides.
How do I maintain floor integrity over time?
Regular inspections are essential—check for loose tiles, creaking hardwood planks, or grout deterioration. Addressing small issues early prevents larger problems like water damage or structural weakening. I also recommend establishing a proactive cleaning routine, especially in high-traffic areas where wear is accelerated. Moving forward, consider installing quality doormats at entrances and felt pads under furniture legs to reduce scratches and dirt ingress. As the industry evolves, innovative tools like robotic floor cleaners and smart moisture sensors are becoming more affordable, promising even better maintenance practices in the near future. Trying out one of these advanced tools can be a game-changer for long-term upkeep, so I encourage you to explore options like Wi-Fi-enabled moisture meters to catch leaks early and protect your flooring investments. By combining consistent care, the right tools, and staying informed through expert resources, you’ll keep your floors looking pristine for decades, ensuring your renovation work remains a worthwhile investment.
Wisdom from My Floor Rising Failures
One of the most unexpected lessons I learned was how a small miscalculation in floor leveling could ruin an entire project. Watching my first tile installation crack within months taught me that patience and precision are worth their weight in gold. I also discovered that not all leveling compounds are created equal; selecting the right one makes a noticeable difference in durability. Lastly, I realized that every floor has its quirks—sometimes a repeated check and adjustment can save days of headache, emphasizing that slow and steady wins the race in flooring projects.
Tools and Guides That Transformed My Approach
To elevate my flooring game, I leaned on trusted resources like the precise leveling techniques guide, which helped me understand the nuances of surface preparation. My essential toolkit includes a high-quality laser level for accuracy, a reliable mixing paddle for leveling compounds, and a rubber trowel for smooth application. These tools have become my go-to, instilling confidence that my floors will stand the test of time. Additionally, professional tutorials from industry experts kept me motivated and informed, transforming a daunting process into an achievable craft.
Don’t Let Fear Hold You Back—Start Today
The journey to perfect floors is a blend of patience, practice, and persistence. Remember, every expert was once a beginner facing similar challenges. Your dedication to detail will pay off with floors that not only look stunning but also endure for decades. So, take the first step, equip yourself with the right knowledge and tools, and embrace the process. Your future self will thank you for the effort you put in today. Now, are you ready to create a flawless foundation that elevates your entire space? The opportunity is in your hands.