

I still remember the winter of 2018 when my front hallway looked like a muddy war zone. Between two energetic retrievers, wet boots, and a constant stream of neighborly visits, the heavy foot traffic was absolutely relentless. I had recently finished a weekend project and made a classic rookie mistake: I rushed into picking a wood floor solely on its surface-level looks, completely ignoring how it would stand up to real life. The result? Within six months, my beautiful new hallway floor looked like it had been scrubbed with wire brushes. If you have ever stared down at your scratched, dull entryway and felt that instant pang of regret, you are definitely not alone.
Choosing between a classic hardwood and a modern grass alternative for your home’s busiest thoroughfare is a decision that will either make you smile every time you walk through the door, or leave you hunting for area rugs to hide your regrets. Today, we are going to settle the debate once and for all so you do not repeat my costly mistakes. We will look at how density, moisture resistance, and overall durability play out in the real world. We will also address how proper prep work, like mastering flooring installation and leveling success, makes or breaks both materials. Let us dive into what actually works when the boots hit the floor.
Is bamboo really tougher than traditional red oak?
We have all heard the marketing talk claiming that bamboo is the indestructible wonder-material of the twenty-first century. But as someone who learned the hard way after watching a heavy toolbox dent my brand-new floor, I can tell you that the truth is a bit more nuanced. It all comes down to how the material is manufactured. Standard vertical or horizontal bamboo is actually quite soft and prone to denting, whereas strand-woven bamboo is incredibly dense and tough.
According to the Janka hardness scale, which measures the resistance of a wood species to denting, traditional Red Oak sits at a respectable 1,290 lbf. In comparison, high-quality strand-woven bamboo can easily soar past 3,000 lbf, making it significantly harder than even the toughest domestic hardwoods. But hardness is only one piece of the puzzle. If you do not prepare your subfloor using precise floor leveling techniques, even the hardest material on earth will flex, creak, and eventually fail at the joints.
My early failure taught me that ignoring subfloor preparation is the fastest way to ruin a premium product. Beyond structural strength, bamboo and oak handle seasonal changes differently. If you are leaning toward grass, you should know why bamboo flooring shrinks more than you expect during dry winters. Have you ever installed a floor only to watch gaps open up a few months later? Let me know in the comments below!
Preparing the Ground Work Before You Lay a Single Plank
The secret to a floor that survives decades of heavy boots and dog claws is not actually the wood itself. It is the invisible layer beneath it. Think of your subfloor like the foundation of a house. If it is wavy, your expensive hardwood or dense strand-woven bamboo will constantly flex. This continuous bending acts like a crowbar on the tongue-and-groove joints, slowly snapping them apart. To prevent this, you must master the art of subfloor preparation. This starts with knowing exactly how flat your floor is. Take a long straightedge or learn the string line method for checking floor flatness over 20 feet to spot the dips before they become squeaks.
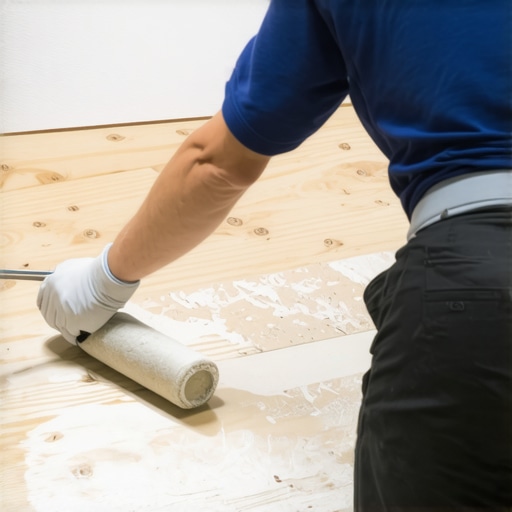
Once you locate the dips, you might think about pouring self-leveling underlayment immediately. Stop right there. A common mistake is letting that liquid leveler find its way through any small gap in your subfloor, ruining your ceiling below or wasting expensive material. I learned this when I poured five gallons of wet leveler in my upstairs hallway, only to hear it dripping onto my basement workbench five minutes later. Always learn how to stop your floor leveler from leaking through the subfloor by sealing every joint, seam, and knot hole with a high-quality silicone caulk or specialized tape first. Also, do not forget to apply a dedicated primer to ensure the leveler bonds solidly to your plywood base.
The Crucial Role of Acclimation and Moisture Control
Whether you choose solid oak or strand-woven bamboo, you are dealing with organic materials that breathe. They act like dense sponges, expanding when the summer humidity peaks and shrinking when the winter radiators turn on. If you install them straight out of the box, you are inviting disaster. You must use a reliable tool to check the moisture content of both the wood planks and your subfloor. Knowing how to use a moisture meter before installing wood floors is the only way to prove your materials are stable enough to lay down. If you skip this, you might end up wondering why your bamboo flooring is cupping despite low humidity, which is almost always due to trapped subfloor moisture trying to escape upward through the planks.
Managing the Expansion Gap
Every floor needs room to move. Many DIYers make the mistake of tight-fitting the boards right up against the drywall. When summer arrives, the wood expands, hits the wall, and has nowhere to go but up, resulting in a buckled floor. You must leave an expansion gap around the entire perimeter. A great trick to keep these gaps perfectly uniform while you nail or glue down your rows is using coin spacers. Learn how the quarter trick for checking expansion gaps in luxury vinyl floors can be adapted for traditional hardwood and bamboo installations alike. Once your baseboards and shoe moldings are installed over the gaps, nobody will ever know they are there, but your floor will have the breathing room it desperately needs.
Is a self-leveling compound actually self-leveling?
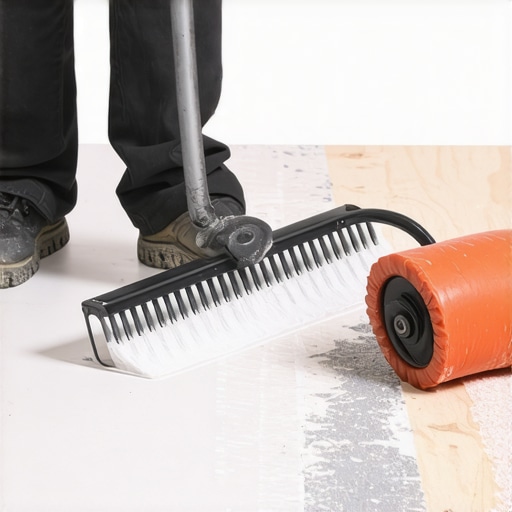
In my early years of renovating, I fell for the biggest marketing lie in the flooring industry: the idea that self-leveling underlayment behaves like water and magically creates a perfectly flat surface on its own. It absolutely does not. If you just pour it and walk away, you will end up with a bumpy, wave-like surface that ruins your hardwood installation. In reality, the high surface tension of these cementitious mixes requires mechanical help to flow into low spots. A study by the National Wood Flooring Association (NWFA) highlights that subfloor flatness deviations of more than 3/16 inches over a 10-foot span are the leading cause of premature joint failure in interlocking floors. To avoid this costly mistake, you need to active-help the process. Learn the secret to mixing leveler for a glass-smooth finish, and always use a specialized gauge rake to spread it evenly.
Another common trap is pouring your compound directly onto dusty plywood without a dedicated primer. When you skip primer, the dry wood instantly sucks all the moisture out of your wet leveler, causing it to shrink, crack, and lift. This is exactly why your self-leveler is bubbling over plywood and failing to bond. Always roll out an acrylic latex primer and let it dry to a tacky finish before pouring. This creates an airtight barrier that stops air bubbles from rising up and leaving tiny craters in your cured floor.
When you are dealing with uneven subfloors, some DIYers think they can compensate for dips by using extra-thick padding or cheap underlayment. This is a massive mistake. A soft subfloor allows the planks to bounce underfoot, putting immense pressure on the tongue-and-groove joints until they snap. This is why your click-lock flooring is popping out at the joints after just a few months of normal walking. No pad can replace proper floor leveling, and getting your base flat is the only way to guarantee your hardwood or tile investment will last a lifetime.
Have you ever fallen into this trap and watched your self-leveler dry into a lumpy mess? Let me know in the comments below!
My Personal Toolkit for Perfect Installs
Over the years, I have stopped relying on basic tape measures and hand trowels to get the job done. If you want professional results, you need professional-grade equipment. The absolute first tool I pack for any flooring job is a high-frequency concrete and wood moisture meter. I personally use the Wagner Meters Orion series because it non-destructively measures moisture deep within the planks without leaving ugly pinholes. This is critical when you want to know how to use a moisture meter before installing wood floors to prevent cup distortion.
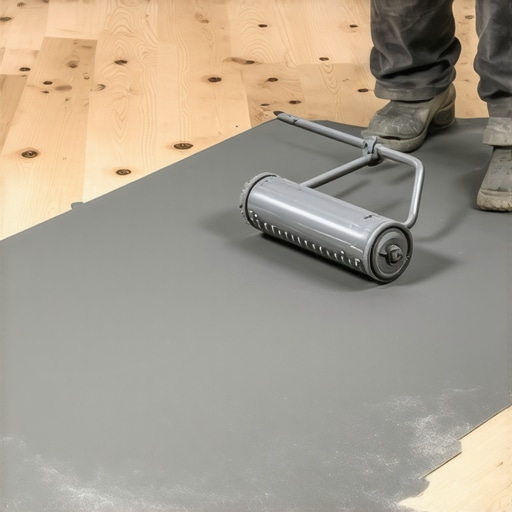
For leveling pours, a standard garden rake or flat trowel is your worst enemy. Instead, I always use a heavy-duty gauge rake set to the exact depth of my floor’s deepest dip, followed immediately by a spiked roller. Using a spiked roller popped every micro-bubble in my cementitious mix and helped the self-leveler flow perfectly into the low spots. If you have ever struggled with a lumpy floor, learning how to use a spiked roller for the perfect leveling pour will completely change your workflow.
How do I maintain these dense floors over time?
Once your floor is laid and perfectly flat, the real test of time begins. For bamboo and traditional hardwood, keeping sand and grit off the surface is your first line of defense. Fine grit acts like sandpaper under your shoes, wearing down the protective polyurethane coat. Never use steam mops on these materials, as pressurized heat forces moisture deep into the joints, causing swelling. Instead, stick to a microfiber mop and a specialized, pH-neutral cleaner. If you want to keep that showroom glow, read up on hardwood floor care secrets to longevity and shine to avoid dulling your expensive finish.
As for the future of flooring, the industry is moving rapidly toward smarter, hybrid materials. Manufacturers are now blending ultra-dense stone-plastic composites (SPC) with real wood veneers, giving you the authentic texture of oak with the waterproof characteristics of vinyl. However, no matter how advanced these materials become, the physics of your home will remain the same: a beautiful floor is only as good as the flat subfloor beneath it. For your next project, I highly recommend trying the spiked roller technique during your prep phase to see how effortless achieving a glass-smooth floor can actually be.
What Decades of Sanding and Spills Taught Me About Flooring Durability
If you take away only one lesson from my years of trial, error, and messy hallways, let it be this: a gorgeous floor is entirely built on patience, not just a hefty budget. I used to think that buying the most expensive premium planks guaranteed a lifetime of beauty. Now, I know better. Here is the insider wisdom you need to avoid those late-night DIY regrets:
- Density beats species names: Do not buy standard bamboo expecting it to perform like strand-woven material. If it does not explicitly say “strand-woven” on the box, treat it like soft pine.
- Your subfloor is your destiny: I have seen gorgeous hardwood floors ruined because someone wanted to save fifty dollars on self-leveler. Spend the time and money to get your base flat.
- Moisture is always moving: Even if your home feels dry, subfloor moisture is constantly trying to find its way out. Always check your levels before laying down a single board.
- Expect the winter gap: Wood and bamboo are living, breathing elements in your home. Embrace the natural movement of these materials rather than trying to fight it with overly tight installations.
The Real-World Toolbox I Never Leave Behind
I do not get sponsored to recommend these, but over twenty years of refining my flooring installation and leveling routine, these specific tools have saved my knees, my back, and my wallet:
- The Spiked Roller: This is the single most satisfying tool in my kit. If you want a flat subfloor, you need to use this to release air bubbles from your underlayment.
- A High-Quality Pinless Moisture Meter: This tool will tell you precisely when your subfloor is dry enough to accept wood planks without causing future cupping or warping.
- Heavy-Duty Brass Gauge Rake: Forget using standard hand trowels for large pours. This tool lets you set a uniform depth across the entire room in minutes.
- High-Tack Sealing Tape: Before you pour a single bag of liquid leveler, seal every gap. It prevents ruined ceilings and keeps the expensive compound exactly where it belongs.
Step Boldly Into Your Next Renovation Project
Now that you know how density, proper subfloor preparation, and moisture management work together, you are fully equipped to make a decision that fits your actual lifestyle. Do not let the fear of prep work hold you back from transforming your home. Achieving a flawless, long-lasting surface is entirely within your reach when you take the time to build a solid foundation first. Whether you select the timeless elegance of traditional white oak or the incredible durability of strand-woven bamboo, your efforts during the prep phase will pay off every single time you step through your front door.
Have you ever run into unexpected subfloor issues during a home project? Let me know in the comments below!