Ever had that sinking feeling when you walk into a room and notice your new hardwood or tile floor is uneven, creaky, or just plain unappealing? I’ve been there. I remember installing my first hardwood floor and thinking I could skip the meticulous leveling process. Big mistake. That uneven surface haunted me for years, causing cracks and premature wear. It was a lightbulb moment that made me realize: proper leveling isn’t just a step; it’s the foundation of lasting beauty and durability.
Why Proper Floor Leveling Matters More Than Ever
In 2025, the focus on durability and aesthetic appeal has never been higher. A perfectly leveled floor ensures your investment lasts, whether you’re laying down tiles, hardwood, or laminate. According to industry experts, improper leveling can lead to cracking, squeaking, and uneven wear that shortens the lifespan of your floors. It’s not just about looks; it’s about saving money and frustration down the line. I promise, with the right techniques, you can avoid the pitfalls I faced early on. Today, I’ll share the strategies that transformed my projects from problematic to pristine.
Have You Fallen Into the Trap of Overlooking Leveling?
If you’re like most DIYers or even seasoned pros, it’s easy to underestimate the importance of a level surface. I made that mistake early on, rushing through the prep work and paying dearly later. Trust me, skipping or rushing this step can cause costly repairs or replacements. To get it right, check out this comprehensive guide for expert-level solutions. Mastering floor leveling is my top recommendation for achieving flawless results that last decades. Ready to dive into the practical steps? Let’s do it.
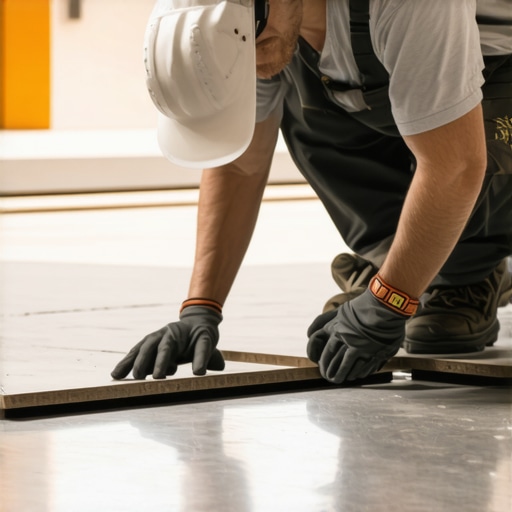
Ensure a Solid Foundation Before You Start
Think of your floor like a canvas for a masterpiece. If the base isn’t level, your entire project can become a crooked mess. My first attempt at leveling a kitchen tile was a disaster—tiles cracked and shifted because I skipped proper prep. To avoid this, start by thoroughly assessing your subfloor. Use a long level or a laser level to identify high spots and dips. Mark these areas clearly so you know where to focus your efforts. Remember, the key to a lasting finish is a perfectly flat surface, which you can achieve by removing high points with a grinder or sanding down uneven spots. For detailed techniques, check out this expert guide.
When it comes to installing hardwood floors, many people fall prey to misconceptions that can lead to costly mistakes. One of the most persistent myths is that minor unevenness in the subfloor isn’t a big deal. In reality, even small dips or high spots can cause significant issues over time, such as squeaking, cracking, or uneven wear. This is why meticulous floor leveling is crucial, especially for high-quality hardwood installations. Skipping or rushing this step can undermine the entire project, making it essential to invest time in proper subfloor assessment and correction. For detailed strategies, don’t miss this expert guide.
Another common misconception is that all leveling compounds are created equal. In fact, many DIYers rely on quick-setting fillers that harden too fast or don’t adhere well to concrete or wood substrates. This can cause future cracks or shifting. The secret is choosing the right product for your specific subfloor material and climate conditions. Advanced installers often prefer self-leveling compounds that offer superior adhesion and flexibility, ensuring the surface remains flat and durable for decades. Expert insights can be found at this resource.
Now, let’s challenge a prevalent belief: that tile or hardwood installation is purely about aesthetics. While appearance matters, the underlying techniques—like proper subfloor preparation and precise leveling—are what guarantee longevity. This is especially true for sophisticated projects where high-traffic or moisture exposure demands extra attention. For advanced tips, check out this comprehensive guide.
What about the trap of underestimating the importance of tools? Many assume a simple level or a straightedge suffices. But for truly flawless results, professional-grade laser levels and moisture meters are indispensable. They help detect subtle imperfections and environmental issues that can sabotage your project early on. Using the right tools is a game-changer that separates amateurs from pros. Learn more about essential equipment at this expert article.
Finally, a hidden nuance often overlooked is the impact of climate and humidity on floor leveling and installation. Wood and some flooring substrates expand and contract with temperature fluctuations, which can cause uneven surfaces or gaps if not accounted for. Advanced installers consider seasonal adjustments and climate-controlled environments to ensure stability over time. For insights into managing these factors, visit this detailed resource.
Have you ever fallen into this trap? Let me know in the comments. Remember, mastering these nuances elevates your craftsmanship and guarantees a beautiful, durable floor for years to come.
Investing in high-quality flooring is just the beginning; keeping it in top shape requires the right tools and ongoing maintenance. Over the years, I’ve refined my toolkit to include specific equipment that ensures precise installation, easy repairs, and long-term durability.
Why a Laser Level Is Your Best Friend
When it comes to floor leveling and installation, a professional-grade laser level is indispensable. Unlike traditional bubble levels, laser levels project a perfectly straight line across the entire room, making it easier to identify high and low spots with pinpoint accuracy. I personally prefer models like the Bosch GLL 3-80 because of their durability and bright, clear laser beam. Using a laser level not only speeds up the process but also enhances precision, reducing the risk of uneven surfaces that can lead to cracking or squeaking down the line.
Moisture Meters for Climate Control
Moisture levels in the subfloor and environment significantly impact long-term floor stability, especially for hardwood. I recommend a reliable moisture meter such as the Extech MO290. It helps monitor moisture content before, during, and after installation, ensuring your subfloor remains within optimal ranges. This proactive approach prevents future warping, buckling, or gaps caused by seasonal humidity fluctuations. For more detailed advice on managing moisture, check out this resource.
Floor Scrapers and Sander Attachments
Maintaining your floors also means addressing scratches, stains, or uneven spots over time. A high-quality floor scraper like the Stanley FatMax helps remove old adhesives or damaged finish layers without harming the wood beneath. For smoothing out minor imperfections, I use a detail sander with fine-grit sanding pads. This combination makes touch-ups quick and professional-looking, extending your floor’s lifespan.
Cleaning Equipment That Protects Your Investment
Long-term maintenance isn’t complete without proper cleaning tools. I prefer microfiber mops and gentle, pH-neutral cleaners to avoid stripping the finish. Regular cleaning, combined with periodic deep cleaning using a steam cleaner designed for hardwood, keeps floors looking shiny and new. Remember, avoiding harsh chemicals preserves your finish, saving you money on repairs or refinishing.
Predicting the Future of Flooring Maintenance
As technology advances, I believe we’ll see more smart tools integrated with apps that monitor environmental conditions and alert homeowners to potential issues before they escalate. IoT-enabled moisture sensors or AI-based surface analyzers could become standard, allowing for even more proactive maintenance. Embracing these innovations now can give you a significant edge.
How do I maintain hardwood or tile floors over time?
The key is regular cleaning, prompt repairs of any damage, controlling indoor humidity, and periodic inspections with the right tools. Don’t forget to revisit your flooring’s condition annually and use specialized products recommended in this guide for best results. Try implementing a seasonal moisture check with your moisture meter to prevent costly issues down the road.
By investing in these specific tools and following consistent maintenance routines, your floors will not only look stunning but also stand the test of time. Ready to elevate your flooring game? Start with a laser level or moisture meter today and see the difference it makes!
The Hardest Lesson I Learned About Floor Leveling
One of my biggest lightbulb moments was realizing that rushing through the subfloor assessment leads to a domino effect of issues—cracks, squeaks, and uneven wear. Taking the time to thoroughly evaluate and correct high spots and dips saved me from costly repairs later. It taught me that patience and precision in the beginning are the keys to a flawless finish.
Why Choosing the Right Tools Changed My Approach
Switching to professional-grade tools, like a laser level and moisture meter, transformed my projects. These tools helped me detect subtle imperfections and environmental issues that casual tools might miss. Investing in quality equipment turned my DIY efforts into professional results, proving that the right gear is essential for lasting durability.
Learning from Mistakes and Embracing Better Techniques
My early mistake was relying on quick-setting leveling compounds that crack over time. Over time, I discovered that selecting products suited for my specific subfloor and climate made all the difference. Now, I focus on expert-recommended self-leveling compounds and advanced techniques, which have extended the lifespan of my floors and kept them looking pristine.
Seeing the Bigger Picture in Flooring Success
Understanding that proper floor leveling isn’t just about aesthetics but about long-term performance changed my perspective completely. It’s about creating a foundation that withstands daily wear, moisture fluctuations, and time. This holistic view ensures my floors remain beautiful and durable for decades, making every effort worth it.