
It was a quiet Sunday morning when I finally snapped. I was gently tiptoeing around my living room, trying not to wake up my family, only to be greeted by that dreaded squeaking sound every few steps. You know the one—annoying, persistent, and enough to drive anyone crazy. At first, I thought it was just the old hardwood flooring. But after trying the usual fixes—tightening screws, applying lubricant—I realized I needed a different approach. That’s when I stumbled upon a simple, unexpected solution: baby powder.
The Squeak That Ruined My Calm—and My Home
Have you ever experienced the frustration of squeaky floors in your home? It’s more than just an annoyance; it can be embarrassing when guests visit, and over time, it can even lead to more significant damage if left unaddressed. I remember feeling helpless, thinking I’d have to rip up parts of my floors or worse, call in professional contractors for costly repairs. But let me tell you—there’s a trick I wish I knew sooner that costs next to nothing and is surprisingly effective.
When I first heard about the baby powder trick, I was skeptical. I’d made mistakes early on, like assuming all squeaks are caused by loose nails or humidity issues. Those misdiagnoses only wasted my time and money. But after researching further, I found that the root of many squeaks is friction—between the wood planks and nails or subfloor—caused when the wood contracts or shrinks. Baby powder, with its fine, dry particles, works by filling in the tiny gaps, reducing friction and stopping the squeak at its source.
Is Baby Powder Really the Magic Fix for Squeaky Floors
Some folks might wonder if this trick is just a fad or if it’s truly worth trying. According to flooring experts, powders like baby powder or talcum are effective because they get deep into the cracks where lubricants can’t reach. Plus, it’s a dry solution that doesn’t damage your flooring or leave a mess like oil or grease. Just remember—cleaning up afterward is simple, and it’s gentle for your flooring and family.
Early on, I made the mistake of applying lubricants directly onto the floor surface, which made my floors look greasy and attracted dirt. It was a mess to clean up, and the squeaky sound didn’t fully disappear. That’s why I now recommend applying baby powder into the seams and cracks—targeted, effective, and safe.
If you’re tired of the constant squeaking and ready for a quick fix that truly works, then stay tuned. I’ll walk you through the steps to silence those pesky sounds for good. Trust me, once you see how simple this trick is, you’ll wonder why you didn’t try it sooner.
Lift the Rugs and Inspect the Floorboards
Start by removing any rugs or furniture covering the squeaky area. Walk slowly over the suspected spots and listen closely. If the squeak intensifies when you press down, pinpoint the exact boards or nail locations causing the noise. Visual inspection might reveal loose nails or gaps. Once located, mark these spots for targeted treatment.
Apply Baby Powder Into the Gaps and Cracks
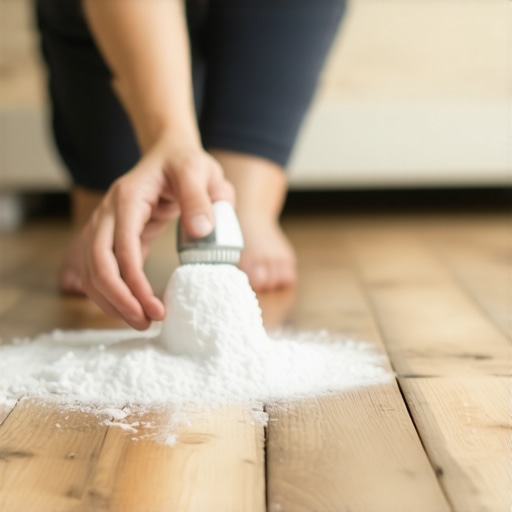
Pour a small amount of baby powder into the seams where the squeak occurs. Use a soft brush or cloth to work the powder deep into the cracks. The fine particles settle into friction points, reducing movement. I remember applying it to a stubborn section in my living room—rushing a bit, spilling powder, and making a slight mess, but it was worth it when the squeak stopped immediately.
Use a Mallet and Nail Set for Loose Nails
If you find loose nails, gently tap them further in with a hammer or set them with a nail set, then countersink them slightly below the wood surface. Avoid over-driving, which can cause the board to lift. After securing the nails, fill the holes with wood filler and sand smooth for an even surface.
Inject Adhesive for Bouncy or Bumped Boards
For boards that bounce or shift when walked upon, drill a small hole through the tongue and groove joint, then inject wood glue or a construction adhesive using a syringe or squeeze bottle. Weight down the area until dry to ensure adhesion. Remember, excessive glue can squeeze out, so apply sparingly—just enough to bond the surfaces.
Secure Loose Boards with Screws or Bridging Blocks
If boards move or squeak despite previous fixes, drive finishing or deck screws through the top into the subfloor or joists. Drill pilot holes first to prevent splitting. For larger sections, install bridging blocks underneath the floor joists to provide additional support. This step is like giving your floor a sturdy backbone, preventing future squeaks.
Fine-Tune the Surface for a Smooth Finish
After all repairs, fill any holes or gaps with suitable wood filler, then sand smooth once cured. Vacuum the area thoroughly to remove dust and residual powder. Reinstall the baseboards and rugs once everything is level and silent.
When it comes to installing flooring, many homeowners and even some professionals fall prey to certain myths that can compromise the final result. Let’s shine a light on some of these misconceptions, explore the nuances behind them, and discuss advanced mistakes that can trip up your project.
Why Uniform Thickness Isn’t Always Better: The Truth About Thinset Mortar
One widespread belief is that using the thickest layer of thinset guarantees a perfectly level tile surface. However, over-application can lead to uneven bonding and lippage. Expert installers know that proper trowel notch size and consistent application are far more critical than mere thickness. According to mastering-floor-leveling, achieving a uniform thinset layer ensures better adhesion and a flatter, more durable surface. An advanced mistake many contractors make is ignoring the substrate’s moisture content, which can cause thinset to shrink or crack over time, leading to uneven floors.
Inaccurate Subfloor Assessment Is a Silent Killer
Many assume their subfloor is flat enough without thorough testing. This oversight can lead to cracked tiles or squeaks down the line. An often overlooked nuance is checking for subtle high or low spots using a long straightedge or laser level. Ignoring moisture testing or assuming a new subfloor doesn’t need leveling can cause costly repairs later. Proper assessment, as outlined in floor leveling challenges, can save you from these pitfalls. Experts emphasize that even a slight unevenness of less than 1/8 inch over ten feet can cause significant issues in tile and hardwood installations.
Hardwood Floors and Moisture Management Needs Nuance
Common myths suggest that acclimating hardwood floors is unnecessary or that temperature and humidity are constant after installation. In reality, wood is a hygroscopic material—its dimensions change with moisture variations. A subtle mistake is neglecting proper acclimation or ignoring seasonal humidity shifts, leading to cupping, buckling, or gaps. Advanced DIYers and pros use moisture meters and consider local climate insights, like those discussed in wide plank hardwood tips, to minimize these risks. Failing to control indoor humidity, especially during dry or damp seasons, is a silent threat to long-term flooring integrity.
Understanding these nuances separates the average from the exceptional in flooring projects. It’s not enough to follow basic steps; mastering these advanced considerations can be the difference between a beautiful, long-lasting finish and an ongoing headache. Have you ever fallen into this trap? Let me know in the comments. For more expert insights, explore flooring installation tips and elevate your next project.
Maintaining your flooring, especially hardwood and tile, requires more than just occasional cleaning. Having the right tools and following precise methods ensures your floors remain pristine and durable over time. One essential piece of equipment I personally rely on is a high-quality moisture meter. For hardwood floors, fluctuating humidity can cause expansion and contraction, leading to gaps or buckling. Using a moisture meter like the Tramex MS700 allows me to monitor the moisture content before, during, and after installation, aligning with best practices outlined in the ultimate guide to floor leveling.
Another tool I swear by is a vibration dampening sander for refinishing hardwoods. It minimizes dust and uneven sanding, vital for long-term appearance. When it comes to tile maintenance, a rubber float eases grout cleaning, preventing cracks and ensuring a tight seal. I also recommend investing in a good-grade silicone caulk gun—like the Wagner Power Caulk—it offers control and prevents waste, which is crucial when sealing joints or gaps to prevent moisture ingress.
For adhesive and leveling compounds, I prefer using a paddle mixer with variable speed settings. It ensures thorough blending without introducing air bubbles, crucial for creating an even substrate. I personally use the Amazonbasics Dual Paddle Mixer, as I’ve noticed that a consistent mixture leads to fewer troubleshooting issues down the line, aligning with tips from step-by-step flooring installation.
Looking ahead, I predict that smart moisture sensors integrated with home automation will become standard in maintaining flooring health. These devices will alert homeowners to rising humidity or leaks before any damage occurs, making maintenance more proactive and less reactive.
How do I keep my hardwood and tile floors in top shape over the years? Regularly check moisture levels, invest in quality tools, and perform preventative repairs promptly. For instance, applying a specialized floor cleaner and polish—like Bona Hardwood Floor Cleaner—can restore shine and protect the finish from daily wear and tear. And if you’re unsure about your subfloor’s condition, consider professional assessments and remediation, which will save you money and headaches long-term.
Feeling inspired to elevate your flooring maintenance routine? Try incorporating a digital moisture meter into your regular checkups—that small investment can prevent major issues like cupping or buckling. For detailed guidance on handling floor imperfections or long-term upkeep, visit flooring installation tips and get started today.
The Hardest Lesson I Learned About tile,floor leveling,flooring installation,hardwood floors
One pivotal realization was that meticulous preparation often beats the allure of quick fixes. I used to believe that applying more adhesive or thicker mortar would level my floors faster, but experience taught me that precision and understanding the material behavior make all the difference. This has driven me to always double-check moisture content and subfloor flatness before proceeding, saving time and frustration in the long run.
The Myth That Caused My Most Expensive Mistake
I once ignored seasonal humidity variations during hardwood installation, thinking the climate was stable. The result? Gaps, cupping, and costly repairs. Now, I know that controlling indoor humidity with dehumidifiers or humidifiers—depending on the season—is crucial for enduring results. This small shift in approach has given me peace of mind and floors that stand the test of time.
Secrets That No One Tells You About Floor Leveling
Achieving a truly seamless floor isn’t just about using the right tools; it’s about understanding the subtle dynamics of your substrate. I learned that applying a primer to the base surface enhances adhesion, and that using a laser level helps catch those hidden high or low spots. Investing time in these steps prevents future squeaks and unevenness, making your installation look professional and last longer.
Room for Improvement that Changed My Approach
I used to overlook the importance of waiting for curing times when sealing or grouting. Rushing these steps led to cracks and chipped tiles. Now, I adhere strictly to manufacturers’ drying instructions, and I always schedule buffer days for unexpected delays. Patience in these stages preserves the integrity of the work and ensures that your beautiful new floors remain damage-free.
The Role of Quality Tools in Long-Term Success
Trusting inexpensive tools often results in subpar finishes and added labor. Over time, I realized that investing in a good moisture meter, a vibration-dampening sander, and a professional-grade grout float drastically improved my results and reduced rework. These tools, though seemingly costly upfront, pay for themselves by elevating your craftsmanship and the durability of your floors.
Where to Go from Here
If you’re serious about achieving flawless, lasting floors, dive into resources like Mastering Floor-Leveling Secrets and Step-by-Step Installation Guide. Continuous learning and leveraging expert tips will empower you to tackle projects with confidence, transforming your space into a durable masterpiece. Remember, each step counts—your diligence today builds the foundation for beautiful, silent, and lasting floors for years to come.