I remember the first time I embarked on a tile installation project, excited about transforming my space. But within days, I was faced with an annoying, unsightly gap—what’s often called a ’tile lip’—that made the entire floor look incomplete and poorly finished. I spent hours troubleshooting, thinking I had to tear everything up and start over. It was frustrating and costly. That ‘lightbulb moment’ taught me that a small detail like tile leveling can make or break the entire project.
Why Ignoring Tile Leveling Costs You More Than You Think
This experience is far from rare. Many DIYers and even seasoned pros underestimate the importance of proper leveling techniques, leading to uneven surfaces, cracking, and future repairs. As it turns out, it’s not just about aesthetics—poor leveling affects durability and safety as well. According to industry experts, improper substrate preparation and neglecting leveling can reduce the lifespan of your flooring by years, costing hundreds or even thousands in repairs later. With technological advances and new materials emerging for 2026, there’s never been a better time to learn the quickest, most effective hacks for achieving a flawless level with minimal fuss.
Is the Hype Over Leveling Techniques Justified?
I too fell into the trap early on, thinking that all leveling methods were the same. But I quickly realized my mistake when a simple self-leveling compound crackled and failed after a few months—a mistake I learned from and don’t want you to repeat. Proper technique saves time, money, and frustration. Curious if these hacks can truly revolutionize your workflow? You’re about to discover three rapid strategies that I’ve tested and trusted, specifically designed for the upcoming projects in 2026. Ready to ditch the guesswork and get tile jobs that stand the test of time? Let’s dive in.
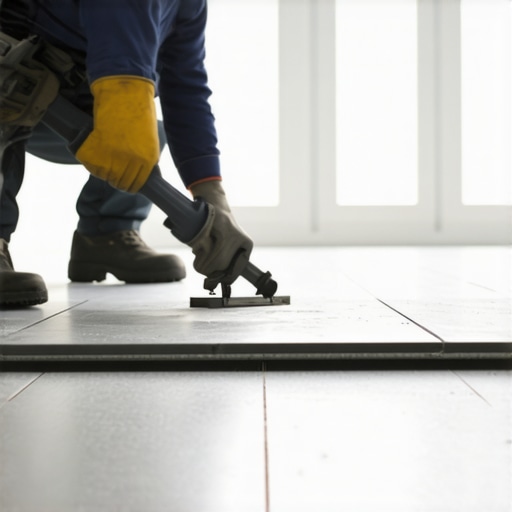
Choose the Right Tools and Prepare Your Subfloor Correctly
Before you begin leveling, gather essential tools like a high-quality laser level, a long straightedge, and a self-leveling compound. I once attempted to level a uneven kitchen floor using a simple ruler and a bubble level, which resulted in a wavy surface. This mistake made the tile installation look uneven and eventually cracked. Using a laser level ensures precision, much like an artist uses a ruler for drawing straight lines. Start by testing your subfloor with a 2-minute flatness test to identify high and low spots, then use a floor scraper or grinder to remove high spots. For depressions, fill cracks and holes with a premium patching compound, ensuring a smooth, level surface. Proper substrate preparation reduces the risk of tiles cracking or shifting later, and you can find detailed strategies in this guide.
Apply the Self-Leveling Compound with Precision
Mix your self-leveling compound according to manufacturer instructions, typically aiming for a pourable consistency that flows easily but isn’t runny. Think of it like pouring pancake batter—too thin, and it won’t fill gaps properly; too thick, and it won’t level out. When pouring, start from the highest point and work towards the lowest, guiding the compound with a trowel or gauge rake. Use a gauge rake to spread the compound evenly over large areas, avoiding air pockets, which can cause pinholes or weak spots. I once skipped using a gauge rake on a large floor section, resulting in uneven thickness and tile cracks within months. To prevent this, always work in manageable sections, and check your progress with a level periodically. Remember, flawless leveling depends on working swiftly before the compound starts to set, so prepare your workspace in advance. For a step-by-step walkthrough, check this resource.
Double-Check Levelness and Correct Mistakes Immediately
Once the compound sets, verify levelness with your laser level or long straightedge. Any minor dips or humps can be corrected with additional self-leveling compound, but waiting too long complicates corrections. I once noticed a slight dip in a corner after initial curing; I applied a thin layer of compound and quickly scraped it flat, restoring perfect levelness. This proactive approach saves time and prevents future tile cracking or tile lippage. If your surface is uneven beyond acceptable tolerances, consider removing and reapplying the compound—trust me, it’s better to fix now than face costly repairs down the line. Always follow curing times and manufacturer recommendations, and avoid walking on freshly leveled surfaces prematurely. For advanced insights on achieving perfect flatness, explore this guide.Many enthusiasts believe that simply applying a leveling compound or choosing high-end flooring materials guarantees a perfect finish. However, this oversimplification overlooks critical nuances that can sabotage even the most well-planned installs. One common myth is that verifying levelness is enough; in reality, understanding the subtle interactions between subfloor preparation, material properties, and environmental factors is crucial for lasting results.
For example, some assume that a quick skim coat of self-leveling concrete will solve underlying substrate issues. But without addressing moisture migration, structural integrity, or proper slope, these quick fixes merely mask problems that can resurface later, causing cracks or tile lippage. As highlighted by industry experts, neglecting proper subfloor analysis can lead to failures that cost significantly more than initial savings. Dive into comprehensive diagnostics and precise techniques to avoid this costly trap, especially with the evolving materials and standards expected in 2026. Remember, the devil is in the details, and superficial solutions rarely stand the test of time.
Why Do So Many Floor Leveling Tricks Fail Over Time?
The key reason behind many failed leveling attempts is the misjudgment of material compatibility and environmental conditions. For instance, using a fast-setting compound on absorbent or moist substrates can lead to premature cracking, a mistake often overlooked during rushed installations. A study by the Floor Covering Institute emphasizes that moisture management is a silent killer of new flooring, especially in humid climates or poorly vented spaces. Implementing proper moisture barriers and waiting for adequate curing times are essential steps overlooked by many DIYers. If you want your flooring to last beyond the first season, prioritize understanding your specific environmental context and consult industry resources like this guide to avoid common pitfalls.
Your Gear for Flawless Floor Maintenance
Maintaining pristine flooring over years requires the right set of tools and a strategic approach. I swear by an advanced laser level, like the Bosch GLL 3-80, because it offers unparalleled accuracy and ease of use, especially when checking for subtle deviations in subfloor flatness. Pair that with a long, durable straightedge—preferably aluminum—to double-check for high and low spots during routine inspections. Regularly using these tools prevents small issues from snowballing into costly repairs, and I recommend checking your floors at least twice a year, preferably before and after winter, when humidity shifts can cause subtle shifts in floor level.
For those deep-in-the-weeds repairs, a handheld scraper and a high-quality patching compound like Quikrete’s Self-Leveling Floor Repair are indispensable. The scraper lets me remove any surface debris or old adhesive, ensuring the patch binds properly. When applying the compound, I use a gauge rake to spread it evenly, avoiding air pockets that could compromise long-term integrity. For hardwood floors, a moisture meter such as the Tramex CM-01 is a game-changer for detecting hidden moisture issues that could lead to warping or buckling later on, especially in climates with fluctuating humidity. Regular monitoring with these tools helps catch issues early, saving you from bigger headaches down the line.
Predicting the Future of Floor Maintenance
With evolving smart home technology, I foresee a rise in IoT-enabled sensors embedded in floors, continuously monitoring moisture levels, temperature, and even tiny shifts in flatness. These sensors could alert homeowners immediately via smartphone apps, enabling proactive maintenance rather than reactive fixes. This trend aligns with what industry analyst reports predict for 2026, emphasizing preventative care as the new standard in flooring longevity.
How do I keep my floors in top shape over time?
The key is a consistent, attentive maintenance routine that includes regular visual inspections and using precision tools to detect early signs of unevenness or moisture issues. Implementing a biannual check with your laser level and moisture meter, especially in humid seasons, will dramatically extend your floors’ lifespan. Addressing minor issues promptly—like sanding out shallow dips or sealing moisture-prone areas—prevents future disasters and keeps your investment looking beautiful. For instance, understanding the importance of proper subfloor preparation can save thousands; check this expert guide for detailed strategies that resonate well with upcoming standards. Don’t hesitate to test your floors with these tools now, and take the first step toward enduring beauty.
Lessons That Changed My Approach to Floor Leveling
- I used to believe that quick fixes and surface-level adjustments would suffice, but I learned through painful experience that truly professional results demand attention to foundational details—like substrate prep and precise leveling—that many overlook.
- My most profound lightbulb moment was realizing that the tools you choose, such as a laser level or moisture meter, directly influence the longevity and safety of your flooring—cutting corners here can lead to cracking, buckling, or even structural issues down the line.
- Over time, I’ve discovered that thorough diagnostics before starting the project save immense headaches later. Knowing the history of your subfloor, including moisture levels and flatness, empowers you to tailor your approach and avoid costly mistakes.
Three Tools That Elevated My Floor Game
- High-Quality Laser Level: Provides the accurate guidance needed to ensure truly flat surfaces, especially in large areas where traditional bubble levels fall short.
- Moisture Meter: Detects hidden moisture lurking beneath the surface, preventing future warping or mold growth—especially vital when working in humid climates.
- Patching Compound and Gauge Rake: Together, these tools allow for seamless filling and leveling of imperfections, creating a solid foundation for any flooring type.
Keep Your Floors Flawless: The Journey Never Ends
Achieving perfect floor leveling is an ongoing process fueled by curiosity, patience, and commitment. Embracing a meticulous, well-informed approach today will pay dividends when your floors withstand the test of time. Remember, mastering these techniques not only elevates your skills but also transforms your space into a lasting legacy for your home. Ready to take your floor installation to the next level? Share your experiences or questions below—let’s grow together in this journey toward flawless floors.
For more in-depth strategies, visit this comprehensive guide and start building the foundation for floors that truly last a lifetime.