Ever stepped onto a new hardwood floor and felt that unsettling wobble or uneven patch? I remember my first big DIY project at home—thinking I could just lay down some planks and call it a day. Instead, I ended up with a wavy surface that made my coffee spill every time I set it down. That lightbulb moment taught me a lot about the importance of proper floor leveling and installation techniques. If you’re anything like I was, you’re probably wondering why so many floors end up less than perfect, and what you can do to avoid common pitfalls.
Why Floor Leveling Matters More Than You Think
When I first started, I underestimated just how crucial floor leveling is. A subfloor that’s even by just a fraction of an inch can cause serious issues down the line—like cracked tiles, squeaky hardwood, or uneven surfaces that make furniture wobble. According to industry experts, improper leveling is among the top causes of flooring failures. And let’s be honest, no one wants to redo a whole room because of avoidable mistakes.
Have you faced uneven floors that made your project a nightmare?
I made a big mistake early on—skipping the step of checking and correcting high spots. It seemed minor at first, but it led to a lot of frustration. That’s why I want to share what I’ve learned, so you won’t make the same errors. From mastering precise leveling techniques to choosing the right tools, I’ll guide you through the essentials for a flawless finish. Want to save time and money while ensuring your floors last? Keep reading. For more detailed strategies, check out this comprehensive guide.
Getting your floors right the first time is worth every effort. It’s the foundation of a beautiful, durable space. Ready to dive into the practical steps that will transform your project from a potential disaster to a stunning success? Let’s go!
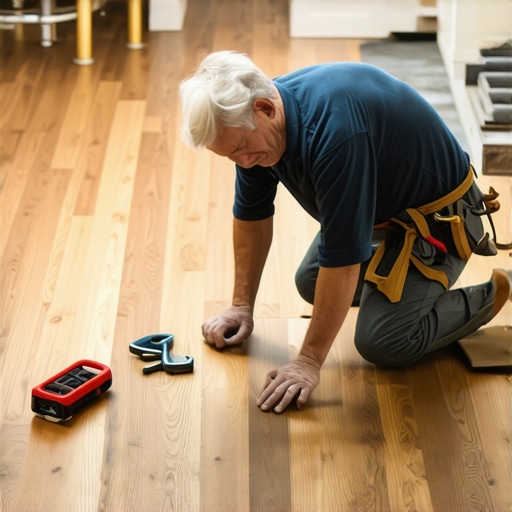
Start with a Thorough Inspection
Before you pick up any tools, walk across your floor and identify high spots and dips. I once skipped this step and ended up with a wavy surface that made furniture wobble. Use a long straightedge or a level to mark uneven areas. This initial scan helps you plan your approach and saves time later.
Prepare Your Subfloor Carefully
Clear the area of debris, dust, and loose material. A clean surface is essential for proper adhesion. Check for moisture issues that could affect your leveling compound or adhesives. If moisture is present, address it with a vapor barrier or moisture mitigation system. Think of it like prepping a canvas before painting—without a smooth surface, your work won’t look right.
Apply Leveling Compound Precisely
Mix your leveling compound according to the manufacturer’s instructions. For small dips, a trowel or putty knife works well. For larger areas, a self-leveling compound is your best bet. When I did my first large patch, I poured the compound and used a long broomstick to spread it evenly, then watched it level itself—like magic. Be sure to work quickly before it starts to set.
Use a Screed for Flatness
If you’re dealing with significant unevenness, a screed (a straightedge) helps you achieve a flat surface. Place the screed across the high points and drag it along to remove excess compound or fill low spots. This technique is like leveling a table—precision makes all the difference.
Check Your Work Frequently
After applying leveling material, use a level or straightedge to double-check. Wait for the compound to cure fully before proceeding. I learned this the hard way when I moved too fast; the floor still had subtle dips. Patience here ensures a flawless surface.
Address High Spots and Low Patches
If you find minor imperfections after curing, sand them down with a fine-grit sander. For stubborn high spots, skim coat with a thin layer of leveling compound and re-sand. Think of it like sanding wood—it’s all about smoothing out the rough edges for a perfect finish.
Verify the Final Surface
Once everything is cured and smoothed, run a long level or straightedge across the entire floor. Look for any irregularities. Small adjustments at this stage can prevent major issues during flooring installation.
Remember, a well-leveled subfloor is the foundation of a durable, beautiful floor. It’s worth taking your time and doing it right—your future self will thank you every time you walk on your flawless hardwood or tile.
Many DIY enthusiasts and even seasoned contractors often fall prey to misconceptions when it comes to hardwood floors, tile installation, and floor leveling. Let’s dig deeper into some of these myths and reveal the hidden nuances that can make or break your project.
Why the Popular Belief That Leveling Is Always Simple Can Fail You
One of the most common myths is that applying a leveling compound is a straightforward process. While it might seem simple—pour, spread, and wait—the devil is in the details. Using the wrong type of compound or neglecting proper surface preparation can lead to cracks, uneven surfaces, or even future floor failure. Industry experts emphasize that understanding the specific needs of your subfloor—whether it’s concrete or wood—is critical. For instance, self-leveling compounds are excellent for concrete but may not adhere well to wooden surfaces without proper primer. Check out these techniques for more advanced strategies.
Don’t Overlook the Impact of Subfloor Material and Condition
Many assume that a clean, dry subfloor is enough, but the material composition and existing condition can drastically influence the outcome. For example, a wooden subfloor with high moisture content can cause leveling compounds to bubble or delaminate. Similarly, uneven concrete slabs may need additional preparation like grinding or patching before leveling. Missing this nuance often results in floors that wobble or crack prematurely, costing time and money. Learn more about evaluating your subfloor at this guide.
Advanced Mistake: Believing That All Floor Leveling Techniques Are Equal
Some believe that one method—be it self-leveling compound or sanding—works universally. But the truth is, each situation demands a tailored approach. For instance, sanding is suitable for minor dips in wood floors, but for large or deep unevenness, a combination of patching and leveling is required. The wrong choice can cause instability or an uneven surface that undermines your flooring’s durability. For a comprehensive understanding, consider reviewing this in-depth resource.
What Can Go Wrong When Installing Tiles or Hardwood Without Proper Preparation?
Many overlook the importance of meticulous surface preparation—cleaning, moisture testing, and fixing imperfections—assuming their subfloor is good enough. This oversight can cause tiles to crack, loosen, or develop unsightly grout lines over time. Hardwood floors installed over uneven surfaces may squeak, warp, or separate, especially if the subfloor wasn’t properly leveled. Proper preparation is not just a step but the foundation of long-lasting results. For tips on perfect installation, visit this article.
Have you ever fallen into this trap? Let me know in the comments. Mastering the nuances of floor leveling and installation can save you countless headaches, so don’t skip the details that matter most.
Maintaining your hardwood floors, tile, and flooring installations is crucial to ensure they stay beautiful and durable over the years. One of the best ways to keep your floors in top shape is by investing in quality tools and adopting a regular maintenance routine. Personally, I rely on a few specific tools that have proven indispensable in my projects, and I recommend them to anyone serious about flooring care.
Invest in a High-Quality Floor Sander
A powerful, yet gentle, floor sander is vital for refinishing hardwood floors. I use a drum sander with variable speed settings, which allows me to remove old finishes uniformly without damaging the wood underneath. This tool is perfect for restoring older floors, especially when combined with fine-grit sandpaper for a smooth finish. Regular sanding helps prevent dirt and grime buildup, making cleaning easier and prolonging the life of your flooring. For tips on hardwood refinishing, check out this expert guide.
Use a Laser Level for Precision
When installing new tiles or hardwood, a laser level ensures your surfaces are perfectly aligned. I personally prefer a cross-line laser with a self-leveling feature, which makes it easy to set reference points accurately. This tool significantly reduces errors, saving time and material costs in the long run. Plus, it helps you maintain a consistent grade across large areas for a professional finish. As flooring trends move towards even greater precision, investing in reliable laser levels will become even more essential.
Maintain with an Effective Floor Cleaning System
Keeping your floors clean without causing damage requires the right equipment. I swear by a microfiber mop combined with pH-neutral cleaning solutions; it’s gentle on finishes but effective at removing dirt. For deep cleaning, I use a steam cleaner designed specifically for hardwood and tile, which sanitizes without harsh chemicals. Regular cleaning prevents scratches and stains, extending the time between refinishing sessions. For ongoing care, check out these maintenance secrets.
Future Trends in Flooring Maintenance Tools
Looking ahead, I believe technology will further revolutionize how we maintain floors. Automated cleaning robots and smart sensors that monitor moisture and wear are on the horizon. These innovations could make routine maintenance more effortless and precise, helping homeowners catch issues early before they escalate. Embracing these tools now can give you a significant advantage in preserving your investment.
How do I keep my floors in top condition over time?
Establish a consistent cleaning schedule, use mats at entry points to reduce dirt ingress, and avoid heavy furniture dragging. Regular inspections help identify problems early, whether it’s a loose tile or a scratched hardwood surface. Applying protective finishes or sealants periodically can also restore shine and prevent moisture damage. I recommend scheduling professional inspections every few years, especially if your floors see heavy use. Remember, a little preventative care now can save you costly repairs later. For a comprehensive approach, explore this detailed guide.
Ready to take your flooring maintenance to the next level? Start by trying out a laser level for your next installation or renovation project. Precision tools make a real difference in achieving professional results that last. Your floors will thank you for it!
The Hardest Lesson I Learned About Floor Leveling and Installation
One of my most eye-opening experiences was realizing that even a tiny miscalculation during floor leveling can lead to major headaches—cracked tiles, squeaky hardwood, or furniture wobbling. It taught me that patience and precision are crucial, and rushing through surface prep or ignoring subtle dips often results in costly fixes later.
3 Myths About Floor Leveling That Held Me Back
I used to believe that pouring leveling compound was straightforward, but I learned the importance of surface preparation, choosing the right compound, and understanding the subfloor material. Missteps here can cause future failures, so investing time in research and proper techniques pays off.
What Experts Won’t Tell You About Achieving Flawless Floors
Many overlook how critical it is to evaluate your subfloor’s condition and moisture levels before starting. A clean, dry, and well-prepared surface ensures better adhesion and longevity. Skipping this step is a common mistake that can undermine even the best leveling efforts.
My Essential Toolkit for Floor Leveling and Installation
- Self-Leveling Compound: My go-to for large dips, providing a smooth, even surface with minimal effort.
- Laser Level: For precise alignment across expansive areas, saving time and reducing errors.
- Screed and Trowel: Critical for spreading and smoothing leveling compounds effectively.
- Fine-Grit Sander: Perfect for addressing minor imperfections after curing, ensuring a seamless finish.
Embracing the Future of Flooring Maintenance
Looking ahead, innovations like automated sensors and smart cleaning robots will revolutionize how we care for our floors. Investing in these tools now can help catch issues early and extend the lifespan of your hardwood or tile floors. Regular inspections, combined with quality tools, turn routine maintenance into a simple, rewarding task.
Your Turn to Take Action
Remember, mastering the nuances of floor leveling and installation isn’t just about aesthetics—it’s about ensuring durability and safety. When you prioritize proper preparation and invest in the right tools, your floors will stand the test of time. Ready to elevate your flooring game? Share your experiences or ask questions below—I’d love to hear your stories!