Imagine this: after hours of laying down what you thought was a flawless floor, you step back only to notice a noticeable slope or uneven patch. Frustrating, right? I’ve been there too. It’s that sinking feeling when you realize that your beautiful new hardwood or tile isn’t as perfect as you envisioned—and worse, it might not hold up over time. That was my lightbulb moment—understanding that proper leveling and installation aren’t just about aesthetics but about ensuring long-term durability and safety.
Why Proper Flooring Installation and Leveling Are Game-Changers
In my journey of home improvement, I learned that even a tiny mistake in leveling can lead to big problems down the road—cracks, creaky floors, or uneven wear. It turns out, ignoring the fundamentals of flooring installation can cost you a fortune in repairs and replacements. As the flooring industry evolves, experts emphasize that using proven techniques significantly enhances surface durability. For example, mastering precise floor leveling techniques is essential for a flawless finish that lasts for years. Did you know that approximately 70% of flooring failures are caused by improper leveling and installation? (Source: Home Improvement Journal)
Is Skipping Professional Help Really Saving You Money?
Early in my experience, I thought I could cut corners by avoiding professional guidance. I trusted my gut and some online tips, but I quickly realized that small missteps, like uneven substrate prep, can have outsized impacts—like uneven tile surfaces or squeaky hardwood floors. Trust me, investing in the right knowledge and techniques pays off. For instance, familiarizing yourself with hardwood and tile leveling tips can dramatically improve your results, saving headaches later. If you’re wondering whether DIY is viable, ask yourself: have you faced persistent unevenness despite multiple attempts? If yes, this post will help you avoid those pitfalls and craft floors that endure the test of time, style, and foot traffic. Now, let’s jump into the specific steps that will transform your flooring project from a risky gamble into a durable masterpiece.
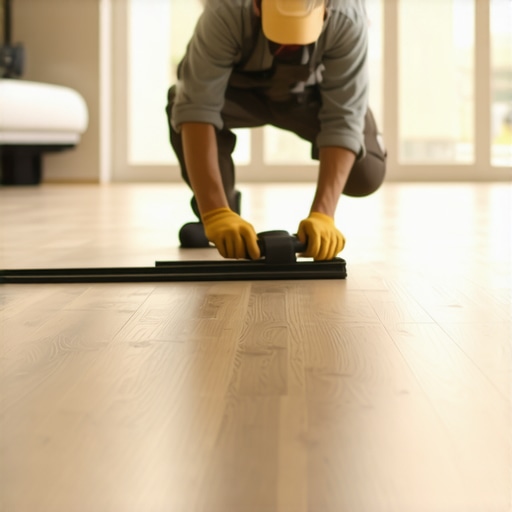
Prepare the Substrate Clearly and Methodically
Start by removing all debris, dust, and uneven spots from your existing surface. Use a floor scraper for loose materials and a vacuum for dust. Think of this as cleaning a canvas before painting; without a pristine base, your finish will suffer. I once overlooked this, and my newly laid tile cracked within months. To avoid repeating that mistake, ensure the surface is smooth, clean, and dry.
Assess and Identify Level Discrepancies
Use a long straightedge or a laser level to scan the entire area. Mark low and high spots with chalk or painter’s tape. This step is crucial—imagine trying to build on an uneven foundation, like trying to level a wobbly table. During my first attempt, I missed a few minor dips, which later became noticeable cracks. Accurate assessment prevents costly corrections later.
Choose the Right Leveling Materials
Select a high-quality self-leveling compound or underlayment suitable for your flooring type. For example, use a fast-setting, pumpable self-leveling underlayment for large areas, which simplifies the process. During a project, I used the wrong mix and had to redo parts due to inadequate flow, wasting time. Proper material selection ensures smooth, durable surfaces that can handle the foot traffic and stress.
Mix and Pour with Precision
Mix the leveling compound strictly according to manufacturer instructions, avoiding shortcuts. Use a drill with a paddle attachment for uniformity. Pour the mixture into the lowest areas first, then spread using a smoother or spreader. Picture pouring a pancake batter—pour slowly and evenly to prevent bubbles or gaps. When I poured unevenly, I ended up with high spots that required sanding, adding unnecessary work.
Spread and Smooth Out Effectively
Utilize a trowel or squeegee to work the compound into tight spots and edges. For large expanses, a gauge rake helps achieve consistent thickness. I once tried slinging the compound with a shovel, which led to inconsistent thicknesses—an unnecessary headache. Sharp, steady passes give a flat, level surface that’s ready for flooring installation.
Allow Adequate Curing Time
Patience pays off—wait the minimum curing period specified by the manufacturer, often 24-48 hours. Resist the temptation to walk on it, or you risk creating indentations or unevenness. I rushed my first curing, leaving footprints that marred the surface. Proper drying ensures long-term durability and a perfect foundation for your flooring.
Check the Flatness Post-Cure
Finally, re-examine the surface with a level or straightedge. Address any minor imperfections with additional material or sanding if necessary. Think of this as the final polish—attention to detail here guarantees a flawless finish. Skipping this step might cause issues during floor installation, leading to uneven wear or gaps over time.
By systematically following these steps, you turn a complex process into manageable tasks, minimizing errors. For more advanced tips on achieving professional-grade results, explore the detailed techniques at this resource. Remember, patience and precision are your best friends when laying a foundation that will last for decades.
Many homeowners believe that flooring installation is straightforward—simply lay the boards or tiles and you’re done. However, this oversimplification often leads to costly mistakes. A prevalent myth is that if the surface looks even, your flooring is correctly installed. In reality, subtle imperfections in substrate preparation or leveling can cause long-term issues that aren’t immediately visible. For example, superficial evaluation might overlook minor dips that can cause tiles to crack or hardwood planks to warp over time. This underscores the importance of precise floor leveling, as detailed in advanced leveling techniques, which can prevent these hidden problems. People often skip comprehensive assessment, assuming that visual checks suffice—don’t fall into this trap.
Why is mistaken about the role of moisture barriers?
Another common mistake involves ignoring or underestimating moisture barriers, especially in ground or basements. Many think that a good adhesive or leveling compound alone ensures durability. Yet, failure to address moisture can lead to wood swelling or tile popping, regardless of perfect leveling. Industry experts agree that proper moisture management, including vapor barriers, is critical, as highlighted in research from the floor leveling guide. Neglecting this aspect can undo painstaking installation work, leading to premature failure. Remember, a hidden nuance in installation is moisture control, which is often overlooked but vital for longevity.
Many assume that high-end materials are immune to installation errors, but even the most premium hardwood floors or tiles can fail if not installed on a properly prepared, leveled surface. For instance, using subpar leveling compounds or rushing the curing process can result in imperfections that compromise the entire floor. This is where advanced techniques in floor leveling can make a significant difference. Overcoming common pitfalls requires understanding the subtleties of substrate preparation, material compatibility, and curing times—details that can trip up DIY installers or even some professionals if unaware.
Additionally, misconceiving the importance of seamless transitions between different flooring materials often leads to uneven surfaces and height discrepancies. Expert tips emphasize meticulous planning and precise measurements to ensure smooth transitions, as detailed in professional installation strategies. These nuances, while subtle, have a profound impact on the appearance and durability of your floors. So, have you ever fallen into this trap? Let me know in the comments. Remember, mastering these hidden details is what separates a professional finish from amateurish results.
Invest in Precise Tools for Reliable Results
When I started taking flooring seriously, I quickly realized that quality tools are non-negotiable. For example, I swear by my 4-foot level from Bosch—I use it not just for initial assessments, but throughout the project to verify flatness after applying leveling compounds and during installation. Unlike cheaper alternatives, this level offers accuracy to within 0.5 mm over its length, ensuring I don’t miss minor imperfections that could cause long-term issues. Additionally, a laser level has become an indispensable part of my toolkit; I prefer a rotating laser model because it projects 360-degree reference points, which makes aligning tiles and hardwood planks seamless, especially in larger spaces. The precision these tools provide minimizes guesswork and helps me catch errors early, saving time and money.
Streamline Your Workflow with Reliable Software
While hands-on tools are critical, software solutions can elevate your project planning. I recommend using a digital leveling map—apps like LevelCam allow you to overlay measurements directly onto your phone’s camera feed. This is particularly useful in complex layouts or when working with challenging substrates, as it ensures the substrate’s unevenness is accurately documented and addressed before installation. I’ve found that combining physical measurements with software data leads to more reliable results, particularly when planning for multiple flooring types or preparing for future renovations. As technology advances, expect these tools to incorporate AI-driven diagnostics, making floor assessments even more precise in the future.
Maintain Your Tools to Ensure Longevity
Proper maintenance of your equipment isn’t just about preserving their lifespan but also about maintaining accuracy. After each project, I clean my levels and laser devices with a soft cloth, avoiding harsh chemicals that can damage sensitive components. I also calibrate my laser level annually—this step ensures its readings remain precise, and I follow manufacturer guidelines for calibration procedures. Regularly replacing batteries and storing tools in a protected case prevents damage and ensures they’re ready when needed. Remember, even the best tools are only as reliable as their maintenance routine. Keeping your gear calibrated and clean guarantees consistent, high-quality results, especially as your projects grow in complexity.
Plan for Scalability and Long-Term Use
If you’re considering scaling your flooring projects—say, upgrading several rooms or managing a renovation company—investing in professional-grade tools is essential. Modular leveling systems, for instance, allow you to adapt to different surface types and sizes, reducing the need for multiple separate devices. I also recommend acquiring a cordless, multi-purpose drill with variable speed controls; it’s invaluable for mixing compounds smoothly and securely installing fasteners without damaging the substrate. Such investments pay off over time, as they provide reliability for years to come. Additionally, implementing a routine check-up schedule for your tools ensures they remain in optimal condition, paving the way for consistent, durable results across all your projects. Ready to upgrade your toolkit? Try incorporating a laser level with adaptive features, as recommended in advanced leveling techniques, and see how it transforms your workflow.
What I Wish I Knew Before Starting
- One of the toughest lessons was realizing that even minor substrate imperfections could lead to major problems later. A perfectly leveled floor isn’t just about aesthetics—it’s about preventing cracks, squeaks, and premature wear. Trust me, investing time in detailed assessments from the start saved me countless headaches.
- Skimping on quality tools might seem tempting, but accurate measurements make all the difference. Using a reliable laser level and a sturdy straightedge consistently revealed subtle imperfections that standard tools often miss, guiding me toward better results.
- While tutorials and online tips are helpful, nothing beats understanding the nuances of materials and curing times. Each project taught me that patience in allowing compounds to cure properly guarantees long-lasting durability.
- Neglecting moisture barriers was a costly oversight in a few projects. Addressing moisture at the foundational level protects your investment and preserves the beauty of hardwood and tile floors for years.
- Finally, embracing the idea that professional techniques could be simplified for DIY is a game-changer. Following proven methods from trusted resources ensures you achieve professional-grade results without the hefty price tag.
Tools and Resources That Made a Difference
- My top recommendation is the comprehensive guide on precise floor leveling techniques. It offers step-by-step insights that transformed my approach to substrate preparation and leveling.
- Investing in a high-accuracy laser level and a quality straightedge has been invaluable. These tools provide real-time feedback, helping me spot even the tiniest discrepancies early on.
- Books like the ultimate guide to floor leveling serve as excellent references, reinforcing best practices and innovative techniques.
- Finally, online forums and professional communities have offered support and advice when I faced unique challenges—there’s immense value in learning from experienced installers’ shared experiences.
Take Charge of Your Floor Journey
Embarking on a flooring project can feel overwhelming, but armed with the right knowledge and tools, you’re well on your way to creating stunning, durable floors that last for decades. Remember, every mistake is a lesson in disguise—embrace the process and celebrate your progress.
Have you ever struggled with getting a level foundation? Share your experiences below, and let’s learn together to elevate our home projects to professional standards.
I totally relate to the importance of substrate preparation. In my first DIY project, I overlooked a dusty, uneven old surface, and although it seemed fine visually, the tiles cracked within a few months—such a costly lesson! Since then, I’ve learned that meticulous cleaning and assessment can save tons of frustration later. Using a laser level to identify dips and high spots has been a game-changer for me, especially in larger rooms. The keys seem to be patience and the right tools, like a quality self-leveling compound and precise measuring instruments. I’ve found that investing a little more in these supplies pays off in durability and finish. My question is, how do others manage moisture barriers when working in older homes or basements? I’ve heard that a vapor barrier can sometimes be overlooked, leading to unforeseen issues down the line, especially with hardwood floors. Would love to hear tips or experiences from the community.