
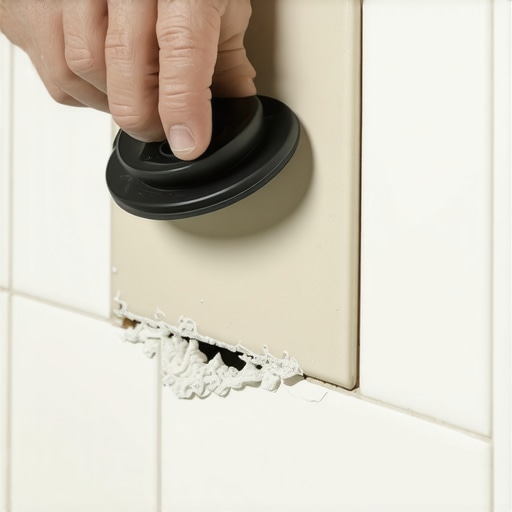
Ever stepped onto your vinyl or tile floor and felt that heartbreaking crunch beneath your foot? Or worse, have you cracked a tile just as you’re about to finish a home renovation? I remember the moment clearly—my heart sank as I saw that tiny chip turn into a jagged break. It was late at night, and the idea of ripping up the entire floor or hiring a pro seemed overwhelming and expensive. Then, lightbulb moment: a simple suction cup, often found gathering dust in my toolbox, could save the day.
The Power of a Suction Cup: My Unexpected Game-Changer
When confronted with a single broken tile, many homeowners like me feel stuck—either resigning to a less-than-perfect patch or risking more damage trying to pry out the piece. But what if I told you there’s a surprisingly effective way to replace that solitary tile without the mess, cost, or hassle of traditional methods? This technique isn’t just a quick fix; it’s a practical solution rooted in tried-and-true DIY hacks I’ve tested and perfected over time.
Is the Suction Cup Hack Actually Worth the Hype?
Initially, I was skeptical—who wouldn’t be? The idea of lifting a heavy ceramic tile with just a suction device sounded too simple. Early on, I made the mistake of trying to yank out a tile without softening the adhesive or preparing the surface, which only resulted in more cracks. Trust me, my mistake taught me that proper preparation and patience are key. But once I understood the technique—using a suction cup combined with the right leverage and adhesive—I was amazed at how smoothly the process became.
This approach not only saved me time and money, but it also minimized damage, kept the costs low, and gave me a sense of DIY empowerment. If you’ve ever faced the frustration of a chipped tile or cracked surface, this method could be a game-changer for you too. And, according to experts, these small, clever solutions can often make all the difference—saving homeowners hundreds in repair costs (source: TileTrendShop).
In the sections ahead, I’ll walk you through the step-by-step process of using a suction cup to replace a broken tile, along with tips to ensure your fix lasts. Ready to turn a potential disaster into a DIY victory? Let’s get started.
Preparing the Surface and Tools
Start by clearing the area around the damaged tile, removing any debris or dust. Gather a sturdy suction cup with a strong grip, a utility knife, adhesive suitable for your tile type, a putty knife, and a damp cloth. I remember one time when I used a basic bathroom suction cup, which initially slipped mid-use, so investing in a heavy-duty version paid off with a smoother lift.
Softening the Adhesive for a Cleaner Lift
Before applying the suction cup, slightly dampen the grout lines around the tile with a sponge. This moist environment helps loosen the adhesive, reducing the risk of cracking the tile or damaging neighboring ones. I learned this tip the hard way when I tried to pry out a tile dry and caused more chips, prolonging the repair process. Remember, patience and gentle prep are key to success.
Using the Suction Cup to Extract the Tile
Position the suction cup centered on the tile, pressing firmly to ensure a good seal. Give it a few gentle, steady pulls—think of it as a gentle tug on a stubborn jar lid rather than yanking a door off its hinges. When I replaced a cracked bathroom tile, I found that gradually increasing the pressure over multiple attempts minimized breakage. If the tile resists, pause, re-wet the grout, and try again. Be cautious not to apply excessive force, which can cause the tile to shatter or crack further.
Removing Residual Adhesive and Preparing for New Tile
Once the tile pops free, use a putty knife to scrape away old adhesive from the subfloor, taking care not to gouge the surface. Wipe any dust or debris with a damp cloth. Clear, smooth surfaces ensure good adhesion for the replacement tile. During my project, I used a utility blade to gently trim stubborn residual adhesive, which resulted in a flush, level surface—crucial for the next steps.
Applying New Adhesive and Setting the Tile
Spread a thin layer of tile adhesive onto the prepared subfloor using a notched trowel—match the trowel size to your tile dimensions, like a 1/4-inch notch for larger tiles. Press the new tile firmly into place, wiggling slightly to ensure full contact. Use tile spacers if necessary to align with surrounding tiles. I recommend a test fit first; during my last fix, dry-fitting the tile prevented misalignment later. Confirm proper placement before the adhesive sets.
Allowing Adhesive to Cure and Finishing Touches
Follow the manufacturer’s instructions for curing time, typically 24 hours, before walking on or grouting the tile. Keep the area free from moisture and disturbances. Once cured, remove spacers and apply grout, pressing it into the joints with a rubber float. Clean excess grout with a damp sponge before it hardens. After my experience grouting a patch, I found that sealing the grout helped prevent stains and water damage, prolonging the life of the repair. For comprehensive tips on maintaining your tile investment, visit Hardwood Floor Care Secrets.When it comes to installing floors—be it tile, hardwood, or other materials—many homeowners and even some professionals fall prey to misconceptions that can compromise quality and longevity. One prevalent myth is that leveling the subfloor is a tedious, unnecessary step. In reality, meticulous floor leveling is the foundation of a flawless finish; skipping this can lead to cracked tiles and uneven surfaces, issues that are costly and labor-intensive to fix later. **Don’t believe the myth that floor leveling is optional.** For advanced techniques and a foolproof approach, see [floor leveling tips to ensure perfection](https://tiletrendshop.com/precise-floor-leveling-techniques-to-achieve-flawless-surfaces).
Another widespread misunderstanding involves waterproofing. Many assume that sealing tiles or hardwood prevents water damage, but in truth, failing to properly prepare and install moisture barriers can cause extensive damage, especially in moisture-prone areas like kitchens and bathrooms. As a rule, always incorporate comprehensive waterproofing strategies—these are your best defense against costly repairs. As highlighted by industry experts, improper moisture management is one of the top causes of flooring failure. Learn more at [expert tips for moisture control](https://tiletrendshop.com/flooring-installation-mistakes-to-avoid-for-lasting-results).
A common trap for beginners is choosing the wrong adhesive or underlayment without understanding the material’s nuances. For instance, using standard thinset mortar with large-format porcelain tiles can lead to lippage or cracking due to inadequate bonding or movement absorption. It’s essential to match adhesives and underlayment to your specific materials and conditions—failure to do so can forever mar the beauty and durability of your floors. Dive into [tile selection tips for long-lasting installation](https://tiletrendshop.com/tile-selection-tips-for-elegant-hardwood-floors-in-2025) to avoid these pitfalls.
Now, a more sophisticated question for those looking to elevate their knowledge: *What are the effects of substrate movement on different flooring types, and how can detailed subfloor assessment prevent costly mistakes?* The answer lies in understanding that substrates—especially concrete and wooden subfloors—are dynamic. Minor shifts or moisture fluctuations can cause significant issues if not addressed during installation. Proper assessment and preparation, including understanding the specific requirements for each flooring type, are crucial. For an in-depth guide, check out [mastering floor preparation for perfect results](https://tiletrendshop.com/mastering-floor-leveling-pro-secrets-for-perfect-installations).
Remember, every mistake in the preparation phase amplifies over time, leading to expensive repairs or replacements. These misconceptions can be costly, but they’re also easily preventable once you recognize the nuances involved. Have you ever fallen into this trap? Let me know in the comments, and together we can elevate your flooring projects to professional standards.
Keeping Your Floors in Top Shape with the Right Tools
Maintaining pristine floors requires more than just occasional cleaning; it demands the right equipment and a proper routine. I’ve found that investing in high-quality tools not only extends the life of your flooring but also makes repairs more manageable. For instance, a calibrated laser level is indispensable for ensuring floors remain perfectly even over time, especially after significant structural shifts. I personally use the Bosch GCL100-80CG laser level because of its accuracy and ease of setup, which helps me spot uneven spots that could lead to cracks or gaps later on.
Why Specialized Sanders Save Your Hardwood
When it comes to hardwood floors, regular sanding tools just don’t cut it if you’re aiming for professional results. My go-to is the Mirka DEROS 5650CV. Its variable speed control and ergonomic design help me gently sand down scratches and surface wear without damaging the wood’s integrity. Plus, its dust extraction system keeps the workspace cleaner and safer. Using the right sander minimizes the risk of uneven patches, which can become glaringly obvious over months or years.
Staying Ahead with Routine Checks and Upkeep
Long-term flooring beauty isn’t a set-it-and-forget-it deal. Regular inspections are critical—look for signs of moisture infiltration, warping, or separation, especially in humid environments. Incorporating tools like a digital moisture meter (I recommend the Protimeter Aquant) helps me catch potential issues early, preventing costly repairs down the line. Scheduled maintenance with these devices ensures that your flooring remains stable and durable, saving you money and frustration over time.
How do I maintain my flooring over time?
Consistent cleaning with gentle methods, monitoring humidity levels with reliable tools, and addressing minor repairs promptly are essential. For hardwood, applying a protective finish periodically with a quality buffer prolongs its shine and resistance, as outlined in Hardwood Floor Care Secrets. For tile, sealing grout lines every few years and inspecting for cracks keeps everything in order. Staying proactive with these tools and practices minimizes future issues—think of it as routine health checks for your floors. A good tip is to schedule semi-annual inspections with a focus on areas prone to movement or moisture. These small steps make a substantial difference in keeping your floors looking fantastic for decades.
I encourage you to upgrade your maintenance routine by integrating one advanced tool, such as a moisture meter or laser level, and see how much easier it becomes to keep your floors in pristine condition. Looking ahead, I predict that smart, IoT-connected sensors will soon play a larger role in real-time monitoring of humidity and vibrations—technology that will help prevent issues before they start. Want to explore more about elevating your flooring game? Check out transforming your space with smart design for inspiration.
What I Wish I Knew Before Fixing a Broken Tile
The biggest lesson I learned is that patience truly is a virtue. Rushing to remove or replace a tile without proper prep almost always results in more damage. Taking the time to soften adhesive and gently lift tiles with a suction cup can save you a headache—and money—in the long run.
The One Tool That Changed My Repair Game
Investing in a high-quality, heavy-duty suction cup was a game-changer. It allows for a controlled lift, minimizing the risk of cracking surrounding tiles. This simple tool, combined with patience, can make a seemingly daunting task manageable even for DIY novices.
When DIY Means Thinking Differently
I realized that a lot of traditional repair methods are outdated or overly complicated. Sometimes, thinking outside the box—like using a suction cup for tile removal—can turn a tough job into an achievable project. This mindset shift has encouraged me to troubleshoot creatively whenever I face home repairs.
Curated Gems for Flooring Success
Over the years, I’ve come to trust certain resources that elevate my flooring projects. My go-to is this inspiring guide to tile design, which helps me choose the right style and material for each space. Proper tools like a quality notched trowel and moisture meter have also saved me from costly mistakes.
Your Floors, Your Canvas—Now Go Create
Remember, every professional was once a beginner. Your dedication and willingness to learn can turn even a small repair into a rewarding experience. With the right mindset and tools, you’re well on your way to achieving perfect, lasting results. So, why not give that tile repair a shot today? Your home—and your confidence—will thank you.