
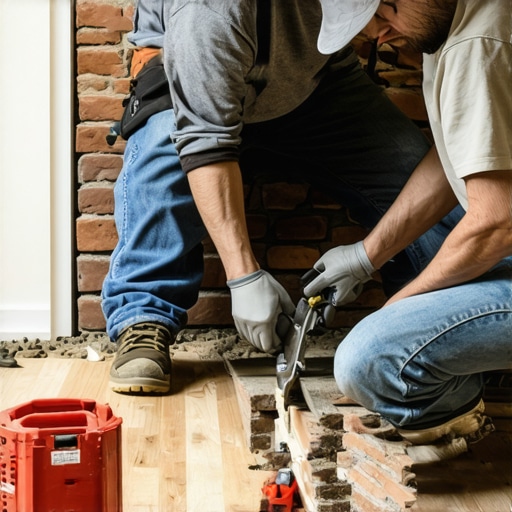
I vividly remember the moment I realized I had made a crucial mistake in my renovation journey. Standing in my living room, staring down at the uneven edge of the fireplace brick where I should have carefully undercut for my new hardwood flooring, I felt that sinking feeling of doubt. The gap was not just unsightly; it was a reminder of rushed decisions and incomplete knowledge. It was a lightbulb moment that changed how I approached floor installations forever.
The Sneaky Challenge of Fireplace Brick and Hardwood Floors
The truth is, getting a seamless transition between your fireplace and new flooring is more complicated than it looks. Fireplace brick, especially when it’s been there for years, can be stubborn. If you don’t undercut it properly, your hardwood planks won’t sit flush, leading to gaps, uneven edges, or worse, damage down the line.
Over time, I learned that the secret lies in the precise technique of undercutting the brick — a step often overlooked or underestimated by DIYers and even some pros. It’s an essential part of creating a clean, professional finish that stands the test of time. My own early mistakes—like trying to chisel away the brick without the proper tools—seriously hampered my project. That’s when I realized the importance of understanding the right method, and I want to share that insight with you today.
In this post, I’ll walk you through the correct way to undercut fireplace brick, ensuring your hardwood floors fit perfectly and last longer. From choosing the right tools to techniques that prevent damaging your brick or your floor, I’ll cover it all. Whether you’re tackling a renovation or just planning a new install, mastering this step can save you from headaches and costly corrections later on.
Is the Labor-Intensive Process Actually Worth the Effort?
I used to dismiss undercutting as a minor detail — until I saw the difference it made in the final look and durability of my floor. Early on, I made the mistake of rushing through this step, which resulted in uneven edges and visible gaps. That experience taught me that skipping or improperly performing this task can compromise the integrity of your entire flooring job. For more on avoiding common mistakes that plague flooring projects, check out this guide on installation pitfalls.
Now, with proper techniques under my belt, I can confidently say that undercutting is not just worth the effort — it’s essential. When done right, it ensures seamless, long-lasting results that enhance your home’s aesthetic and value. Ready to learn how to do it correctly? Let’s dive into the steps that will make your fireplace and hardwood transition flawless and durable.
Preparing Your Tools and Workspace
Before diving into undercutting, gather your essential tools: a reciprocating saw with a diamond blade or a handheld angle grinder fitted with a segmented diamond blade, and a sturdy chisel and hammer for refinement. Protect your surroundings with dust sheets and wear safety goggles and a dust mask. Clear the area of furniture and other obstructions to ensure a safe, unhindered workspace. Proper preparation is key to achieving a clean cut.
Measuring and Marking the Cut Line
Accurately measure the height and width where your hardwood will meet the fireplace brick. Using a straightedge or a chalk line, mark the precise undercut line on the brick. To prevent accidental overcutting, double-check measurements and consider making a light initial score with a masonry chisel. This step ensures your cut is aligned and consistent, which is crucial for a seamless transition.
The Actual Undercutting Process
Start the reciprocating saw or angle grinder and carefully cut along the marked line. Think of this like carving out a groove for a puzzle piece—precision is paramount. Maintain a steady hand and let the tool do the work, avoiding excessive pressure that could cause the blade to wander or chip the brick. Use short, controlled passes to remove material in layers, preventing heat buildup and splintering. During this process, keep the tool at a low speed for better control. Proper technique avoids damaging your brick or creating uneven surfaces.
Refinement with Chisel and Hammer
After the bulk removal, switch to a chisel and hammer to smooth and refine the edges. Lightly tap along the cut line, removing any remaining jaggedness or debris. Think of this as trimming the edges of a sculpture to perfect your handiwork. Be gentle to avoid fracturing the brick. For stubborn spots, use the chisel to gently pare away rough edges that the power tools might have missed. This step often is where my initial attempt failed—rushing here resulted in uneven surfaces, making subsequent flooring installation difficult.
Checking the Fit of Your Hardwood
Once the brick is adequately undercut, test-fit a few hardwood planks in the transition area. There should be a snug fit, with the plank sitting flush against the brick. If gaps appear, reassess your cut for areas needing a finer undercut or additional refinement. This trial step is like fitting a key into a lock—precision ensures smooth operation and a seamless look. Remember, patience during this phase prevents costly adjustments later.
Sealing and Finishing
Finally, seal the exposed brick edges with a suitable masonry sealant if necessary. This protects against moisture infiltration and maintains the integrity of the brick. Applying a thin bead of sealant along the cut edge creates a clean, professional finish—similar to sealing a well-crafted joint. Be sure to clean any excess to keep the area tidy, as detailed in hardwood floor care tips.
Many homeowners and even seasoned DIYers fall prey to misconceptions that can compromise the longevity and aesthetic of their floors. One widespread myth is that leveling a subfloor is always a straightforward process, but in reality, overlooking subtle imperfections can lead to lippage or uneven surfaces that become glaring over time. Contrary to popular belief, using a self-leveling compound isn’t a universal fix; the success depends heavily on proper surface prep and understanding the material’s limitations, as highlighted in expert guidance on [floor leveling techniques](https://tiletrendshop.com/precise-floor-leveling-techniques-to-achieve-flawless-surfaces).
Another common mistake is underestimating the importance of correct adhesive application for tile installation. Applying thinset too thick or unevenly can cause tiles to crack or pop loose, especially in high-traffic areas. The nuance here is in mastering the tackiness and consistency of your mortar, a detail often neglected amidst rushing to complete the project. For advanced tips, check out [best practices for tile adhesion](https://tiletrendshop.com/tile-installation-pointers-that-save-time-and-money) to prevent these costly issues.
Tile grout also presents a trap for the unwary. Many assume that grout color consistency is solely a matter of initial selection, but improper mixing, application, and sealing can lead to color variations and stains down the line. To avoid these pitfalls, it’s crucial to follow expert mixing ratios and sealing protocols, which are discussed comprehensively in [grout sealing and maintenance](https://tiletrendshop.com/hardwood-floor-care-secrets-to-longevity-and-shine).
Why does thinset sometimes peel or skin over?
This phenomenon often results from improper substrate prep or incompatible thinset formulations. For example, applying a standard thinset over a non-porous surface without primer can cause the adhesive to lose grip prematurely. Recognizing these nuances can save you from redoing entire sections. According to industry experts, selecting the right thinset type—such as modified versus unmodified—for specific substrates is vital, a topic explored in detail in [how to choose the best thinset](https://tiletrendshop.com/why-thinset-is-skinning-over-and-how-to-keep-it-sticky).
Moving beyond basic techniques, understanding the subtle interplay between materials and environmental conditions elevates your project from amateur to pro. For instance, temperature and humidity fluctuations can cause tiles to shift or crack if not properly accounted for during installation. Incorporating these considerations, as explained in [environmental factors affecting tile bonding](https://tiletrendshop.com/why-engineered-wood-buckles-more-often-than-solid-planks), is part of mastering advanced flooring installation.
Have you ever fallen into this trap? Let me know in the comments. Remember, meticulous attention to these nuances is what separates a durable, beautiful floor from a recurring headache. For a comprehensive guide on achieving flawless results, reviewing detailed strategies in [installing tiles like a pro](https://tiletrendshop.com/installing-tiles-like-a-pro-step-by-step-strategies-for-2025) can be invaluable.
Maintaining your flooring’s integrity over time is essential to preserving its beauty and functionality. One of the most effective ways to ensure longevity is by investing in the right tools and adopting practical maintenance routines. For hardwood floors, a high-quality vacuum with a soft brush attachment is my go-to. It gently lifts dirt and debris without scratching the surface, which is crucial because regular cleaning prevents abrasive particles from causing wear over years. For tile and grout, I rely on a steam cleaner with adjustable temperature settings—this allows me to sanitize without harsh chemicals that may degrade the grout or tile sealant.
How do I keep my flooring system working smoothly over the years?
The key lies in proactive maintenance: schedule regular inspections to identify minor issues like loose tiles or small gaps that can escalate if ignored. Applying a protective finish or sealant every few years, especially on hardwood, helps ward off moisture penetration and scratches. For uneven floors resulting from subfloor movement or settling, I favor a professional-grade self-leveling compound and a durable trowel — this combination allows for precise corrections, ensuring your floor remains flat and safe.
Looking ahead, technology is evolving with smart vacuum cleaners that map your space and adjust suction intelligently, reducing manual effort and improving cleaning efficiency. Additionally, advancements in floor-specific sealants promise longer-lasting protection against spills, wear, and scratches. Embracing these innovations can reduce maintenance time and extend the intervals between major repairs, making your investment more cost-effective in the long term.
What tips can keep my hardwood floors looking perfect for decades?
First, establish a routine of gentle cleaning and avoid excessive moisture—use a damp mop rather than soaking wet cleaning tools. Second, place felt pads under furniture feet to prevent dents and scratches. Third, control indoor humidity levels; hardwood reacts to moisture changes, often causing gaps or buckling. A dehumidifier or humidifier can help maintain a stable environment. For more expert guidance, reviewing hardwood floor maintenance tips can be invaluable—implementing even one new technique from this resource can dramatically improve your flooring’s lifespan.
Finally, consider investing in quality tools like a floor buffer with a soft pad — this can gently restore shine and smooth out minor scratches without the need for full refinishing. Remember, consistent upkeep using the right equipment not only prolongs the life of your floors but also keeps them looking pristine for years to come. As the industry advances, I predict a shift toward more automated maintenance solutions, like robotic floor cleaners integrated with IoT technology, which will customize cleaning schedules based on usage patterns. Starting with a simple upgrade, such as trying an advanced cleaning tip or tool today, can set the foundation for decades of beautiful, durable floors—so why not give that a try now?
Throughout my renovation journey, I’ve learned that paying attention to the smallest details can dramatically elevate the final result. One of the most insightful lessons was realizing the profound impact of meticulous undercutting of fireplace brick when installing hardwood flooring. Rushing through this step or neglecting it can lead to unsightly gaps and lasting frustrations. Embracing patience and precise technique transformed my approach, allowing me to achieve a flawless, professional finish that withstands the test of time. This experience cemented my belief that mastery of seemingly minor tasks is what truly separates amateur projects from expert craftsmanship. By sharing my journey, I hope to empower you to avoid common pitfalls and elevate your flooring project to the next level, making your space truly stand out.