
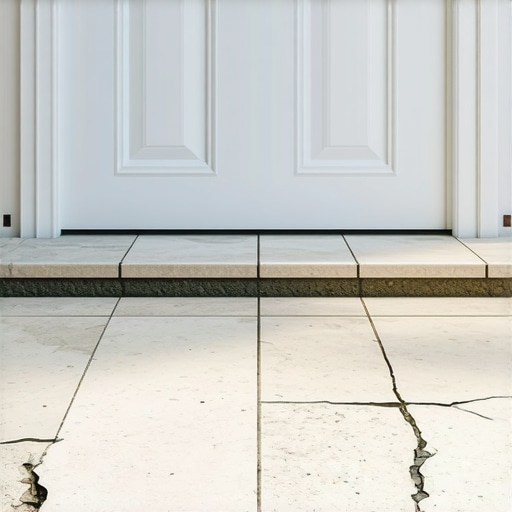
I remember the exact moment I realized I had a serious problem with my tile installation. I was stepping over the doorway—an area where I thought everything should be smooth and stable—and suddenly, I felt that unsettling click beneath my foot. Looking down, I saw a crack splitting across my large format tiles. It was a gut punch. After hours of careful planning, meticulous leveling, and choosing the perfect tiles, why had this one critical area failed?
Untangling the Mystery of Cracking Tiles at Doorways
If you’ve faced a similar issue—your beautiful, large-format tiles cracking right at the threshold—you’re not alone. This is a common frustration that can turn an elegant flooring project into a nightmare. The good news? With a little insight and the right techniques, you can prevent this problem from repeating in your home. Today, I’m going to share the core reasons behind doorway cracks and, more importantly, how to tackle them with proven solutions.
Is It Really Just Bad Luck or Poor Material?
Early in my journey, I blamed defective tiles or bad adhesive. Turns out, the problem isn’t always with the materials. Often, it’s about how the subfloor behaves under stress. The doorway area tends to be a natural weak spot because it experiences more movement—subtle shifts from settling, expansion and contraction, or even foot traffic. Studies have shown that improper floor leveling can increase stress points, leading to cracks in large tiles (source: Precise Floor Leveling Techniques).
Early on, I also made the mistake of rushing the installation without verifying that the subfloor was properly prepared. That oversight was a costly lesson. Proper assessment and preparation of the subfloor are crucial to prevent movement that causes tiles to crack over time. Now, let’s get to the core of why your doorways are vulnerable—and what you can do about it.
Ready to fix this once and for all? Let’s examine the specific causes and the tried-and-true methods to keep your floors pristine and crack-free.
Assess and Prepare the Subfloor
Start by inspecting your subfloor for movement or unevenness. Use a long straightedge or a level to identify high or low spots, especially near doorways where cracks often appear. If you notice irregularities, address them immediately by applying a suitable floor-leveling compound, following the instructions on this detailed guide. During my own project, I encountered an uneven subfloor that caused tiles to crack over time. After proper assessment, I applied self-leveling underlayment and let it cure thoroughly, which stabilized the surface and prevented future fractures.
Ensure Proper Subfloor Stability
Floor movement causes stress on tiles, especially at doorways where shifting is common. Secure loose or squeaky subfloor panels with screws, and replace damaged sections to eliminate wobbling. For plywood subfloors, consider installing a cement backer board to add rigidity. Remember that the subfloor must be firmly anchored; a loose base will lead to tile cracks. I once added a layer of uncoupling membrane over existing plywood to absorb movement, significantly reducing crack development in the finished tile floor.
Design for Expansion and Contraction
Large tiles are prone to cracking if they can’t expand naturally. Leave appropriate gaps around the perimeter and at doorways, typically 1/4 inch, to accommodate seasonal movement. Use proper expansion joint fillers or silicone caulking to allow flexibility without compromising aesthetics. In my last installation, I intentionally left a gap at the doorway threshold, then covered it with a baseboard, ensuring movement didn’t cause tiles to crack or buckle.
Apply Quality Adhesive and Proper Troweling Techniques
Choose a high-quality thinset mortar suitable for large-format tiles, and adhere to the manufacturer’s mixing instructions. Use the correct trowel size—often a serrated 1/4″ x 3/8″ trowel for large tiles—to create an even bedding layer. During my experience, I used a notched trowel that was too small, resulting in insufficient bonding and eventually cracking. Switching to the right size and technique improved adhesion and longevity.
Check and Maintain Leveling During Installation
Regularly verify the level of your tiles as you lay them. Use a level or laser line for accuracy. When you spot any unevenness, immediately adjust the tiles by pressing or shimmying them into place before the adhesive cures. I recall adjusting several tiles multiple times to achieve a perfect surface, which prevented uneven stress points that could crack under pressure.
Let the Adhesive Cure Without Disturbance
After placing the tiles, avoid walking or placing heavy objects on them until the mortar has cured thoroughly—usually 24 hours, per manufacturer instructions. Rushing this step can lead to shifting and cracking, especially in doorway areas.
Use Proper Grouting and Sealant Practices
Once the tiles are set, apply a grout suitable for large-format tiles. Opt for epoxy grout when moisture or stain resistance is crucial. Seal the grout lines after curing to prevent water infiltration, which can weaken the substrate and cause cracks. In my projects, sealing the grout proactively has prolonged the integrity of the floor and minimized crack risks over time.
Many homeowners assume that a perfectly level subfloor guarantees a flawless tile or hardwood installation. However, the truth is, the nuance lies in how you interpret and prepare that levelness. A common mistake is relying solely on surface-level measurements without considering the substrate’s behavior over time. For instance, even floors that appear true at first can develop cracks or squeaks if subfloor movement isn’t properly addressed. Experts like Dan Stulberg emphasize that understanding the underlying material properties and environmental factors—such as humidity fluctuations—is crucial for long-lasting results. Overlooking these subtle factors often leads to costly mistakes, like tiles cracking at doorways or hardwood planks gapping after seasonal changes. So, instead of just measuring for flatness, delve into the material’s resilience and the installation techniques that accommodate natural movement. Techniques like using uncoupling membranes or flexible sealants can absorb minor shifts, preventing stress buildup that causes damage. Think of it as emphasizing resilience over rigidity—an approach that extends the lifespan of your flooring. To master this, consider consulting detailed guides like floor leveling techniques and stay aware of common pitfalls in floor leveling challenges. Have you ever fallen into this trap? Let me know in the comments. Proper preparation and nuanced understanding can transform a good installation into a lasting masterpiece.
Keep Your Floors in Prime Condition with the Right Tools
Achieving a flawless flooring installation is just the beginning; maintaining it over time is equally crucial. Investing in high-quality tools not only simplifies long-term upkeep but also ensures your floors remain beautiful and durable. For instance, a precision moisture meter helps monitor humidity levels, preventing issues like warping or buckling in hardwoods. Personally, I rely on a reliable hygrometer to track environmental conditions, which guides when to perform routine maintenance or adjust indoor humidity.
Another indispensable tool is a specialized grout haze remover, which I use periodically to keep tiles looking pristine without damaging the surface. For hardwood floors, a soft microfiber mop combined with a pH-balanced cleaner prevents scratches and preserves the finish. Don’t underestimate the value of a good vacuum designed for hard surfaces, as it efficiently removes debris from grout lines and between tiles, extending their lifespan.
Embrace Routine Maintenance for Enduring Beauty
Consistent care is the backbone of flooring longevity. Regularly inspecting for signs of wear or damage allows you to address small issues before they escalate. For example, addressing loose tiles promptly with appropriate adhesive fixes prevents cracks from spreading. I recommend establishing a schedule for light cleaning and inspections—think of it as giving your floors a health check-up that keeps them resilient over the years.
Sealing grout lines every couple of years enhances water resistance and inhibits the growth of mold and mildew, particularly in moisture-prone areas. When it comes to hardwoods, refinishing or polishing every few years can restore their luster and protect against scratches. With tools like a orbital sander or a quality floor buffer, you can handle minor refinishing jobs yourself, saving money and extending the life of your investment.
Plan for Growth: Scaling Your Flooring Projects
If your DIY projects or renovation plans grow, understanding how to scale effectively is vital. Modular flooring systems, such as click-lock vinyl or engineered hardwood, are designed for easy expansion and repairs. These systems allow you to replace sections without relaying the entire floor, which is a huge time saver and cost-effective. I’ve found that maintaining a stockpile of matching materials and using precise tools—like a digital caliper for measuring plank width—makes scaling seamless.
Looking ahead, the trend points toward smart flooring systems embedded with sensors to monitor environmental conditions and even detect wear in real-time. Integrating these innovations could revolutionize how we preserve our floors. To stay ahead, explore professional-grade levelers and tools that adapt to both small repairs and large-scale renovations, ensuring your flooring remains both functional and stunning.
How do I maintain my flooring system over time?
One advanced tip is to utilize a moisture barrier beneath all installations to prevent water migration, which is especially important for areas prone to humidity fluctuations. Installing a high-quality vapor barrier can dramatically reduce issues like swelling and mold. Plus, regularly checking environmental conditions with a digital hygrometer helps you react proactively—think of it as a health monitor for your floors. For expert guidance on creating a resilient foundation, consider visiting this detailed floor leveling guide. Now’s a great time to implement a moisture barrier in your next project—take that step towards long-term flooring success!
What the Hardest Lesson About Floor Cracks Taught Me
- I once believed that perfect materials and flawless surface preparation alone could guarantee crack-free floors, but I learned that ignoring the subtle movements beneath the surface can undermine even the most meticulous installation.
- The importance of embracing natural expansion and contraction became clear when I realized that neglecting proper expansion joints often led to cracks, especially at doorways.
- Experience showed me that ongoing maintenance and monitoring environmental factors are crucial in preserving the integrity of tile and hardwood flooring over years, not just during installation.
Tools and Resources That Changed My Approach
- Investing in a digital moisture meter allowed me to stay ahead of humidity issues that cause flooring problems, making preventive care straightforward and effective.
- Using quality uncoupling membranes provided a reliable way to absorb movements, especially in large-format tile installations, preventing stress buildup.
- Reading guides like this detailed guide on floor leveling has been transformative, guiding me to prepare substrates that truly support long-lasting floors.
- High-quality adhesives and proper troweling techniques, coupled with routine leveling checks, have made a noticeable difference in floor durability and appearance.
Let Your Floors Inspire Your Next Move
Now that you’re equipped with insights that go beyond the basics, take the leap toward flawless and resilient flooring. Remember, every step you take in understanding the nuances of installation and care contributes to floors that stand the test of time. Whether you’re tackling a DIY project or working with professionals, applying this insider wisdom will make your flooring journey more rewarding. Ready to start your next flooring adventure? Share your plans or questions below—I’m excited to see how you elevate your space with confidence! For personalized guidance, don’t hesitate to reach out.