Ever laid down a new hardwood floor only to realize it wobbles or has an annoying hump in the middle? I’ve been there, and let me tell you, that lightbulb moment when I finally understood the importance of proper floor leveling changed everything. It’s frustrating to invest time, money, and effort, only to end up with a surface that looks uneven or worse, damages quickly. That experience made me realize why mastering the art of floor leveling matters so much in 2025, especially with the latest innovations and techniques that promise a flawless finish.
Why Skipping Floor Leveling Costs You More Than You Think
When I first started my home renovation journey, I thought a quick subfloor check was enough. I was wrong. Poorly leveled floors not only look bad but can also cause problems down the line—squeaks, cracks, and even structural issues. According to industry experts, improper leveling is one of the top reasons for premature floor failure. Learning how to do it right from the beginning can save you a ton of hassle and money later on.
Have You Faced This Problem Too?
If your previous projects have left you frustrated with uneven surfaces or cracked tiles, don’t worry—you’re not alone. Many homeowners and DIY enthusiasts make mistakes early in their projects, like neglecting to use the right tools or skipping the essential steps. I once tried to skip the primer when leveling, which was a rookie mistake I paid for with extra work and cost. To avoid this, I recommend checking out this guide for expert tips that truly make a difference.
In this post, I’ll walk you through the most effective strategies for 2025, so your hardwood floors or tiles turn out perfect—durable, beautiful, and free of those pesky uneven spots. Ready to become a floor leveling pro? Let’s dive into what it takes to achieve professional results at home.
Start with a Solid Foundation
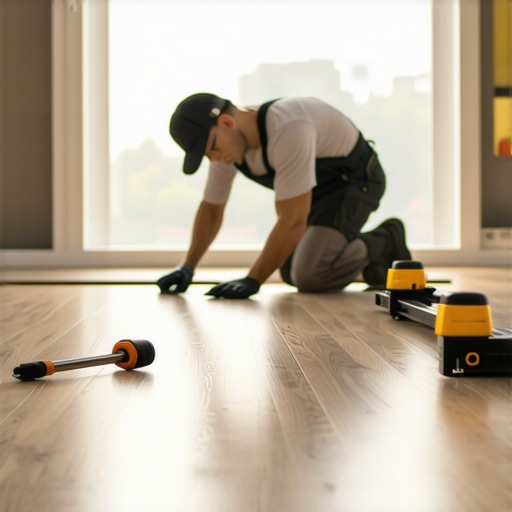
When I tackled my first hardwood flooring project, I learned that a perfectly level subfloor is the backbone of a stunning finish. To achieve this, I used a self-leveling compound, which spreads out like a thick pancake batter, filling in low spots and smoothing over bumps. Mix the compound as per the manufacturer’s instructions, and pour it onto the floor. Use a trowel or a gauge rake to spread it evenly, working quickly before it begins to set. Allow it to cure fully—typically 24 hours—before proceeding. This step is crucial, and skipping it can lead to uneven floors that crack or squeak over time. For detailed guidance, check out this expert guide to floor leveling.
Use the Right Tools to Measure and Adjust
Check for Level
After the initial leveling, I used a long spirit level and a laser level to identify remaining high or low spots. Place the level across different sections of the floor—if it tips, you’ve got uneven terrain. I discovered that a laser level offers incredible precision, especially in larger rooms. Mark any uneven areas with chalk or painter’s tape for easy reference. This step prevents surprises down the line, especially when installing tiles or hardwood planks. Precise measurement is the key to a flawless finish, so don’t skimp here.
Make Micro-Adjustments
For minor dips, I used a floor patch product, applying it with a trowel and feathering the edges. Think of it like smoothing icing on a cake—small, controlled strokes create a seamless surface. Once applied, I gently sanded the patches after they dried to blend with the surrounding floor. Remember, patience during this step saves you from future headaches, like uneven seams or cracking tiles. For more tips, visit this resource.
Prepare the Surface for Final Finish
Before laying your flooring material, ensure the entire surface is clean and free of dust. I swept and vacuumed thoroughly, then mopped with a damp cloth to remove any residual debris. A clean, dry surface is vital because dust particles can cause imperfections or prevent adhesives from bonding properly. If you’re installing tiles, double-check the flatness with a straightedge—any gaps greater than 1/8 inch should be filled. Cleanliness and precision here make all the difference in achieving that professional look and durability.
Remember, Practice Makes Perfect
In my early projects, I learned that even small missteps can ripple into big problems. Take your time with each step, measure twice, and don’t hesitate to rework areas that aren’t quite right. The investment in prep work pays off when you see a perfectly flat, durable floor that will last for years. For a comprehensive overview, explore this ultimate guide on floor leveling techniques.
Many homeowners and DIY enthusiasts believe they know the essentials of floor leveling, but there are some nuanced pitfalls that can undermine even the most prepared projects. Let’s dig deeper into the hidden nuances, myths, and mistakes that often trip people up in 2025, especially as new techniques and materials emerge.
Why the Biggest Myths About Floor Leveling Are Misleading
One of the most pervasive misconceptions is that a simple visual check is enough to ensure a floor is level. In reality, subtle dips of less than 1/8 inch can cause major issues over time, especially with hardwood and tile installations. Relying solely on the naked eye can lead you to overlook these minor, yet critical, imperfections. Using laser levels or long spirit levels, as I’ve found through experience, provides a much more reliable assessment. For more detailed insights, check out this comprehensive guide.
Common Mistakes That Can Sabotage Your Floor
Another trap is neglecting the curing time of leveling compounds or patching products. Rushing through these steps can leave you with soft spots or uneven surfaces that settle over time. It’s tempting to proceed quickly, but patience pays off. I’ve learned that waiting at least 24 hours, sometimes longer under humid conditions, ensures stability and smoothness. Additionally, misusing tools like trowels or not feathering edges properly can create high spots or ridges that compromise the final finish. Precision during application is key. For advanced tips on application techniques, visit this expert resource.
What About Advanced Tech and Materials That Many Overlook
In 2025, innovative leveling products such as self-healing compounds and ultra-fast curing formulas are transforming the game. However, many overlook the importance of surface prep before applying these materials. Dust, oil, or residual moisture can ruin even the best products. I always recommend thorough cleaning and testing moisture levels beforehand. Also, don’t forget that temperature and humidity can significantly impact curing times and adhesion. Experts emphasize that understanding these nuances can make or break your project. Learn more from this expert guide.
In sum, mastering the art of floor leveling goes beyond the basics—pay attention to detail, use the right tools, respect curing times, and stay informed about new materials. Have you ever fallen into this trap? Let me know in the comments.
Keeping your floor leveling work in top shape over time requires more than just the initial effort. It involves selecting the right tools, performing regular maintenance, and staying informed about new techniques to ensure long-term durability. As a DIY enthusiast or professional, I’ve found that investing in quality equipment and adopting a routine maintenance schedule can significantly extend the life of your floors.
Invest in Precision Measuring Tools
For maintaining perfectly leveled floors, I rely on a high-quality laser level like the Bosch GLL 3-80. Its accuracy and ease of use make it invaluable for periodic checks, especially when working on large surfaces. Unlike traditional spirit levels, laser levels project a continuous line across the room, helping you identify any deviations instantly. This tool is particularly useful in detecting subtle dips that might develop over time due to shifting subfloors or moisture issues. Regularly checking your floors with a laser level can help catch problems early before they escalate, saving you costly repairs down the line. For more on choosing the best tools, see this resource.
Maintain Your Tools for Consistent Results
Proper maintenance of your leveling products and tools is critical. I always clean my trowels and mixing buckets after each project to prevent residue buildup that can affect application quality. For power tools, I ensure blades and bits are sharp and free of debris. These small steps keep tools functioning accurately, which directly impacts the quality of your floor leveling work. Additionally, storing materials in a dry, temperature-controlled environment prevents premature curing and deterioration. If you’re using self-leveling compounds frequently, I recommend calibrating your mixing ratios periodically, as inconsistent mixing can lead to uneven curing and surface imperfections. Staying diligent with maintenance ensures your tools perform reliably and your floors remain level over the years.
Stay Updated with Emerging Materials
In 2025, new leveling compounds and adhesives are entering the market, promising faster curing times and better adhesion. I’ve been experimenting with self-healing compounds that can automatically fill minor cracks, reducing future maintenance. Learning how to use these innovative materials effectively can give you an edge, especially for larger or more complex projects. Make sure to follow industry updates and test new products on small sections before full application. This proactive approach allows you to stay ahead of potential issues and ensures your floors are not only level but also resilient against future shifts or damages. For detailed product insights, check this guide.
How do I maintain my floors over time?
Regular cleaning is fundamental — use a damp microfiber mop to remove dust and debris, avoiding excess moisture that can cause swelling or shifting of subfloors. Inspect your floors periodically with a laser level to identify any dips or uneven spots early. Address minor issues promptly by reapplying patching compounds or adjusting loose tiles before they become major problems. Additionally, controlling humidity levels in your home helps prevent wood floors from expanding or contracting unevenly. I recommend setting your home’s humidity to around 40-50% for optimal stability. Embracing these maintenance habits keeps your floors in pristine condition and preserves the investment for years to come. For more detailed care routines, visit this article.
In conclusion, combining the right tools, diligent maintenance, and staying abreast of cutting-edge materials will ensure your floor leveling remains effective over the long term. Don’t hesitate to try out advanced tools like laser levels or experiment with innovative compounds—these small investments can make a big difference in the durability and appearance of your floors. Ready to elevate your flooring game? Start with precision measuring and regular checks — your future self will thank you for it!
The Hardest Lesson I Learned About Floor Leveling
One of the biggest surprises I encountered was how even a tiny dip of less than 1/8 inch can cause major issues over time. I used to rely on visual checks alone, but I quickly learned that precision tools like laser levels are game-changers—saving me from costly mistakes later. This lightbulb moment taught me to never underestimate the importance of accurate measurement.
3 Myths About Floor Leveling That Held Me Back
I used to think that rushing through the curing process wouldn’t matter, but I found out the hard way that patience is vital. Waiting at least 24 hours ensures stability and prevents future cracks or dips. Also, I believed surface prep was optional—until I realized dust or moisture can sabotage even the best materials. Now, I always clean thoroughly before applying leveling compounds or patching products.
What Experts Won’t Tell You About Achieving Flawless Floors
Many overlook the latest innovations like self-healing compounds that automatically fill minor cracks. Using these can extend the life of your floors significantly. However, surface prep remains crucial — clean and test moisture levels before application. Understanding these nuances has transformed my approach, giving me confidence that my floors will stand the test of time.
Curated Recommendations for Floor Leveling Success
My Essential Toolkit for Floor Leveling includes a high-quality laser level like the Bosch GLL 3-80, which I trust for its accuracy and ease of use. It helps me detect even subtle dips early, saving time and effort. I also swear by professional-grade self-leveling compounds, which cure faster and provide a more durable finish. For learning proper techniques, I recommend exploring this comprehensive guide. Finally, regular maintenance tools like a microfiber mop and moisture tester help me keep my floors in top shape for years to come.
Don’t Be Afraid to Start Your Floor Leveling Journey
Achieving perfectly leveled floors in 2025 is within your reach—just remember to measure accurately, use the right tools, and stay patient. Every project I’ve completed has boosted my confidence and improved my home’s comfort and beauty. So, why not take that first step today? Your future self will thank you for investing in floors that last a lifetime.
This post really hit home for me, especially the emphasis on precision tools like laser levels. I’ve learned from my own projects that even a small dip can cause big issues down the line. I once rushed the curing process and ended up with cracks that took longer to fix, so patience truly pays off. I’m curious, does anyone have experience with the newest self-healing leveling compounds? I’ve heard they can save a lot of headache, but I’d love to hear if they live up to the hype in real-world applications. Also, proper surface prep seems to be often overlooked, but I now know it’s a crucial step before applying any leveling products. What’s your go-to method for ensuring your subfloor is ready for the perfect finish? Overall, this guide is a fantastic resource for anyone looking to take their flooring projects to the next level in 2025.
This post resonates with me, especially the part about how even tiny dips can cause big problems in the long run. I recently finished a project where I thought minor unevenness wouldn’t matter, but after a few months, I started noticing squeaks and slight cracks. It was a lesson learned the hard way about how critical meticulous prep and precise leveling are. I’ve been curious about these self-healing compounds myself—they sound like a game-changer for reducing future maintenance. Has anyone tried them on larger floors, and do they really hold up over time?
As for surface prep, I always make a point to thoroughly clean and test moisture levels before applying any compounds. Do others have tips for ensuring the subfloor stays stable over the years, especially in humid climates? I’d love to hear about techniques or products that have worked well for longevity. It’s amazing how much attention to detail can make or break the entire project. Thanks for sharing such an insightful guide—definitely a must-read for DIYers and pros alike!
This post really nails a crucial aspect of flooring that often gets overlooked by DIYers like myself. I completely agree that a perfectly leveled subfloor is the foundation of any successful hardwood or tile installation. I’ve had my own share of issues with uneven floors, especially when rushing through the process and skipping thorough measurement or proper curing times. Using laser levels has been a game-changer for me—I can’t recommend them enough for detecting those tiny dips that the eye can’t see. I’m also intrigued by the mention of self-healing compounds; I’ve read a bit about them but haven’t tried any yet. Have any readers here used them on large projects? How did they perform under real conditions?
To me, surface prep is everything. Cleaning and moisture testing might seem straightforward but can make or break the final result. Do others have favorite products or techniques for quick yet thorough prep? Overall, this guide provides invaluable insights for anyone looking to achieve a flawless, durable finish in 2025 and beyond.