I remember the frustration vividly—spending hours laying down beautiful tiles only to see them crack or discolor within a few years. I thought I was doing everything right, following what everyone said was best. But the truth is, I overlooked some critical details that made all the difference. That lightbulb moment changed my entire approach, and I want to share it with you because, believe me, lasting beauty isn’t just about choosing the right material—it’s about installing it properly and maintaining it over time.
Why Proper Installation Matters More Than Ever
In 2025, the market is flooded with stunning tile and hardwood options that can elevate any space. But even the most beautiful floors can fall apart if not installed correctly. A shoddy job can lead to uneven surfaces, cracked tiles, or warped floors—problems that are costly and frustrating to fix later. According to experts, many common flooring issues stem from improper leveling and inadequate surface preparation. I learned this the hard way when I skipped the crucial step of floor leveling and paid the price when my tiles started to crack after just a year. So, if you want your investment to stand the test of time, understanding the importance of proper installation is key.
Is It Really Worth the Extra Effort and Cost?
Honestly, I was skeptical at first. I thought, “How much difference can a few extra steps make?” Turns out, quite a lot. Skipping critical procedures like precise floor leveling or using the right adhesives can drastically reduce the lifespan of your floors. In fact, many homeowners find that investing in quality installation techniques saves money in the long run—fewer repairs, less hassle, and a more stunning finish. If you’re like I was, questioning whether it’s worth the effort, I suggest checking out authoritative tips on floor leveling techniques to see how small details lead to big results.
Now, let’s walk through some of the most effective tips and tricks I’ve picked up over the years. These strategies will help you achieve professional-quality results and ensure your floors stay beautiful in 2025 and beyond. Ready to dive into the details? Let’s get started and transform your space with confidence.
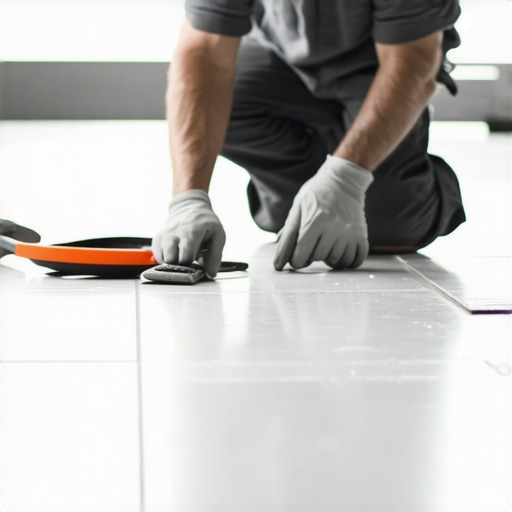
Prepare the Surface Rigorously
Start by removing all furniture and debris from the area. Use a high-quality floor scraper to eliminate old adhesives or coatings, ensuring a clean base. Next, inspect the subfloor for unevenness or damage; these issues can cause future cracks or warping. Apply a self-leveling compound like those discussed in floor leveling techniques to create a perfectly flat surface. I once skipped this step in a small bathroom, thinking it was unnecessary, only to see the tiles crack within months. The fix involved extensive grinding and re-leveling, which was costly and time-consuming. Proper surface prep is your best defense against such problems.
Use the Right Tools and Materials
Invest in quality tools—like a calibrated tile cutter, a notched trowel, and a rubber mallet. When choosing adhesives or mortars, match them specifically to your material; hardwood requires different sealants compared to tiles. For hardwood floors, opt for adhesives that allow for slight expansion and contraction, preventing gaps and buckling. For tiles, ensure the mortar is suitable for the type of tile and subfloor. I learned this the hard way when I used an all-purpose adhesive that caused my hardwood to squeak and warp. Check details in hardwood installation tips for guidance.
Lay the Material with Precision
Begin by planning your layout. Use a chalk line or laser level to mark reference lines, ensuring symmetry and straightness. When laying tiles, start from the center of the room and work outward, so cuts are less noticeable. Keep joints consistent with spacers, and periodically check your work with a level. For hardwood, stagger planks in a brick pattern to improve stability and visual appeal. I once installed a tile floor starting from one corner and didn’t double-check alignment; the result was a noticeable crooked edge that I had to fix later. Precise planning avoids such mishaps.
Apply Finishing Touches Properly
Once the material is laid, allow it to cure fully before walking on it. Follow manufacturer instructions for drying times. Seal the surface with appropriate coatings—like a durable polyurethane for hardwood or a penetrating sealant for tiles—to protect against moisture and wear. Regular maintenance prolongs their life. For hardwood, I recommend checking out hardwood care secrets. During my last project, I applied a high-quality sealant that kept my floors shining and protected from scratches for years, proving that finishing touches are worth the effort.
Schedule Regular Maintenance
Cleaning your floors with appropriate products is essential. Use gentle, pH-balanced cleaners to avoid damaging the surface. For hardwood, avoid excessive water; instead, use a damp mop and buff regularly with a soft cloth. For tiles, clean grout lines to prevent discoloration. I learned this lesson when ignoring grout maintenance led to stubborn stains, which only came out after a thorough cleaning with specialized grout cleaners. Regular upkeep keeps floors looking new and lasting longer. For tailored advice, check floor care tips.
Many homeowners believe that choosing the right materials and following basic installation steps guarantees long-lasting floors. However, even seasoned DIYers and professionals often fall prey to nuanced pitfalls that can undermine their efforts. Let’s dig deeper into what most people get wrong about flooring installation and how to avoid common traps that can lead to costly repairs down the line.
Why Overconfidence Can Sabotage Your Flooring Project
One of the biggest myths is that proper tools and materials alone are enough for a flawless finish. In reality, the devil is in the details. For example, the assumption that surface preparation is a quick step often leads to overlooked issues like residual debris or uneven subfloors. This oversight can cause tiles or hardwood planks to crack, warp, or detach prematurely. Experts emphasize that meticulous surface assessment and correction are essential, as noted in the ultimate floor leveling guide. Skipping this step is an advanced mistake many make, but it’s one that can be easily prevented with proper planning.
Common Myth: All Adhesives Are Created Equal
Another misconception is that generic adhesives work universally across different flooring types. In reality, using the wrong adhesive can drastically reduce the durability of your installation. For instance, hardwood floors require adhesives that accommodate expansion and contraction, while tiles need a specific mortar suitable for their weight and surface. Choosing the wrong product not only affects longevity but can also void warranties. To avoid this, consult with an expert or reliable sources like professional installation strategies to ensure compatibility.
Why Cutting Corners on Joints and Alignment Hurts in the Long Run
Many installers rush through laying out the tiles or planks, neglecting the importance of precise alignment. This can lead to uneven joints, crooked lines, and uneven wear over time. Advanced installers understand that using laser levels and spacers correctly is crucial for a seamless look and structural stability. It’s a small detail that makes a significant difference, especially in larger spaces. Remember, a misaligned floor might seem minor initially, but it can cause stress points that crack or warp your flooring. Be patient and double-check your measurements at every step, as explained in tile installation tips.
Have you ever fallen into this trap? Let me know in the comments.
Understanding these nuanced mistakes can save you time, money, and frustration. When in doubt, consulting with experts or referring to comprehensive guides like contact us can make all the difference. Remember, successful flooring isn’t just about material selection; it’s about precision, patience, and attention to detail at every stage of the process.
How do I keep my floors in top condition over time?
Maintaining your flooring is crucial to preserving its beauty and durability. I rely heavily on specific tools and techniques that I personally find effective. For hardwood floors, I always use a microfiber mop combined with a pH-balanced cleaner, which is gentle enough to prevent damage but effective at removing dirt. Regular sweeping with a soft-bristled broom also helps keep debris from scratching the surface. For tiles, I recommend using a grout brush and a steam cleaner periodically to prevent buildup and discoloration. These tools enable me to perform routine cleaning efficiently and without risking damage, ensuring my floors stay pristine for years.
Investing in quality equipment makes a difference
Beyond cleaning, proper maintenance involves specialized equipment. For example, I use a floor buffer with a soft pad to restore shine on hardwood surfaces, especially after refinishing. When applying sealants or touch-up finishes, I prefer high-quality foam brushes and microfiber cloths, which I find reduce streaks and ensure smooth application. These tools might seem minor, but they make a significant impact on the overall appearance and longevity of your floors. As trends evolve, I expect smart cleaning devices—like robotic vacuums with mapping capabilities—to become standard, simplifying maintenance routines even further.
Long-term results come from consistent care
Consistent maintenance is key. I schedule bi-annual deep cleanings and inspections, checking for signs of wear or damage. When I notice scratches or dullness, I use a dedicated hardwood or tile refurbishing kit, which includes fine grit pads and touch-up stain pens. Proper storage and handling of furniture pads also prevent gouges and scratches over time. For those who want to scale their efforts, investing in an all-in-one floor maintenance system can streamline the process, combining cleaning, polishing, and sealing functions. Remember, the best way to keep your floors working for decades is to stay proactive with regular checkups and timely repairs.
What advanced maintenance techniques should I consider?
Looking ahead, I predict a rise in AI-powered floor monitoring systems that can detect issues before they become visible. Additionally, employing nano-coatings that provide self-healing properties or resist stains could revolutionize maintenance routines. If you’re eager to try a proven method, I recommend starting with a high-quality floor buffer and a professional-grade polish on your hardwood floors—it’s an easy upgrade that yields noticeable results. For expert advice and to explore advanced options, don’t hesitate to contact us. Remember, maintaining your floors isn’t just about appearance; it’s about extending their life and maximizing your investment.
The Hardest Lesson I Learned About Flooring Durability
One of the toughest lessons I faced was realizing that even the best materials can fail if not installed with precision. I underestimated the importance of surface preparation, which led to cracked tiles and warped hardwoods within just a year. This experience taught me that meticulous surface assessment and correction are non-negotiable for lasting results. It’s a lesson I wish I’d learned sooner, and it’s one I want to share with you so you can avoid the costly mistakes I made.
3 Myths About Flooring Installation That Held Me Back
For years, I believed that using generic adhesives was enough and that quick installation would do. Turns out, these myths can sabotage your project’s long-term success. I discovered that choosing the right adhesive for your flooring type and taking the time for accurate joint alignment are crucial. These insights came from deep dives into expert strategies, like those found in the ultimate floor leveling guide. Busting these myths opened my eyes to the real work behind durable flooring.
The Unexpected Cost of Cutting Corners on Details
I used to rush through laying out tiles and ignored the importance of laser levels and spacers. The result was uneven joints that looked unprofessional and caused uneven wear over time. It wasn’t until I slowed down and double-checked every measurement that I saw a dramatic improvement. This experience underscored that patience and attention to detail are the secret weapons for beautiful, lasting floors. Remember, small mistakes in alignment can lead to big problems later, so take your time and measure twice.
My Favorite Tools That Make Maintenance Easier
Maintaining floors in top condition requires the right tools. I swear by a microfiber mop combined with a pH-balanced cleaner for hardwood, and a grout brush with a steam cleaner for tiles. These tools help me keep my floors looking new without risking damage. Investing in quality equipment, like a floor buffer or professional-grade sealants, has paid off by extending the life and beauty of my floors. As technology advances, I’m excited about smart cleaning gadgets that could revolutionize maintenance routines even further.
What I Would Do Differently Next Time
If I had to start over, I’d prioritize surface prep even more and double-check every measurement during installation. I would also stay proactive with regular maintenance, scheduling deep cleanings and inspections to catch issues early. The key is consistent care and the willingness to learn from every project. For those eager to elevate their flooring game, reaching out to experts through contact us can provide invaluable guidance. Remember, mastery comes from experience—and a commitment to doing it right from the start.
Reading through this post really resonated with me, especially the emphasis on surface preparation. I once skipped a detailed leveling process for a small kitchen upgrade and ended up with cracked tiles within a year! It was a costly lesson that taught me the importance of meticulous prep work. I appreciate the detailed tips on using the right tools and materials—these really make a difference. I’ve found that investing in quality adhesives and precise layout planning not only boosts durability but also gives a much more professional finish. Has anyone here tried using laser levels for larger projects? I’d love to hear if it’s worth the investment for home use or if simpler tools suffice, especially when working on more extensive spaces. Overall, this article underscores that patience and attention to detail are key to lasting results, and I couldn’t agree more.
This article hits the mark— I’ve learned the hard way that proper surface preparation is everything. I once rushed through leveling a large dining room, thinking I’d save time, only to notice uneven tiles after a few months. It was a reminder that attention to detail upfront really pays off in durability and appearance over the long haul. I also found that investing in laser levels and quality adhesives made a huge difference, especially in larger spaces where precision is even more critical. That said, I’m curious—does anyone have recommendations for budget-friendly tools that still deliver accuracy? Sometimes extensive equipment can be daunting for DIYers. Overall, I think the key takeaway is patience and meticulousness. Has anyone experimented with innovative tools or techniques recently that boosted their installation results? Would love to hear your experiences and suggestions.
Reading this post reminded me of my last home renovation project, where I underestimated the importance of surface preparation. I skipped a thorough leveling process, thinking it wouldn’t make that much difference, but within a year, I started noticing cracks in the tiles. That was a costly mistake that I learned to avoid now. Since then, I’ve invested more time in properly assessing and preparing the subfloor, which has paid off significantly. I also started using laser levels for larger projects—they help me ensure straight and even installation every time, especially in bigger spaces. Has anyone here found that a particular brand or type of laser level works best for DIY projects? I’m curious about budget options that still deliver reliable accuracy. Attending to small details and using the right tools seem to be key for long-lasting results, and I’d love to hear about others’ experiences with different equipment or techniques that made a difference for them.