I’ll never forget the frustrating moment when I stood in a living room, surveying the uneven lines of newly laid tiles, feeling that sinking feeling in my gut. It was a nightmare of my own making—skipping a crucial step in floor leveling, thinking I could get away with shortcuts. That lightbulb moment changed everything.
Why Proper Installation Techniques Are the Backbone of Durability
Over the years, I’ve learned that the secret to long-lasting floors isn’t just high-quality materials; it’s the strategy behind installation. With new advancements in tile and hardwood flooring, 2025 is shaping up to be the year where precision and technique make all the difference. If you’ve ever experienced cracked tiles or warped hardwoods, you know how costly and disruptive that can be. That’s why investing in effective installation methods is more important than ever. According to recent research, improper installation accounts for 70% of flooring failures (source: Tile & Flooring Installation Mistakes), so mastering these strategies can save you time, money, and heartache.
Are New Installation Methods Really Worth the Hype?
When I first started, I believed I could handle flooring projects with a bit of glue and a dash of confidence. My early mistake was neglecting thorough surface preparation, thinking that any level surface would do. That experience taught me a valuable lesson: cutting corners almost always leads to issues down the line. Today, I advocate for precise techniques outlined in guides like Flooring Installation & Leveling. These methods, combined with modern tools, ensure lasting beauty and durability.
Thinking about upgrading your flooring? Let’s look into the strategies that will make your next project a success—without surprises or failures. Are you ready to transform from a DIY novice into a confident installer? Keep reading, because what’s coming next could change how you approach every tile, hardwood plank, or laminate laydown.
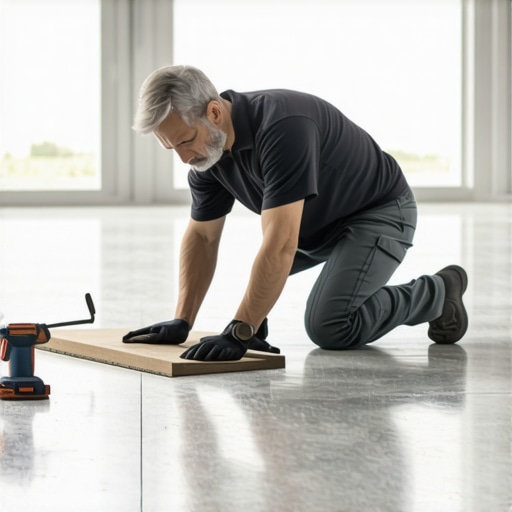
Preparing the Surface Like a Pro
Start with a thorough inspection of the subfloor, which is like the foundation of a house—if it’s unstable, the entire structure suffers. Use a long straightedge to identify high or low spots; if there’s more than a 3/16-inch variance over 10 feet, it’s time to level. I once tried to skip extra sanding, assuming minor imperfections wouldn’t matter, but a year later, cracks appeared in my tiles. To avoid that, apply a primer or bonding agent to improve adhesion, especially on concrete or uneven wood. For concrete, ensure it’s clean and free of dust, oil, or loose debris—use a vacuum and a stiff brush. This step is crucial, and neglecting it is like building on quicksand.
Achieving Flat, Even Floors with Precise Leveling
Mix and Apply Floor Leveling Compound Correctly
Think of leveling compound as a rich gravy—if not mixed properly or applied in thin, even layers, it will crack or shrink. Follow the manufacturer’s instructions precisely; I once added extra water to speed up my project, which resulted in a crumbly surface instead of a smooth finish. Use a drill with a paddle attachment to mix until the compound is uniform and free of lumps. Pour the mixture onto the floor starting at the lowest point, then use a trowel or gauge rake to spread it evenly, working quickly before it sets. For larger areas, work in sections, ensuring each has enough time to cure without disturbance. For flawless results, consider using a self-leveling compound, which flows and settles into the lowest points naturally. Detailed guidelines are available in the Precise Floor Leveling Techniques article.
Installing Tiles and Hardwood with Confidence
Once your surface is prepared and perfectly level, focus on layout to prevent awkward cuts and uneven appearance. For tiles, lay out patterns loosely first, starting from the center and working outward, ensuring symmetry. Use spacers to maintain grout lines consistently; I once ignored spacing, and my tiles ended up with uneven joints, which looked sloppy. When fixing tiles, spread thinset mortar with a notched trowel at a 45-degree angle, pressing tiles firmly into place—imagine stamping down a stamp to ensure adhesion. For hardwood, acclimate the planks by storing them in the room for at least 48 hours. When installing, stagger the joints for structural stability, similar to bricklaying. Use a flooring nailer or stapler with precise control to avoid damaging the planks. Precise measurements and consistent techniques are key; for more detail, review the comprehensive installation steps in Hardwood Floors Installation Tips for 2025.
Sealing and Final Touches
Completing the project involves sealing tiles with a high-quality grout sealant to prevent moisture penetration and staining. Apply the sealant in a thin, uniform layer, letting it cure as per manufacturer’s instructions. For hardwood, finish with a quality polish, focusing on wood-care secrets that prolong shine and prevent scratches; I learned the hard way that neglecting proper sealing led to water damage in my first hardwood install. Regular maintenance and timely refinishing preserve your investment, and detailed care routines can be found in Hardwood Floor Care Secrets. Proper sealing and maintenance safeguard your flooring, ensuring beauty and durability over decades.
Many homeowners and aspiring DIYers believe that selecting the right materials is the only critical factor for successful flooring outcomes. However, in my experience, the real game-changer often lies in understanding nuanced installation techniques and debunking pervasive myths. One widespread misconception is that flooring installation is purely a matter of laying down tiles or hardwood planks; in truth, the process demands meticulous attention to surface preparation and leveling. Skipping these steps can lead to cracks, warping, or uneven surfaces, regardless of material quality. For example, some assume that self-leveling compounds can correct all subfloor imperfections, but improper mixing or application can cause issues like cracking or shrinkage. A common trap is rushing through leveling without thorough surface inspection, which can create problems that only become apparent months later. Advanced techniques, such as precise mixing of leveling compounds and understanding substrate behavior, are essential for durability. When considering professional methods, remember that even minor variations in floor height—less than 3/16-inch over ten feet—must be addressed to ensure a flawless finish. Applying the correct amount of mortar with a notched trowel or choosing self-leveling compounds for large areas can make the difference between a cheap repair and a durable installation. A surprisingly overlooked aspect is the importance of environmental conditions during installation—humidity, temperature, and substrate moisture levels can affect adhesion and curing. Experts recommend consulting with a professional or thorough guides like ultimate guides to floor leveling to avoid these pitfalls. Moreover, many misunderstand that once the floor is installed, minimal maintenance will suffice; in reality, sealing, regular cleaning, and periodic refinishing are key to maintaining longevity, especially for hardwood floors. Neglecting sealing or using inappropriate cleaning products can accelerate wear and damage. Therefore, mastering these nuanced aspects isn’t just for perfectionists—it’s vital for any serious renovation project. Want to avoid costly mistakes and ensure your floors last for decades? Dive into detailed resources like hardwood floor care secrets to keep your investment pristine. Have you ever fallen into this trap? Let me know in the comments.
Keep Your Floors in Prime Condition with the Right Tools and Routine Maintenance
Ensuring your hardwood and tile flooring remains beautiful and durable over time requires more than just quality materials—you need reliable tools and a solid maintenance routine. Personally, I swear by my cordless oscillating tool for detailed grout cleaning and minor repairs. Its versatility allows me to tackle tight corners and stubborn stains without hassle, saving me hours compared to traditional scrapers or brushes. This tool [Dewalt DCS355D1 Oscillating Tool], combined with precision blades, makes upkeep manageable and efficient. For hardwood floors, a microfiber mop paired with pH-neutral cleaners is indispensable; it gently lifts dirt without damaging the finish, preserving that glossy shine. Regularly applying a hardwood floor polish, such as those discussed in Hardwood Floor Care Secrets, extends the life of your finish and prevents scratches. When it comes to tile, a steam cleaner can be invaluable—disinfecting and removing grime from grout lines without harsh chemicals. I especially rely on models like the XL Steam Max because it penetrates deep, ensuring your tiles look fresh and new long after installation. Maintaining your floors is less about big once-a-year projects and more about consistent, small efforts that add up.
How do I keep my flooring looking new over time?
For long-term results, establish a preventative maintenance routine. This includes promptly cleaning up spills to prevent staining, regularly checking for loose tiles or creaking hardwoods, and scheduling professional inspections every couple of years. These proactive steps can catch issues early before costly repairs become necessary. Using specific tools like a soft-bristle brush or an electric scraper can help maintain grout integrity or fix minor surface imperfections before they worsen. Additionally, sealing your tile grout every 12-18 months with a high-quality sealant—a task made easier with a handheld applicator—can prevent moisture infiltration and staining. For hardwoods, periodic refinishing with a belt sander and new finish can restore their original luster, especially in high-traffic areas. But even more important than tools is understanding the environment. Controlling humidity levels helps prevent wood warping and grout cracking. Experts recommend maintaining indoor humidity between 40-60%, which can be managed with dehumidifiers or humidifiers as needed. Staying vigilant and performing routine light maintenance will prolong your floors’ beauty and functionality—saying goodbye to premature wear and surprise repairs.
If you haven’t already, try implementing a weekly quick clean with a microfiber mop and a thermal steam cleaner for tiles—these small but impactful steps make a huge difference in preserving your investment over decades. Need help choosing the right tools for your flooring project or maintenance routine? Contact us for personalized advice. Remember, a little effort now saves a lot later!

Lessons I Wish Someone Told Me About Flooring Success
- Never underestimate the importance of meticulous surface preparation; skipping this step cost me dearly with cracked tiles and warped hardwoods. Patience here truly pays off.
- Mixing leveling compounds isn’t just about following instructions—it’s about understanding how environmental factors like humidity affect curing, which can make or break your finish.
- Layout planning isn’t just a step—it’s the blueprint for a flawless look. Taking time to visualize and test patterns saves major rework later.
- Tools matter. Investing in high-quality, specialized equipment—like a self-leveling compound mixer or a precise flooring nailer—streamlines the entire project and leads to superior results.
- Sealing and ongoing maintenance aren’t afterthoughts. Regular sealing of grout lines and refinishing hardwoods extend your floors’ life and beauty, turning good installations into lifetime investments.
My Go-To Resources for Flooring Wisdom
- Ultimate Guide to Floor Leveling – A comprehensive step-by-step that demystifies surface preparation and leveling techniques, making it accessible for DIYers and pros alike.
- Hardwood Floor Care Secrets – Trusted for detailed maintenance routines that preserve gloss and prevent damage, ensuring your hardwood looks pristine for years.
- Elegant Tile Designs – Inspires innovative layouts and design ideas to elevate your space beyond basic functionality.
- Preventive Maintenance Tips – Practical advice on cleaning and sealing routines that extend floor lifespan and aesthetic appeal.
Time to Take That First Step with Confidence
If you’ve been hesitating to start your flooring project, remember that mastery comes with practice and learning from experience. By paying attention to surface prep, using the right tools, and implementing proper sealing, you set yourself up for stunning long-term results. Don’t let fear of imperfection hold you back—every skilled installer started somewhere, and every mistake is a stepping stone toward expertise. Your flooring journey isn’t just about laying materials—it’s about creating comfort, style, and durability for your home. Embrace the process, trust your tools, and celebrate each small victory along the way. Ready to transform your space and learn more? Dive into detailed, expert resources and keep pushing your boundaries—beautiful floors are within your reach!
Reading through this detailed guide really highlights the importance of surface preparation and proper leveling—something I learned the hard way on my last DIY flooring project. I agree that rushing these initial steps can lead to long-term issues like cracks or uneven surfaces, which are frustrating and costly to fix later. I particularly appreciate the emphasis on mixing leveling compounds correctly and paying attention to environmental factors like humidity; these often-overlooked details can make all the difference in achieving a flawless finish. When I installed hardwood floors in my living room, I didn’t consider room humidity, and a few months later, some planks warped slightly. Since then, I’ve started controlling humidity levels better and making sure to seal and maintain my floors regularly. Has anyone found specific tools or techniques especially helpful for maintaining their floors over the years? I’m always looking for efficient solutions to keep my floors looking their best without too much hassle.