One weekend, I was eagerly installing a new hardwood floor in my living room, only to realize after a full day of work that my floor was uneven and wobbly. It was a gut-wrenching moment. That mistake cost me time, money, and a whole lot of frustration. But it was also a turning point. I learned that the secret to a flawless hardwood floor isn’t just in the choice of wood but in mastering proper floor leveling techniques and installation strategies. If you’ve ever faced a similar nightmare—squeaky, uneven floors—you know exactly what I mean. Today, I want to share the insights that transformed my approach and can do the same for you. We’re diving into expert tips for leveling and installing hardwood floors in 2025 that will ensure your project lasts for years without issues.
Why Floor Leveling Is the Foundation of a Beautiful Hardwood Floor
Think about it—what’s the point of investing in high-quality hardwood if your subfloor isn’t properly prepared? A level subfloor is the unsung hero of a lasting, stunning finish. Uneven surfaces can lead to gaps, creaks, or worse, the floor buckling over time. Early on, I made the mistake of rushing through the leveling process, thinking I could fix it later. Spoiler: That’s a huge mistake. Proper floor leveling isn’t just about aesthetic appeal; it’s about structural integrity and long-term durability. That’s why I always recommend consulting trusted resources like this comprehensive guide to floor leveling. It’s a game-changer, helping you avoid common pitfalls and save money in the long run. Ready to get your floors perfectly flat and ready for installation? Let’s go.
Is Floor Leveling Still Worth the Effort in 2025?
Absolutely. I used to think that a quick patch job would do the trick. Boy, was I wrong. Skipping the proper leveling process can lead to costly repairs or replacements down the line. In fact, according to industry experts, poor floor prep is one of the top reasons for flooring failures. Trust me, investing a little extra time now will pay off big later. Want to learn how to do it right? Check out these expert tips for 2025 to master the art of flawless floor leveling. Now, let’s get into the step-by-step process that will make your hardwood installation rock-solid and beautiful for years to come.
Preparing Your Subfloor with Precision
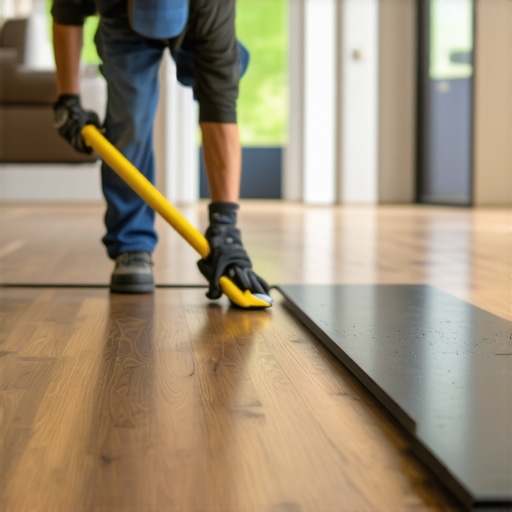
Start by thoroughly inspecting your existing subfloor. I remember one project where I found hidden soft spots beneath the old plywood; addressing these early prevented future squeaks. Use a long straightedge or a level to identify high and low spots. Mark these areas clearly. I once used chalk to trace uneven sections, which made subsequent steps easier. Clean the surface of dust and debris to ensure good adhesion of leveling compounds. Applying a primer or bonding agent recommended for your subfloor type enhances the bond and prevents future issues.
Choosing the Right Floor Leveling Compound
Select a high-quality self-leveling compound suitable for wood subfloors. I recommend opting for products with rapid setting times to keep your project on schedule. Mix the compound according to manufacturer instructions, ensuring a smooth, pourable consistency. Think of this step as pouring a pancake batter—too thick, and it won’t spread evenly; too thin, and it won’t fill gaps properly. Pour the mixture starting from the low areas, allowing it to flow naturally into the voids. Use a trowel or smoothing tool to spread the compound where necessary, especially in stubborn dips.
Achieving Flawless Surface with Proper Technique
Once poured, gently shake the surface to encourage the compound to settle into all crevices. I once had a minor spill that I quickly spread out with a trowel, avoiding air pockets. Allow the compound to cure fully—this usually takes at least 24 hours. After curing, inspect the surface; it should be perfectly flat and level. Sand down any high spots carefully, but avoid over-sanding, which can weaken the surface. Remember, a smooth, level base is your foundation for a durable, beautiful hardwood floor.
Double-Check Levelness Before Installation
Use a laser level or long straightedge across the entire surface to confirm flatness. For larger areas, I always cross-check from multiple angles. Any remaining imperfections should be addressed with additional leveling compounds. It’s better to spend extra time now than to deal with squeaks or unevenness later. Proper leveling not only improves aesthetic appeal but also extends the lifespan of your hardwood. For more detailed techniques, check out this comprehensive guide.
Sealing and Preparing for Final Installation
After confirming levelness, consider sealing the surface with a primer compatible with your flooring type. This step helps prevent moisture issues and improves adhesion for the hardwood. Once the primer dries, proceed with the installation, following best practices such as acclimating your wood flooring in the room for at least 48 hours. Remember, a well-prepared subfloor is essential for a flawless finish that lasts for years.
Many homeowners and even some professionals fall prey to misconceptions when tackling hardwood flooring projects. One pervasive myth is that perfect subfloor leveling isn’t crucial, especially if the floor looks okay initially. However, as I’ve learned through years of hands-on experience, neglecting precise leveling can lead to squeaks, warping, and costly repairs down the line. For example, I once skipped thorough subfloor preparation, thinking minor dips wouldn’t matter. The result? A wobbly, noisy floor that needed complete replacement. It’s a reminder that the foundation truly makes or breaks your flooring’s longevity.
Another common mistake is relying solely on self-leveling compounds without understanding their limitations. Many assume these products will automatically create a flawless surface. In reality, proper application techniques, such as mixing to the correct consistency and spreading evenly, are vital. I recommend consulting detailed guides like this comprehensive guide for tips on avoiding air pockets and ensuring a smooth, durable surface.
One trap that often surprises even seasoned DIYers is ignoring moisture levels in the subfloor. Moisture can cause leveling compounds to crack or delaminate. Advanced installers use moisture meters and proper sealing techniques to mitigate this risk. This nuance might seem minor but can save you from expensive fixes later. For high-quality results, always remember that thorough inspection and preparation are your best allies.
How can advanced techniques improve your floor’s durability?
Incorporating techniques like feathering the edges of leveling compounds or applying primer before the compound can significantly enhance adhesion and surface stability. Industry studies, such as those from the expert sources, confirm that meticulous surface preparation directly correlates with longer-lasting flooring. Overlooking these details can lead to premature wear and tear, undermining your investment.
Finally, avoid the mistake of rushing through the final inspection. Using laser levels or long straightedges with precision ensures that your surface is genuinely flat. Taking the time to double-check and correct minor imperfections prevents future issues like squeaking or uneven wear. Remember, a little extra effort now pays dividends in the durability and beauty of your hardwood floors. Have you ever fallen into this trap? Let me know in the comments.
Maintaining your hardwood floors and tile surfaces requires more than just routine cleaning; it involves investing in the right tools and adopting advanced techniques to ensure durability over time. In my experience, using high-quality equipment can dramatically reduce long-term issues and save you money. For example, I swear by a professional-grade laminate floor scraper, which is perfect for removing old adhesives before new installations, ensuring a clean, smooth surface for lasting results. Additionally, a moisture meter is indispensable when working with subfloors, as it helps prevent future cracking or delamination caused by hidden moisture. I personally rely on the Protimeter Surveymaster, a trusted device that provides accurate readings and peace of mind, especially in older homes where moisture levels are unpredictable.
When it comes to floor leveling, precision tools are critical. I prefer using a laser level like the Bosch GLL 3-80, which offers cross-line functionality and high accuracy, making it easier to spot minor dips and high spots. This tool has become my go-to because it saves time and ensures an ultra-flat surface, vital for both hardwood and tile installations. For smoothing and spreading leveling compounds, I recommend a durable notched trowel, specifically one with a 1/4-inch notch, which I find ideal for achieving consistent thickness and avoiding air pockets. Proper application of leveling compounds can significantly extend the lifespan of your flooring, so investing in quality tools pays off.
In terms of ongoing maintenance, I advocate for a regular inspection schedule. Using a floor scraper or a small pry bar to lift up loose tiles or to remove debris from grout lines can prevent larger problems later. For hardwood floors, I suggest periodic refinishing with a drum sander — I prefer the Clarke American Sanders 8-Inch Edger for its maneuverability and consistent results. These tools help restore the surface’s shine and protect against wear. Moreover, applying a high-quality floor polish or sealant every few years can prevent moisture ingress and reduce scratches, maintaining the aesthetic appeal and structural integrity. Remember, the key to long-term durability is proactive care, not just reactive fixes.
Looking ahead, I believe the trend in flooring maintenance will increasingly involve smart technology. Devices equipped with sensors for moisture and wear detection will become more affordable and widespread, allowing homeowners to monitor their floors remotely. This proactive approach will help catch issues early before they escalate into costly repairs. For now, I recommend integrating simple yet effective tools like moisture meters and laser levels into your routine to elevate your flooring projects.
How do I keep my floors looking perfect over time?
The secret is consistent upkeep using the right tools and techniques. Regular cleaning with microfiber mops, combined with spot treatments for scratches or grout repairs, can preserve your surface’s beauty. Don’t forget to inspect your floors periodically for signs of moisture or damage, addressing issues promptly. For detailed strategies, check out this expert guide on hardwood floor care. Try implementing a quarterly check with a moisture meter and a laser level to catch potential problems early. Small investments in quality tools and routine inspections will keep your floors stunning for decades.
The Hardest Lesson I Learned About Hardwood Floors and Floor Leveling
One of the most valuable lessons I discovered is that rushing the subfloor preparation almost always leads to issues down the line. I once skipped detailed inspection and ended up with squeaky, uneven floors that cost me time and extra money. Now, I know that patience and precision during floor leveling can save you endless headaches later.
3 Myths About Floor Leveling That Held Me Back
For years, I believed that self-leveling compounds could fix any unevenness without proper surface prep. That’s false. Proper application, understanding compound limits, and moisture control are crucial. Debunking these myths transformed my approach and results.
What Experts Won’t Tell You About Achieving Long-Lasting Durability
Many overlook the importance of moisture management in subflooring. Using a reliable moisture meter like the Protimeter Surveymaster and sealing the surface before laying hardwood ensures longevity. These small but vital steps are often hidden from beginner guides but are essential for durability.
Curated Resources for Your Flooring Success
My go-to guide for perfect floor leveling is this comprehensive guide. It offers detailed techniques that prevent common mistakes. For tools, I trust the Bosch GLL 3-80 laser level for its accuracy, and a quality notched trowel makes all the difference in spreading leveling compounds evenly. Lastly, this resource on hardwood refinishing has helped me maintain floors over the years.
Your Turn to Make It Happen
Now that you have these insights, I encourage you to approach your hardwood flooring project with confidence and patience. Proper leveling is the foundation of a beautiful, lasting floor. Remember, investing in the right tools and techniques today ensures your floors will shine for decades. Have you ever struggled with subfloor issues? Share your experiences below, and let’s learn together.
Reading through this post really resonated with my own experience of installing hardwood floors. I made the mistake early on of rushing the subfloor prep, which led to squeaks and uneven spots that I had to fix later. Since then, I’ve learned the importance of thorough inspection and using the right tools, like a good moisture meter, to assess the subfloor before starting. I especially agree with the emphasis on patience—taking the extra time to level properly can save you hundreds of dollars and headaches in the long run. Like you, I’ve also found that sealing and priming before installation makes a significant difference in the durability of the finish. My question is: for those working on older homes with potentially more moisture issues, what are your best strategies to manage moisture and ensure a stable foundation for hardwood? I’d love to hear tips from others who’ve dealt with similar challenges.
Having recently tackled my own hardwood floor installation, I can definitely relate to the importance of precise subfloor prep. One thing I found helpful was using a calcium chloride moisture meter before even beginning the leveling process, especially in older homes where moisture can be unpredictable. Sealing the subfloor with a moisture barrier beforehand has also proven to be a game changer in preventing future issues. It’s interesting how such details can significantly impact the longevity of the floor.
This post really hits home! I remember my initial hardwood flooring project, and I was tempted to skip some of the detailed leveling steps to save time. That decision, of course, resulted in squeaks and even some buckling after a few months. Since then, I’ve learned that thorough inspection and proper subfloor prep are truly investments that pay off. The idea of using a laser level and moisture meter is so practical — I personally rely on a moisture meter like the Protimeter Surveymaster; it’s a game changer in detecting hidden moisture issues before they cause problems. For those working with older homes, I’d suggest sealing the subfloor with a moisture barrier and taking the time to identify soft spots and softening areas early. Has anyone else found specific techniques effective in managing moisture in these environments? Would love to hear your tips on maintaining stability for long-lasting floors.