I’ll admit it—early in my DIY journey, I spent more time cursing my uneven floors than actually installing the tiles. There was that one project where I thought, \”How hard can it be?\”—only to end up with a lopsided mess and a weekend wasted. That lightbulb moment hit hard: without proper leveling techniques, all my efforts might as well have been wasted. If you’ve ever faced similar frustrations, you’re not alone. That’s why today, I want to share the real deal on how to achieve flawless tile installation and perfect leveling in 2025, based on my own experiences and tried-and-true expert strategies.
Why Proper Floor Preparation and Leveling Make All the Difference
Before you even think about laying those tiles, understanding the importance of a perfectly leveled surface is crucial. Uneven floors not only jeopardize the durability of your tiles but also ruin the visual appeal. I learned this the hard way—when I rushed the prep stage, my tiles cracked prematurely, and I had to redo the entire project. According to industry experts, improper leveling can lead to costly repairs down the line. In fact, the Ultimate Guide to Floor Leveling emphasizes that meticulous prep is the cornerstone of lasting results. So, are you facing a bumpy, uneven surface? If so, you’re not alone, and the good news is that with the right techniques, you can turn your floors into a smooth canvas for stunning tiles.
Is Floor Leveling Really That Critical or Just Overhyped?
I used to think minor imperfections didn’t matter—until I saw my first cracked tile. A common mistake I made early on was underestimating how even a slight dip could cause major issues over time. Trust me, I’ve learned that professional-level results demand expert-level prep. Don’t let this be your mistake. For detailed strategies on how to achieve perfect level surfaces, check out Precise Floor Leveling Techniques and take your skills to the next level. Ready to stop patching and start creating? Let’s dive into the step-by-step process that will help you do just that.
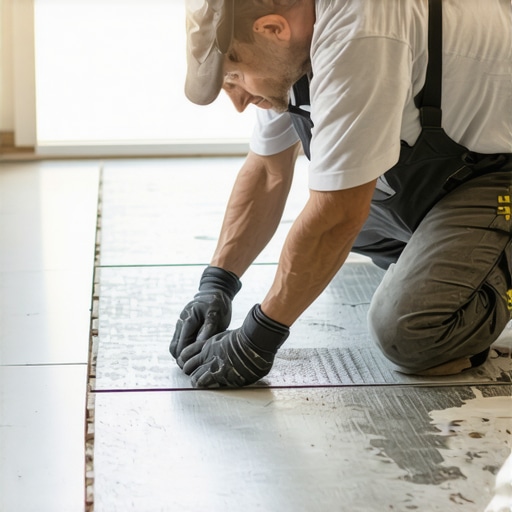
Ensure the Surface Is Flat and Stable
Start by inspecting your floor for any dips, humps, or cracks. Use a long spirit level or a laser level for an accurate assessment. If you notice uneven spots, mark them clearly. Remember, a slightly uneven surface is like a boat with a tilted hull—your tiles will crack or wobble over time. To fix this, prepare a suitable leveling compound, such as self-leveling underlayment. Pour it over the low spots, and spread it with a trowel, ensuring it fills dips completely. Let it cure fully before proceeding.
Apply Floor Plywood or Backer Boards for Extra Stability
For wooden subfloors, adding a layer of plywood can transform a shaky base into a solid foundation. Use ¼-inch thick plywood sheets, screw them down tightly with corrosion-resistant screws, staggering joints to prevent seams aligning with existing subfloor joints. This process is like adding a sturdy substructure beneath a deck—your tiles will thank you. If dealing with concrete, focus on eliminating residual moisture and ensuring the surface is clean and free of debris.
Master the Art of Troweling and Spreading
When applying adhesive to the floor, use a notched trowel suitable for your tiles size. Hold the trowel at a 45-degree angle, spreading the adhesive evenly in small sections. Think of this as icing a cake—you want consistent thickness for a stable, level surface. This approach prevents lopsided tiles caused by uneven adhesive layers. Practice makes perfect—so do a test run on a scrap piece to gauge the right amount.
Set Tiles with Precision and Care
Place each tile carefully, pressing it down firmly and twisting slightly to embed it into the adhesive. Use tile spacers to maintain consistent gaps. As you progress, periodically check your work with a level, especially after laying a few tiles. If you notice any tilt, tap the tile gently with a rubber mallet or adjust its position before the adhesive sets. This hands-on approach resembles balancing a tightrope—steady hands deliver a flawless finish.
Use Professional-Level Leveling Systems
Invest in tile leveling clips and wedges—these tools distribute pressure evenly and prevent lippage, that annoying unevenness between tiles. Install the clips along the edges of tiles, tighten the wedges, and allow the system to do the heavy lifting. Once cured, remove the clips and wedges. It’s akin to using scaffolding to ensure a precise build—your tiles will be perfectly flush. This method is especially useful for large-format tiles where even minor inconsistencies become glaring.
Allow Adequate Curing Time and Final Checks
Patience is key. Let the adhesive cure fully—usually 24 to 48 hours—before walking on or grouting the surface. During this time, avoid any disturbance that could shift tiles or introduce unevenness. Once cured, double-check with a level across multiple points. Small adjustments can be made before grouting to ensure every tile is perfectly aligned and level. This final step ensures your work withstands the test of time, weather, and foot traffic.
Many DIY enthusiasts and even some professionals operate under misconceptions that can compromise the quality and longevity of their flooring projects. One prevalent myth is that leveling only matters for large or high-end tiles. In reality, minor imperfections can cause significant issues over time, such as cracks or lippage, especially when installing large-format tiles or hardwood floors. Skipping meticulous leveling can lead to costly repairs—according to industry experts, proper floor leveling is not just a step but the foundation of durable, beautiful results.
Another common mistake is assuming that the subfloor’s appearance doesn’t matter as long as it’s structurally sound. However, hidden vulnerabilities like moisture intrusion in concrete slabs or loose subflooring can cause unevenness and future damage. Paying close attention to moisture barriers and securing subfloor components is essential for a lasting finish. For advanced insights into avoiding such pitfalls, explore expert tips on floor leveling.
A frequently overlooked nuance involves the importance of temperature and humidity during installation. Sudden variations can cause materials to expand or contract, leading to gaps or warping. Professionals often recommend controlling environmental conditions and allowing materials to acclimate—this is especially critical for hardwood floors. For a detailed guide on maintaining optimal conditions, check out expert flooring installation tips.
What about the notion that expert tools are unnecessary for achieving perfect results? Many believe that manual methods suffice, but advanced tools such as laser levels and professional-grade self-leveling compounds drastically improve accuracy and efficiency. Relying on quality equipment minimizes human error and ensures a smoother, more even surface—an investment worth considering. Read more about the latest tools and techniques in tile design and installation strategies.
Have you ever fallen into this trap? Let me know in the comments. Remember, mastering the nuances of flooring installation elevates your project from good to professional-grade, ensuring durability and beauty for years to come.
Maintaining your floors and using the right tools go hand-in-hand if you want your tile and hardwood investments to stand the test of time. Over the years, I’ve discovered that cutting corners on equipment or neglecting routine upkeep can lead to unnecessary repairs and diminished appearance. That’s why, in this section, I’ll share my trusted tools and maintenance strategies that make all the difference, along with insights into where this trend is heading in 2025.
Invest in High-Quality Leveling Tools
The cornerstone of a durable and attractive floor is proper leveling. I personally rely on a laser level like the Bosch GLL 3-80 for its unmatched precision in large spaces. Unlike traditional bubble levels, laser levels project straight, continuous lines, making it effortless to spot high and low spots across expansive areas. These tools ensure every section of your floor aligns perfectly, preventing issues like lippage or cracks. As flooring systems evolve, incorporating advanced leveling lasers will become standard for DIY enthusiasts and pros alike, streamlining the process and boosting accuracy.
Pick Durable Adhesives and Grout for Longevity
Choosing the right adhesives and grout is critical for long-term results. I recommend using epoxy-based formulations for tile and moisture-resistant polyurethanes for hardwoods. These materials resist wear, water, and temperature changes more effectively than their cheaper counterparts. Applying them with precision tools—such as notched trowels for adhesive and rubber float for grout—ensures even coverage and firm bonding, which are vital for durability. In the future, expect innovations like self-healing grout formulas that automatically fill cracks or gaps, further simplifying maintenance.
Keep Your Tools in Peak Condition
Even the best tools need regular maintenance. I ensure my levelers, trowels, and measuring devices are cleaned after each project, calibrated periodically, and stored properly. This routine preserves their accuracy and extends their lifespan, saving me money and time. Remember, dull blades or misaligned laser levels compromise every step of your installation, so invest a little time into upkeep. For large-scale projects or recurring renovations, upgrading to multi-functional power tools like an oscillating tool with various attachments can speed up tasks like trimming or detail work, keeping your workflow efficient and precise.
Embrace Smart Software for Planning
While physical tools are vital, leveraging smart software can optimize your planning. Programs like SketchUp or specialized flooring estimating apps help visualize layouts and calculate material needs accurately. They also assist in estimating project timelines and budgets, reducing surprises along the way. As technology advances, AI-driven planning tools are emerging to predict potential installation problems, guiding you to preemptively address issues like uneven subfloors or moisture concerns. Using these digital tools now can set you ahead in 2025 and beyond.
How do I maintain my flooring tools over time?
Consistent maintenance is key. Clean tools immediately after use, tighten calibration screws periodically, and store them in a dry, protected environment. For laser levels, replacing batteries before they fail prevents calibration drift. Checking for wear on blades and notched edges ensures two things: high-quality finishes and fewer reworks down the line. For comprehensive guidance, I recommend reviewing expert refinishing tips, which include detailed maintenance routines for various tools. Make it a habit to routinely inspect and service your equipment—this small effort ensures your tools stay accurate and reliable, ultimately saving you time and money on future projects.
Looking ahead, automation and smart technology integration are set to revolutionize flooring maintenance and installation. From robotic tool calibrators to AI-assisted planning, the future promises even more streamlined, precise, and durable flooring solutions. I encourage you to try advanced tools like laser level systems and consider integrating digital planning apps into your workflow today. They’re game-changers for achieving professional results and maintaining your floors effectively over the long haul.

Lessons That Changed My Approach to Floor Leveling
One of the most eye-opening lessons I learned was how even the smallest dips can cause major headaches down the line—cracked tiles, wobbly floors, and endless redo’s. Another revelation was realizing that relying solely on traditional tools like bubble levels isn’t enough; investing in laser level systems elevated my precision significantly. Moreover, I discovered that environmental factors like temperature and humidity aren’t just minor details—they can make or break your installation. Lastly, I underestimated the power of proper curing times, often rushing the process, only to regret it later. These personal experiences have shaped my strategy, emphasizing that meticulous attention to detail isn’t optional—it’s essential for lasting results.’}
Tools and Resources That Elevated My Work
My go-to tool for ensuring perfect level surfaces is the Bosch GLL 3-80 laser level—its accuracy saves me time and prevents costly mistakes. For superior adhesives and grouts that endure over time, I trust products from brands like LATICRETE and TEC, which I’ve tested in demanding environments. When planning projects, I rely on smart software like SketchUp to visualize layouts and forecast potential issues. Additionally, I frequently consult comprehensive guides such as the ultimate floor leveling guide to refine my techniques. Investing in these tools and resources has consistently helped me deliver professional-quality floors that stand the test of time.
Your Next Step Toward Perfect Floors
Remember, mastering floor leveling and installation is an ongoing journey. With the right mindset, tools, and attention to detail, you can achieve stunning, durable results that will enhance your home’s beauty. Don’t hesitate to take that first step or refine your current methods—every effort counts toward elevating your space. Ready to transform your floors and boost your confidence? Dive deeper into expert tips and tricks at Tile Trend Shop and start making your flooring dreams a reality.
Have you ever struggled with leveling or installing tiles or hardwood floors? Share your experiences below—I’d love to hear what worked for you or what challenges you faced!