
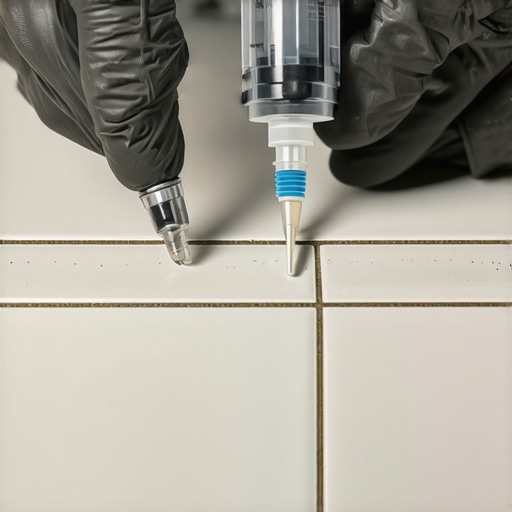
Starting a tile project and ending up with hollow spots that you can actually hear and feel? Believe me, I know the frustration all too well. It’s like discovering tiny caves beneath your beautiful new floor—disheartening and almost infuriating. One day, after a long hours of labor and a fair share of swearing, I had my lightbulb moment: what if I could use a simple syringe to inject the leveling compound directly into those hollow areas? That’s how I stumbled upon the syringe trick for fixing hollow spots under tile, and let me tell you, it’s a game-changer.
Why Those Hollow Spots Are the Real Problem in Your Tile Installation
First off, hollow spots aren’t just an annoyance—they can actually compromise the integrity of your entire floor. When tiles aren’t properly adhered or are sitting over a void, it increases the risk of cracks, tile chipping, and uneven cracks over time. This issue often sneaks up after installation, making you wonder if all those hours of work were for nothing. I learned early on that uneven subfloors and improper leveling are often the culprits. If you’re like me, you’ve probably already faced the frustration of uneven tiles that seem to wobble or, worse, make hollow sounds when walked upon.
But here’s the good news: with a bit of patience and the right technique, you can fix these problematic spots without ripping everything out. That’s where the syringe method shines. It allows you to directly access and fill those voids, restoring both stability and peace of mind.
Are you tired of that unsettling hollow feeling under your tiles? Do you want a straightforward solution to bond those loose spots without the mess and cost of removing entire sections? Then keep reading. I’ll walk you through step-by-step how I used the syringe trick to turn my shaky, hollow tiles into a solid, dependable surface. And trust me, once you master this simple technique, you’ll wonder why you didn’t try it sooner.
By the way, a quick note—early on, I made the mistake of trying to fix hollow spots with standard adhesives that didn’t reach deep enough. That mistake ended up wasting time and money. If you want to avoid common pitfalls, I recommend checking out this comprehensive guide on [floor leveling challenges and common mistakes](https://tiletrendshop.com/floor-leveling-challenges-common-mistakes-and-how-to-avoid-them). Now, let’s get into the step-by-step process of how I used a syringe to address these tricky spots—and how you can do it, too.
Prepare Your Materials and Assess the Area
First, gather a high-quality, needle-tip syringe—preferably a silicone or metal one for precise control—and a fast-setting, premixed leveling compound suitable for tile repair. Carefully inspect the hollow spots by walking over the area, listening for hollow sounds and feeling for softness. Mark these spots with a pencil or painter’s tape for easy identification. Think of it like diagnosing a water leak under a floor—pinpointing the exact location avoids unnecessary mess and expense.
Drill Small Access Holes for Easy Injection
For stubborn or deep voids, drill tiny pilot holes in grout lines next to the hollow spots, about 1/8 inch wide. These will serve as entry points for your syringe. Wrap the area with painter’s tape to control any spills and keep your workspace tidy. Once drilled, clear out any dust, as clean surfaces help ensure the leveling compound adheres properly. Imagine it like creating tiny doors to access hidden cavities within your flooring—small but effective.
Inject the Leveling Compound with Precision
Fill your syringe with the ready-mix leveling compound, then slowly insert the needle into the drilled hole or directly under the tile if accessible. Gently depress the syringe plunger to inject the compound into the void. You’ll see or feel the substrate beneath the tile start to firm up as the compound fills the space—like slowly inflating a tiny balloon beneath the tile. Keep the needle steady and avoid over-pressurizing, which could cause the tile to lift. During my first attempt, I overfilled a spot, which caused a minor lift, but I quickly learned to inject gradually and monitor the process.
Reasons for Slow and Steady Injection
Inject small amounts at a time—less than a teaspoon—to prevent excess pressure. Pausing periodically allows the compound to settle and reduces the risk of creating new voids or lifting tiles. This approach is akin to filling a balloon slowly to prevent popping. If you notice the tile lifting or the compound bubbling, stop immediately to avoid damage. Remember, patience is key; rushing often leads to more work later.
Seal and Let Cure for Long-Lasting Results
After injecting the compound, quickly seal the drilled holes with matching grout or epoxy to prevent the compound from leaking out. Use a putty knife or small spatula to smooth the surface, blending it with the surrounding tile. Allow the compound to cure fully, following the manufacturer’s instructions—usually 30 minutes to a few hours—before walking on the area. Think of it as giving the compound enough time to set properly, much like letting cement dry before adding weight.
During my own fix, I found that applying a small patch of tape over the drilled holes helped contain the material during curing, ensuring a flush finish. This method saved me from having to remove tiles or redo large sections and kept my project affordable and manageable.Many homeowners believe that choosing the right hardwood or tile is all about aesthetics and initial cost, but beneath these surface decisions lie complex nuances that can make or break your flooring’s longevity. One common myth is that all subfloors are equal; in reality, different subfloor types demand tailored preparation techniques. For instance, concrete slabs require moisture barriers and specific leveling methods, whereas plywood subfloors might need additional sealing to prevent squeaks and movement. Neglecting these differences often results in floor instability or premature failure.
Another overlooked aspect is the significance of understanding floor leveling beyond just using a self-leveling compound. Many installers assume that a quick pour guarantees a perfect surface, but according to experts, improper substrate assessment can cause lumpy or uneven finishes, especially with large-format tiles. This highlights the importance of thorough subfloor evaluation and mastering advanced techniques, such as the Rake Method, to achieve a truly flawless install. You can learn more about these strategies in our detailed guide on [floor leveling techniques](https://tiletrendshop.com/precise-floor-leveling-techniques-to-achieve-flawless-surfaces).
A common trap in tile installation is underestimating the impact of substrate preparation on the adhesive bond. Many focus solely on grout color or tile pattern, forgetting that the success of a lasting installation hinges on the right primer application and substrate cleanliness. For example, using a primer like acrylic or epoxy at the correct stage can prevent issues like delaminating or hollow tiles—problems that are often blamed on poor material quality when the real culprit is insufficient prep.
For experienced professionals and dedicated DIYers alike, mastering the nuances of floor prep is crucial. It’s not just about laying tiles or installing hardwood; it’s about understanding the material interactions, the subfloor conditions, and the curing processes that influence long-term performance. Skimping on foundational steps might save time upfront but can lead to costly repairs down the line.
If you’re interested in avoiding these hidden pitfalls, I recommend exploring our resource on [common flooring installation mistakes](https://tiletrendshop.com/flooring-installation-mistakes-to-avoid-for-lasting-results), which digs into the details many overlook. Remember, the devil is in the details—especially when it comes to flooring that lasts.
Have you ever fallen into this trap? Let me know in the comments. When you understand these nuances, your flooring projects aren’t just beautiful—they’re built to stand the test of time.Maintaining a high-quality, durable floor requires more than just a good installation—it demands the right tools, consistent upkeep, and understanding how to troubleshoot issues as they arise. One of my go-to tools for floor level adjustments is a laser level, specifically the Bosch GLL 3-330C, which offers precise, line-aligned readings to ensure your subfloor remains true over time, preventing hollow spots and unevenness. I also swear by a heavy-duty vacuum with a HEPA filter, like the Dyson V15 Detect, for cleaning substrates thoroughly before sealing or applying any additional coatings—dust and debris are the enemies of long-lasting adhesion and finish. Additionally, a quality grout float and rubber squeegee are indispensable for ensuring even grout application and preventing cracks down the line.
Regular inspections are critical. Periodically check for signs of movement or hollow sounds under tiles or soft spots in hardwood. When issues are detected early, quick injections of specialized epoxy, such as Sika’s Multi-Stick, can reinforce weak spots without the need for complete removal. For preventative maintenance, applying a penetrating sealant like LATICRETE’s Hydro Ban after installation helps avert moisture penetration, which can cause floor warping and delamination over time.
Adopting a proactive approach means investing in tools that aid in ongoing assessments and repairs. Embracing technology such as self-leveling laser guides and moisture meters can dramatically improve your ability to detect and address problems early, saving time and money. Going forward, the trend points to smarter, sensor-based solutions that monitor floor integrity actively, alerting homeowners before issues become visible or audible.
How do I keep my floors looking flawless after installation?
Proper maintenance routines are essential. Use soft brushes or microfiber mops instead of harsh scrubbers, and avoid high-pressure washing; these can loosen grout or scratch finishes. Regularly reapply sealants to hardwood and tile surfaces, especially in high-traffic areas, following manufacturers’ guidelines. Keep a close eye on temperature and humidity levels in your home—significant fluctuations can cause materials to expand or contract, leading to cracks or gaps. For reinforced protection, consider installing a vapor barrier layer beneath new flooring, especially over concrete slabs, to prevent moisture-related issues. You can find detailed recommendations on long-term maintenance and advanced repair techniques in our comprehensive guide on [flooring installation fundamentals](https://tiletrendshop.com/flooring-installation-fundamentals-leveling-for-a-seamless-look).
If you notice recurring hollow spots or loose tiles, don’t wait. Use a syringe with precision-grade epoxy to reinforce those areas, following the step-by-step methods outlined in our article on [the ultimate guide to floor leveling](https://tiletrendshop.com/the-ultimate-guide-to-floor-leveling-for-a-perfect-finish). This proactive approach extends the life of your flooring and preserves its aesthetic appeal for years to come. Prioritize maintenance tasks regularly, and your floors will reward you with enduring beauty and performance for decades.
Throughout my journey with tile and hardwood installations, I’ve uncovered some valuable insights I wish I had known from the start. These lessons not only save time and money but also deepen your understanding of what makes a floor truly durable and beautiful.
The Hardest Lesson I Learned About Floor Leveling and Tile Fixes
– I once believed that a quick pour of self-leveling compound would instantly solve uneven floors, but I soon discovered that without proper substrate assessment, that lumpy surface was just waiting to cause cracks and tiles popping up. Now, I always take the time to evaluate and prepare the subfloor thoroughly before any leveling or tiling—it’s the foundation of a lasting floor.
– Another pivotal realization was the importance of patience during repair injections. Rushing to fill hollow spots with leveling compound can lead to over-pressurization, which may lift tiles or cause new voids. Inject slowly, monitor the process, and let the material cure—those few extra minutes make all the difference.
Secrets Top Professionals Know About Floor Repairs
– Using a syringe for targeted injections has been a game-changer. It allowed me to reach areas that would be difficult to patch with bulk repair methods, ensuring a seamless and solid surface. I trust tools like the [precision syringe](https://tiletrendshop.com/mastering-floor-leveling-pro-secrets-for-perfect-installations) because they provide control that makes repairs look professional and last long.
– Another tip I picked up is to seal drilled access points immediately—using matching grout or epoxy—to prevent leaks and contamination during curing. This small step preserves the integrity of your repair and keeps the surface level smooth.
Stay Curious: Your Next Step in Flooring Mastery
– Don’t let initial setbacks or misunderstandings discourage you. Every experience, even the mistakes, brings new knowledge that elevates your skills. Whether you’re fixing hollow spots or preparing for a major installation, embracing continuous learning ensures your floors stand the test of time, aging gracefully and maintaining their beauty.
– For ongoing inspiration and expert techniques, I recommend exploring this resource on combining tile and hardwood styles or reviewing the precise leveling methods. Staying informed is the key to confident craftsmanship.
– Remember, every scratch, hollow spot, or wobble is an opportunity to learn and improve. With patience, the right tools, and a willingness to master the details, you’ll create floors that aren’t just beautiful but resilient for years to come. Your perfect surface is within reach—trust the process and keep experimenting!