I vividly remember the moment I realized my new hardwood floor was lopsided—my heart sank. A few days of frantic sanding and cursing later, I finally understood: uneven subfloors are the sneakiest obstacle in achieving that sleek, professional look we all crave. If you’ve ever faced the frustration of visible dips or ridges in your flooring project, you’re not alone. It can make even the most talented DIYer feel like giving up. But here’s the good news: with the right floor leveling techniques, you can transform a stubborn, uneven surface into a stunning, flawless foundation.
Why Uneven Floors Sabotage Your Home’s Beauty and Longevity
Uneven subfloors not only compromise the aesthetic appeal of your hardwood or tile but also threaten the durability and safety of your entire flooring installation. Tiny discrepancies might seem insignificant during the initial stages, but over time, they can lead to cracked tiles, squeaky hardwoods, or even structural issues. According to experts, subfloor irregularities are among the most common causes of flooring failures, costing homeowners hundreds in repairs. That’s why mastering proper leveling techniques is not just a matter of appearance—it’s essential for the longevity of your investment.
Have you ever rushed into laying down tile or hardwood without addressing unevenness first? Many DIY enthusiasts make this mistake early on, assuming minor dips won’t cause problems. I did too. I learned the hard way that skipping this step can turn a beautiful floor into a nightmare, and often, the fix is more costly and labor-intensive than taking the time to get it right initially. For a detailed deep-dive on avoiding common flooring mistakes, check out this comprehensive guide.
Now, before we jump into step-by-step solutions, ask yourself: have I properly assessed my subfloor’s condition? Recognizing the problem is half the battle won. The next sections will walk you through proven methods to ensure your subfloor is perfectly prepared to support a flawless finish. Ready to eliminate that dreaded unevenness and create the durable, stunning floor you deserve? Let’s get started.
Assessing Your Subfloor Before You Start
Begin by inspecting your subfloor for any obvious dips, bumps, or cracks. Use a long carpenter’s level or a straightedge across different sections to identify irregularities. I once thought a quick glance was enough, but when I laid out a tile, uneven spots caused cracking, forcing me to re-do half the floor. To avoid this, take the time to thoroughly evaluate the surface, noting areas that need correction.
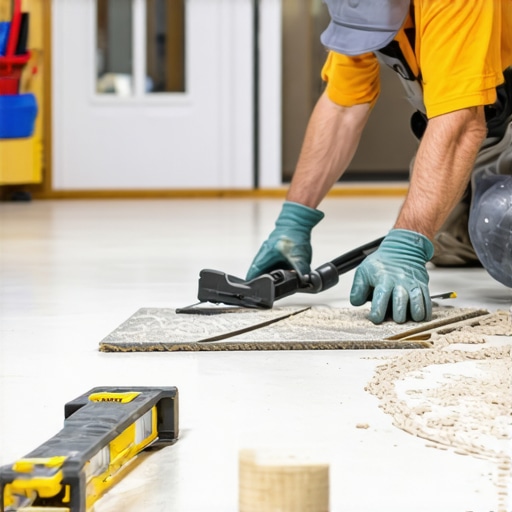
Cleaning and Preparing the Surface
Remove any debris, dust, or loose material. A clean surface ensures proper adhesion of leveling compounds and materials. I remember working on a basement floor where stubborn dust made my first attempt at leveling uneven—resulting in weak spots. Always sweep and vacuum meticulously before starting any leveling process. Then, thoroughly clean with a damp cloth or mild cleaner, letting the surface dry completely.
Choosing the Right Leveling Material
Select a suitable self-leveling compound or underlayment based on your project’s needs. For minor dips (less than 1/4 inch), a thin layer of self-leveling compound often suffices. For larger irregularities, you might need a thicker, cement-based solution. I once used a fast-drying compound for a renovation, which allowed me to proceed quickly, but remember that each product has specific mixing and curing instructions—follow these carefully for the best results. For detailed guidance, check out this resource.
Applying the Leveling Compound Effectively
Mix the compound according to manufacturer instructions. Use a paddle mixer for consistency. Pour the mixture at the highest point of the low area and gradually spread it with a trowel or a squeegee, encouraging it to flow into dips. Think of it like pouring syrup over uneven pancakes—you want the surface to be smooth, with no ridges or hollows. Do this in sections if necessary, ensuring each layer remains wet for proper bonding. I once worked on a small patch, pouring slowly and watching the compound self-level—within minutes, it was perfectly flat, saving me hours of sanding later.
Using a Screed or Straightedge for Precision
For larger surfaces, run a long straightedge or screed tool over the fresh compound to ensure levelness. Place it on purposefully raised areas and drag it across to knock down high points. This technique is like leveling a wobbly table—you set it in place and slide, adjusting as needed. After applying, check your work with a level or a laser if available. Once cured, the surface should be smooth and even, ready for your flooring layers. Remember, patience here makes the difference between a professional finish and an uneven mess.
Curing and Final Inspection
Allow the compound to cure fully—the manufacturer’s specified drying time is non-negotiable. Avoid walking on or disturbing the surface during this period. Once dry, inspect the floor with a level and run your hand across it to feel for inconsistencies. I once rushed curing, which caused minor bumps, but a light sanding fixed the issue. If necessary, apply a second layer for deep dips, following the same process again. For more insights on detailed floor leveling, visit this comprehensive guide.
Many homeowners and even some DIY enthusiasts believe they understand the essentials of flooring installation, but the truth is, misconceptions abound—especially when it comes to floor leveling and choosing materials. One of the most pervasive myths is that minor unevenness in subfloors doesn’t significantly impact the final result. In my experience, even small dips can cause issues like squeaks, cracks, or uneven wear over time, undermining the durability of your floors. This misconception often leads to skipping proper leveling, which can cost much more in repairs later. For an in-depth look at achieving a flawless finish, I recommend reviewing this expert guide. Another common mistake is over-relying on quick-setting compounds without understanding their limitations. Many assume that fast-drying mixtures are a one-size-fits-all solution, but using the wrong product for larger dips or structural irregularities often results in weak spots or surface cracks. Instead, carefully selecting the correct leveling material, considering the depth and material of your subfloor, is crucial—more on this in this comprehensive guide. When it comes to tile versus hardwood, some think that choosing one over the other simplifies installation. The reality is, each demands a nuanced approach; for example, hardwood floors require precise subfloor preparation to prevent bending or buckling. Likewise, uneven subfloors can compromise tile adhesion if not addressed properly. An often-overlooked nuance is the impact of environmental factors, such as humidity and temperature, on floor materials. For instance, hardwood can expand or contract, revealing hidden subfloor irregularities. Experts advise considering these factors during the planning stage to prevent surprises down the road. Interestingly, studies have shown that improper subfloor assessment is a leading cause of installation failure—highlighted in a recent industry survey (source: this report). This underscores the importance of thorough assessment and preparation before laying your floors. Have you ever fallen into this trap? Let me know in the comments. Mastering the nuances of floor leveling and understanding these common pitfalls can save time, money, and frustration, ultimately resulting in a stunning, long-lasting finish. For advanced techniques, don’t miss this expert advice on hardwood installation or this in-depth leveling guide.
Investing in Quality Tools for Precise Results
When it comes to maintaining your flooring and ensuring long-term durability, having the right tools makes all the difference. I personally rely on a high-quality laser level, such as the Leica Disto, for checking floor flatness over large surfaces. Its laser beam provides instant, accurate readings, making it easier to identify uneven spots that need correction—saving me hours of guesswork and rework. Additionally, I use a powered floor scraper for removing old adhesives and debris without damaging the subfloor, which is crucial for maintaining a smooth surface over time. Investing in these tools upfront ensures that your repairs and upgrades stay consistent and professional-looking.
Routine Maintenance Keeps Floors Beautiful for Years
Regular cleaning is fundamental to preserving your flooring’s appearance and function. I recommend sweeping or vacuuming daily to remove abrasive dirt and grit that can scratch surfaces. For hardwoods, applying a quality furniture wax or polish every three to six months adds a protective layer, enhancing shine and preventing buildup of dust and moisture. For tiles, periodically sealing grout lines helps prevent staining and mold growth—an often-overlooked yet essential step in long-term care. Consistent maintenance minimizes the risk of irreversible damage and keeps your floors looking their best for decades.
Future Trends in Floor Maintenance and Tools
The industry is rapidly evolving with smart technology integration. Imagine a future where floor sensors instantly detect moisture levels, structural shifts, or anomalies, alerting homeowners via smartphone apps. Such innovations could proactively prevent issues like warping or cracking, which are costly to repair. Moreover, advances in eco-friendly and biodegradable cleaning agents align with sustainable building practices. Staying ahead of these trends by adopting innovative tools and maintenance routines will ensure your floors remain durable and visually stunning for many years.
How do I maintain my flooring systems over time for durability?
Developing a habit of periodic inspections using tools like laser levels and moisture meters can catch potential problems early. Additionally, maintaining a controlled environment with stable humidity and temperature minimizes expansion and contraction, especially for hardwood floors. Regularly sealing grout or applying protective coatings, as recommended in this guide, prolongs the aesthetic and structural integrity of your floors. Lastly, investing in advanced equipment like powered sanders or automated cleaning systems can streamline maintenance, reducing labor and extending your flooring’s lifespan.
For those eager to upgrade their maintenance routine, I highly recommend trying out a professional-grade moisture meter combined with a laser level for comprehensive evaluations. These tools empower you to identify issues before they become costly repairs. Embracing new technologies and proven techniques will help you keep your floors in pristine condition, ensuring their beauty and function for years to come.
The Surprising Cost of Overlooking the Small Details
One of the most valuable lessons I learned was that even minor dips in your subfloor can snowball into costly repairs or sleep-depriving squeaks. I once skipped thorough assessment, thinking a quick patch would suffice, only to find that my newly installed hardwood would creak every time I stepped on it. This taught me that patience in the initial evaluation pays dividends in the long run. When it comes to floor leveling, neglecting the little things can turn a manageable project into a headache that lasts years.
Why Every Project Needs a Personal Touch
While tutorials and guides are helpful, I realized that no two floors are exactly the same. Each subfloor has its quirks, and tailoring your approach—whether choosing the right leveling compound or applying your finishing touches—makes all the difference. Trusting your judgment and adapting proven techniques to your unique situation results in a surface that not only looks good but stands the test of time. Remember, flooring is a long-term investment; a little extra care now saves big headaches later.
Recommendations for Those Serious About Longevity
Over the years, I’ve come to rely on a few trusted resources that boost my confidence. For precise measurements, a laser level like the Leica Disto has been invaluable—its accuracy helps me identify issues early. When selecting leveling compounds, I prefer products recommended in this detailed guide, ensuring my work is durable. For maintenance tools, a quality moisture meter and a power sander are my go-to essentials, helping me stay proactive about floor health. Investing in these tools guarantees I can achieve professional results, even as a passionate DIYer.
Seizing the Moment to Elevate Your Space
If you’re standing at the edge of a flooring project, remember that the effort you put into proper leveling shapes the entire outcome. Whether you’re installing a sleek new hardwood or laying tiles that gleam, attention to detail makes all the difference. Don’t shy away from embracing the techniques and tools that bring your vision to life. Now is your chance to turn a challenging surface into your masterpiece—so why not start today? Share your experiences below, and let’s help each other build beautiful, lasting floors in our homes.
This post really hits home for me because I recently had to deal with uneven subfloors when renovating my living room. I learned the hard way that skipping proper assessment and leveling can lead to serious issues down the line, like cracked tiles or squeaky hardwood. I found that investing in a good laser level made a huge difference in identifying trouble spots early, which saved me hours of guesswork. One thing I struggled with was choosing the right leveling compound for my specific floor type; I’d recommend thoroughly researching products to match your subfloor’s material and the depth of unevenness, as using the wrong one can compromise the whole job. Has anyone here experienced difficulties in selecting the best leveling materials for different subfloor conditions? Would love to hear tips from fellow DIYers—especially how you manage large or tricky surfaces.
Reading this post resonated with my recent experience doing a floor renovation in my basement. I initially underestimated how crucial thick, cement-based leveling compounds are for large dips, especially in older concrete slabs. I also discovered that a good laser level is indispensable for large surfaces—mine has saved me from countless hours of rechecking. One challenge I faced was ensuring proper curing in a humid environment, which can be tricky. I found that using a dehumidifier during curing helped, but I’m curious about others’ techniques for controlling humidity to maintain proper curing conditions. Also, since every subfloor is different, I’d love to hear how DIYers decide between self-leveling compounds versus hand-screeding for uneven surfaces. Has anyone tried combining methods for better results? It’s fascinating how much attention to detail can influence the longevity of your flooring, and I believe investing in quality tools and materials really makes a significant difference.