Ever spent hours installing a new hardwood or tile floor only to realize it’s uneven? I’ve been there. I remember the frustration of seeing those tiny dips and waves that ruin the sleek look I was aiming for. It’s a lightbulb moment when you understand that a perfectly leveled subfloor is the secret to a durable, stunning finish. Skipping this step can lead to cracked tiles, squeaky floors, and a lot of headaches down the line. But here’s the good news: with the right techniques, you can achieve a flawless surface that lasts for years.
Why Floor Leveling is the Foundation of Success
Think about it—your floor is the foundation of your entire space. If it’s uneven, everything else suffers. From difficulty in installing and maintaining your flooring to potential structural issues, a poorly leveled subfloor can cause more than just cosmetic problems. According to flooring experts, improper leveling is one of the top mistakes homeowners make, leading to costly repairs and replacements. So, investing time and effort into proper leveling isn’t just about aesthetics; it’s about durability and peace of mind.
Have you ever faced this problem? Maybe your tiles crack after a few months, or your hardwood squeaks and warps? If so, you’re not alone. I’ve made my share of mistakes early on—like rushing through the leveling process and ignoring the importance of a precise surface. Trust me, those mistakes cost me time and money. That’s why I want to share what I’ve learned from my own journey, and why proper floor leveling is the first step toward a long-lasting, beautiful floor.
In this guide, I’ll walk you through the essential techniques and expert tips to ensure your subfloor is perfectly prepared. Whether you’re working on a renovation or a new build, mastering these skills will save you trouble later. Ready to dive into the practical steps? Let’s start with understanding the basics of assessing your floor’s levelness and choosing the right materials to get it just right.
Assess Your Floor with a Simple Test
Start by checking your subfloor’s levelness using a long, straightedge or a level. Place the tool across different areas to spot dips or high spots. When I did this for my living room, I noticed a significant dip near a doorway that caused my tiles to crack later. Mark these spots for targeted corrections, and don’t skip this crucial step — it saves time and money in the long run. For detailed assessment methods, see this comprehensive guide.
Prepare Your Tools and Materials
Gather the right supplies: a self-leveling compound, a trowel, a mixing bucket, and safety gear. The key is choosing high-quality materials; I once used a cheaper leveling compound, which cracked after a few months. Always follow manufacturer instructions for mixing ratios to prevent issues. Think of this step like baking — precision matters. For detailed material selection tips, visit this resource.
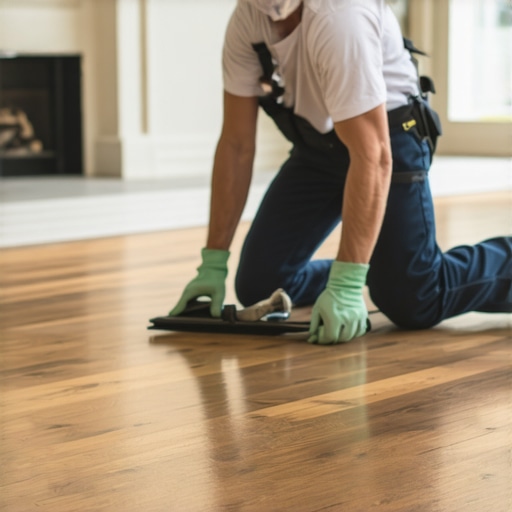
Apply the Self-Leveling Compound
Mix the compound thoroughly until smooth, then pour it onto the low spots. Use a trowel or a gauge rake to spread it evenly, working quickly before it sets. When I did this in my bathroom, I poured in the center and let gravity do its work. To ensure a smooth, flat surface, gently move the mixture with the trowel, feathering the edges into the surrounding area. Think of this process like pouring syrup over pancakes — it needs to flow naturally and settle evenly. For expert tips, see this detailed guide.
Sand and Finish the Surface
Once the compound cures (usually after a few hours), lightly sand high spots or ridges. This step ensures a perfectly smooth surface for your flooring. I learned this the hard way when I skipped sanding, and my hardwood planks didn’t sit flush. Use fine-grit sandpaper to avoid gouging the surface. Think of sanding as ironing out wrinkles — it’s the final smooth touch that makes everything look professional. For more finishing tips, check this guide.
Level Check and Final Touches
Re-test your surface with the level or straightedge. Confirm there are no dips or high spots before installing your flooring. If needed, spot-treat any remaining uneven areas with additional compound. Remember, patience here prevents future problems like squeaks or cracks. I recommend taking your time to ensure a uniform surface — rushing now might lead to costly repairs later. For more detailed inspection methods, see this resource.
Many homeowners and even some seasoned DIY enthusiasts believe they know everything about floor leveling, but in reality, some of the most widespread myths can lead to costly mistakes. Let’s dig deeper into these misconceptions and uncover the hidden nuances that can make or break your flooring project.
Why the
Maintaining your floor leveling system over time is crucial to preserving a flawless surface and avoiding costly repairs. The right tools and a proactive maintenance routine can extend the lifespan of your levelled floors significantly. From specialized equipment to routine inspections, understanding how to keep your floors in top shape is a skill every homeowner and professional should develop.
Invest in Precision Tools for Ongoing Inspection
High-quality laser levels are indispensable for ongoing floor assessments. Unlike traditional bubble levels, laser levels provide a 360-degree view of your surface’s levelness, making it easier to spot deviations early. I personally rely on the Bosch GPL 3 laser level because of its accuracy and durability. It’s rugged enough to withstand the typical dust and debris of renovation sites, and its self-leveling feature ensures quick setup. Using this tool regularly allows me to catch minor dips before they become major problems, saving both time and money. For detailed guidance on tools, see this resource.
Schedule Routine Maintenance Checks
Performing periodic inspections with a straightedge or laser level can help detect subtle shifts in your flooring’s surface. Check high-traffic areas more frequently, especially after heavy furniture rearrangements or renovations. If you notice any unevenness, address it promptly with spot repairs—adding self-leveling compound or re-sanding affected areas. This proactive approach prevents small issues from escalating into structural or aesthetic nightmares. Remember, consistent monitoring is key to long-term durability.
Keep Your Tools in Peak Condition
Tools like trowels, mixers, and leveling compounds require regular maintenance. Clean your mixing blades and trowels after each use to prevent buildup that can compromise application quality. Store your leveling compounds in airtight containers and in a cool, dry place to ensure their effectiveness over time. I’ve learned that investing in quality tools and maintaining them properly minimizes errors during application, leading to smoother, more durable results. For more tips on proper tool care, visit this guide.
Preparations for Future Trends
Looking ahead, the integration of smart sensors and IoT devices into flooring systems may revolutionize how we maintain and monitor our floors. Imagine real-time alerts when your floor begins to shift or when humidity levels affect the surface. Staying updated with these innovations will allow DIYers and professionals alike to keep their floors in pristine condition with minimal effort.
Try These Advanced Maintenance Tips Today
One practical tip is to incorporate periodic laser leveling checks into your routine. Not only does this ensure your surface remains perfectly flat, but it also helps you catch minor issues early, making repairs easier and less expensive. Don’t wait for a visible problem—be proactive. Regular assessments combined with proper tool maintenance will ensure your floors stay beautiful and durable for years to come.
Achieving a perfectly leveled floor can seem daunting, but the insights I’ve gained over years of DIY projects have revealed some game-changing lessons. Here are a few of the hardest lessons I learned about floor leveling that can save you time, money, and frustration:
- Patience Is Key: Rushing the process often leads to uneven results. Waiting for the compound to cure thoroughly before sanding or rechecking ensures a smooth surface.
- Measure Multiple Times: One quick check isn’t enough. I learned to double-check with laser levels and straightedges from different angles, which caught small dips I would’ve missed otherwise.
- Quality Tools Matter: Cheap tools can cause uneven application and surface imperfections. Investing in a good trowel or laser level drastically improves results and reduces rework.
- Don’t Skip the Final Inspection: After applying the leveling compound, always re-test with a level. It’s tempting to move straight to flooring, but that small step prevents future cracks or squeaks.
- Learn from Mistakes: My biggest mistake was ignoring minor dips early on. Now, I treat every imperfection as a learning opportunity, which has made my floors more durable and beautiful over time.
My Essential Toolkit for Floor Leveling
For anyone serious about professional results, here are the tools I swear by: a high-quality laser level like the Bosch GPL 3, a sturdy trowel, and fine-grit sandpaper. These tools have transformed my approach, making difficult tasks manageable and ensuring a flawless finish every time. For more insights into the best equipment, check out this resource.
Empower Your Floors and Your Confidence
The journey to perfect flooring isn’t just about tools and techniques; it’s about empowering yourself to take on challenges with confidence. Every successful project boosts your skills and makes future projects smoother. Remember, every uneven floor you fix today is a step toward a more beautiful, durable home tomorrow. So, don’t wait — start leveling with purpose and precision, and watch your space transform. Have you ever struggled with a tricky spot while leveling? Let me know below, and share your stories or tips!