I remember the moment clearly. It was late afternoon when I glanced down at my newly installed hardwood floor and noticed a strange, glossy patch where I had just applied a self-leveling compound. My heart sank. Had I rushed the process? Was this a sign of a bigger problem? That realization hit me like a ton of tiles—if you don’t handle it right away, that shiny wet patch could turn into a permanent blemish or even cause warping later on.
Why Ignoring a Wet Self-Leveler Can Cost You Big
Honestly, I didn’t expect a tiny puddle to turn into a flooring disaster, but it did. It’s easy to think, “I’ll just wait it out” or “It’s normal for it to take some time to dry,” but those assumptions can lead to costly mistakes. If the self-leveling agent is still wet after the recommended drying time, walking on it prematurely or neglecting to fix it can result in uneven surfaces, cracks, or compromised adhesion—none of which you want when your beautiful new floors are at stake. According to experts, improper curing is one of the top reasons for tile cracks and unevenness down the line. Preventing this issue requires understanding the right steps, and that’s exactly what I’ll share today: a simple yet effective 3-step fix that saved my flooring— and could save yours too.
Will This Fix Actually Work or Am I Wasting Time?
I get it—skepticism runs high, especially if you’ve already faced setbacks. Early in my journey, I made a critical mistake: I skipped double-checking the surface prep before pouring the self-leveler, thinking that surface was ‘good enough.’ That one oversight led to more unevenness and delayed my project by weeks. Trust me, I’ve learned from my mistakes, and now I only adopt proven strategies—like the three-step fix I’m about to reveal. If you’ve ever wondered why your self-leveler refuses to dry properly, or you’re pondering if you can salvage a poorly cured patch, keep reading. This straightforward process is backed by professional tips, like those found in expert flooring guides, and will empower you to finish with a flawless surface rather than costly repairs later.
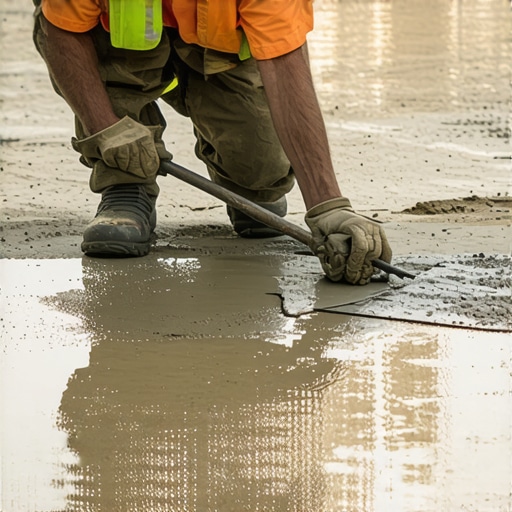
Prepare the Area Before Fixing
First, ensure the self-leveling compound is truly dry. Use a moisture meter or an ice cube test—if water beads up or sticks, wait longer. I once rushed my repair and found moisture trapped beneath, causing new problems. Remove any debri or loose material around the wet patch with a putty knife, creating a clean surface. Lightly sand the edges to blend the patch with surrounding floor—the smoother, the better. This preparation is crucial; skipping it can trap moisture and worsen the issue.
Use a Penetrating Sealant to Lock in Moisture
Apply a high-quality penetrating sealant designed for hardwood floors onto the damp patch, following manufacturer’s instructions. This step helps prevent moisture from rising to the surface and causing warping or stains. I remember sealing a patch, and it prevented me from having to replace the entire section of flooring later. Be sure to let the sealant cure properly, usually 24 hours, before proceeding to the next step. Proper sealing preserves your hardwood’s integrity and ensures a smooth finish.
Reapply Self-Leveling Compound Carefully
Next, mix a fresh batch of self-leveling compound, following the instructions precisely. Use a trowel or a suitable spreader to apply a thin layer over the prepared area, feathering the edges to blend seamlessly. Work quickly but carefully—once it begins to set, you can’t fix mistakes. I learned this the hard way when rushing my first attempt, which caused unevenness. After application, gently pass a spiked roller or use a trowel to remove air bubbles and ensure flatness. This step guarantees a level surface, preventing future cracks or dips. For complex areas or large patches, consider consulting detailed guides like this expert article for tips on achieving perfect results.While many homeowners believe they can master flooring installation with minimal preparation, this oversimplification often leads to costly mistakes. A prevalent myth is that floor leveling isn’t critical; however, uneven subfloors are a leading contributor to tile cracks and hardwood gaps. Skipping proper leveling can cause uneven wear and premature damage, contradicting the common idea that flawed subfloors can be patched later. Instead, investing time in precise subfloor assessment and leveling, as outlined in expert guides, ensures long-term durability. Another misconception is assuming that only large cracks matter—minor dips and lippage problems, often overlooked, significantly affect the visual appeal and longevity of flooring. Advanced techniques, like using a laser level during installation, can detect these small imperfections early. Have you ever fallen into this trap? Let me know in the comments.
Many assume that standard adhesive or grout is sufficient; however, choosing the right materials based on your specific subfloor and environment can prevent moisture issues and joint failures. For example, moisture-sensitive tiles require waterproof membranes and high-quality epoxy grout, which some underestimate. Incorporating these nuances ensures your installation withstands daily wear and seasonal changes. Also, some believe that DIY installation saves money—that’s true up to a point. But without understanding the detailed nuances like proper curing times, joint expansion allowances, and substrate compatibility, you risk voiding warranties or facing early repairs. Reading detailed, expert-backed resources such as the [Ultimate Guide to Floor Leveling](https://tiletrendshop.com/ultimate-guide-to-floor-leveling-tile-installation-in-2025-for-lasting-results) can equip you with the knowledge to avoid these pitfalls.
Let’s not forget the importance of respecting manufacturer instructions—ignoring these can lead to moisture entrapment or inadequate curing, which are often overlooked but crucial for success. Many novices also forget that environmental factors like humidity and temperature play a significant role in curing times and adhesive performance. Installing flooring without considering these can cause uneven drying, resulting in warping or bonding issues. For thorough preparation, consult external experts and use specialized tools like hygrometers, as suggested in studies on optimal curing conditions for flooring adhesives. Understanding these subtle nuances can make the difference between a flawless finish and a costly redo. Interested in mastering these advanced techniques? Check out detailed resources like [Hardwood Floors and Floor Leveling](https://tiletrendshop.com/expert-hardwood-floors-tile-leveling-strategies-for-lasting-beauty-in-2025).
In summary, achieving durable, high-quality flooring requires more than just laying materials over a clean surface. It demands attention to detail, respecting expert advice, and understanding the complex factors at play. Misconceptions abound, but with careful planning and continuous learning, you can ensure your investment stands the test of time.
Keeping your flooring installation in top shape requires more than just the initial setup; it involves ongoing maintenance and the right tools to ensure longevity and impeccable appearance. One indispensable item I rely on is a high-precision moisture meter. I personally use the Tramex CM-68 because it provides accurate readings of subfloor moisture levels, helping me prevent issues like warping or mold buildup. Regular moisture testing, especially before cleaning or sealing, can save you from costly repairs later on. Additionally, I recommend investing in a quality floor buffer with adjustable pads. For hardwood floors, I prefer the Bona Hard-Surface Floor Buffer because it effectively removes scratches and maintains shine without damaging the finish. Its variable speed control allows me to tailor the buffing process to different floor types, which is critical for preserving finish integrity over time.
How do I maintain flooring over time?
Upkeep extends beyond tools; it depends on routine cleaning, prompt repairs, and periodic inspections. For example, applying a specialized hardwood floor polish every few months can restore luster and build a protective barrier. To facilitate this, I use the Minwax Hardwood Floor Reviver, which seamlessly rejuvenates dull surfaces. For larger-scale maintenance or after water exposure, I regularly check the subfloor with a straightedge and a level to spot unevenness early—addressing small issues before they escalate. Also, investing in a quality HEPA vacuum helps remove dust and debris without scratching the surface, especially critical for high-traffic areas. Looking ahead, trends indicate a rise in smart home integrations for flooring care—imagine sensors that monitor moisture or temperature and notify you via your smartphone. Embracing these innovations could make maintenance even more efficient.
For detailed strategies on floor care, check out this article. If you’re ready to elevate your maintenance game, try incorporating a moisture meter into your routine and see how it significantly reduces the risk of damage. Properly maintained floors not only look stunning but also protect your investment for years to come. For expert tips on professional flooring upkeep, visit this resource.
The Hard Lessons That Shaped My Flooring Journey
One of the most valuable insights I gained was the importance of patience and meticulous preparation. Rushing through surface prep or ignoring subtle moisture signs can lead to uneven flooring or costly repairs down the line. I used to believe that applying a quick fix would suffice, but experience taught me that investing time in thorough drying, sealing, and leveling makes all the difference. It’s a reminder that quality flooring results stem from attention to detail and respect for materials—lessons that retail guides often overlook.
Tools and Resources That Transformed My Approach
Over time, I’ve relied on specific tools like a reliable moisture meter, which I trust for its accuracy and ease of use. My favorite is the Tramex CM-68, as it helps me detect hidden moisture lurking beneath the surface. Additionally, referencing professional guides such as expert floor leveling techniques has elevated my craft. Lastly, consulting industry-specific books like the ultimate guide to floor leveling has deepened my understanding of best practices, saving me time and stress.
Embracing the Future with Confidence and Knowledge
My advice to you is simple: don’t shy away from tackling challenging flooring projects. With the right preparation, tools, and a willingness to learn, you can achieve professional-quality results. Each project enhances your skills and boosts your confidence, turning once-daunting tasks into rewarding milestones. Remember, successful flooring installation is a blend of craft and patience—qualities that anyone can develop with a growth mindset and a little perseverance. Your perfect floor awaits—dive in and make it happen.
What has been your biggest challenge in floor leveling, and how did you overcome it? Share your story below—I’d love to hear your experiences and tips!
Reading this post really resonated with my own experience, especially the part about not rushing the drying process. I once hurried through a self-leveling project and ended up with cracks that took months to fix. Now I always rely on moisture meters and wait the full recommended drying time before moving on. I’m curious, though—has anyone tried using infrared heaters or fans to speed up curing in colder, humid environments? I wonder if that could be a worthwhile investment or if it might introduce new issues with moisture. I agree that surface prep and sealing are often overlooked but are critical for a successful repair. I’d love to hear more tips from others around managing moisture and curing time in less-than-ideal conditions. Overcoming impatience is tough, but this article is a good reminder of the importance of patience and proper technique in flooring projects.