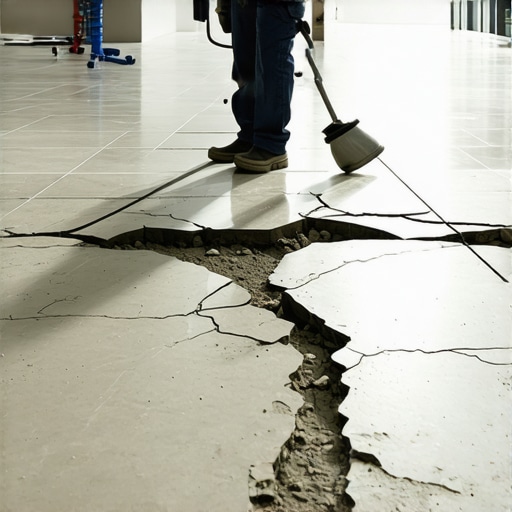
I remember that sinking feeling all too well—the moment I realized my recent tile installation was uneven, causing unsightly lippage and cracks. It was one of those weekends I thought I was saving time by taking shortcuts. Little did I know, those quick fixes would haunt me for years. If you’ve ever skipped proper floor leveling and paid the price later, you’re not alone. Many homeowners and even seasoned pros fall into the trap of shortcuts, especially when rushing to meet deadlines or budget constraints. But here’s the truth: rushing through floor leveling can sabotage your entire tile or hardwood project.
The Hidden Dangers of Cutting Corners with Floor Leveling
When I first started out, I believed that quick fixes like sealing uneven spots or using cheap self-leveling compounds would save me time and money. However, these short-sighted decisions often resulted in tiles cracking or bubbling over time. What I didn’t realize then was that some shortcuts, particularly those involving improper subfloor prep or inadequate moisture testing, set the stage for disaster. According to industry experts, ensuring a flat, moisture-free surface is crucial for long-lasting flooring—in fact, neglecting these steps can increase your risk of failure significantly. For instance, skipping necessary moisture testing can lead to tile lifting or warping down the line.
Are you worried about making the same mistakes? If so, keep reading. We’ll explore the common shortcuts that seem tempting but can ruin your tile projects—and most importantly, how to avoid them.
Is Cutting Corners with Floor Leveling Actually Worth the Hype?
My early mistake was trying to patch uneven spots with a quick spray of leveling spray or a cheap self-leveling compound. I thought, “It looks good enough”—but I ignored the importance of proper subfloor preparation. These shortcuts might seem like a good idea at the moment, but they’re often the main culprits behind tile cracking, hollow sounds, and even subfloor movement later on. These issues aren’t just cosmetic; they jeopardize the stability and durability of your entire floor.
If you’re serious about avoiding these pitfalls, I recommend reviewing some proven strategies on proper floor leveling techniques. For example, investing time in labor-intensive prep can save you substantial hassle down the road. You can learn more about the correct methods by visiting [this comprehensive guide](https://tiletrendshop.com/the-ultimate-guide-to-floor-leveling-for-a-perfect-finish), which lays out step-by-step instructions for achieving a flawless surface.
To ensure your project stands the test of time, it’s vital to recognize these mistakes early. Now, let’s dive into the specific shortcuts that are best avoided—and the smarter approaches that deliver lasting results.
Prepare Your Subfloor Like a Pro
Before any leveling work begins, inspect the subfloor thoroughly. Walk across it and listen for hollow sounds, which indicate dips or soft spots. Use a straight 2×4 board placed on the surface; if it wobbles or gaps are visible underneath, these areas need attention. The goal is a flat, firm foundation, like a stage for a play—every actor (tile or hardwood) depends on it for a smooth performance.
Test Moisture and Flatness with Precision
Moisture testing is crucial, especially in basements or high-humidity areas. Use a moisture meter to ensure readings align with the flooring manufacturer’s specifications. If moisture levels are high, employ proper drying methods or subfloor moisture barriers. For flatness, lay a long spirit level or laser level across the surface. Any deviations exceeding 3/16 inch over 10 feet need correction. Think of it as tuning a guitar string—precision determines harmony.
Choose the Right Leveling Method
Self-Leveling Compounds
When dealing with minor dips (less than 1/4 inch), a self-leveling compound offers a quick fix. Pour the mixture over the surface, and use a smoother tool to spread it evenly. I once used this method in a tight corner; the compound flowed into the low spots easily, resulting in a perfectly smooth surface after curing. Remember, surface preparation is key—clean and prime the subfloor before application.
Shimming and Plywood Overlay
For more significant unevenness, shimming or adding a plywood overlay offers a sturdier solution. Use shims or thin strips of plywood taped and glued to fill dips, then sand smooth. This approach is like building a ramp to level a staircase—careful planning ensures stability. Always check flatness after adjustments to prevent uneven tension on the tiles or flooring.
Implement Proper Sealing and Moisture Barriers
Apply sealers or moisture barriers over the prepared surface according to product guidelines. This step protects your investment, preventing moisture intrusion that could cause future warping or cracks. I learned this the hard way when ignoring moisture barriers; my hardwood floors cupped within a year. Proper sealing is akin to putting a waterproof coat on a boat—essential for durability.
Final Inspection Before Tiling or Flooring
Use a long straightedge or laser level to verify the entire surface—no dips or humps should remain. Walk across the area to confirm no bouncing or squeaking occurs. Any imperfections can cause tiles to crack or hardwood to buckle over time. Think of this as the final dress rehearsal before opening night; perfection here guarantees a standing ovation from your floors.
When it comes to flooring, many assume that following basic steps guarantees long-lasting results, but the truth is, understanding the subtle nuances can make or break your project. One common myth is that a perfectly flat surface is all you need; however, experts emphasize that moisture control and subfloor stability are equally critical for durability. Rushing to install tile or hardwood without meticulous prep—such as thorough moisture testing or addressing minor dips—often leads to issues like cracking, warping, or delamination over time. Advanced installers recognize that small deviations, even less than 1/8 inch, can cause significant problems with alignment and adhesion, especially when working with large tiles or wide planks. Moreover, many overlook the importance of proper curing and sealing procedures, which protect the flooring from future moisture damage and structural shifts. According to a study by the National Wood Flooring Association, improper subfloor preparation and neglecting environmental factors contribute to over 50% of flooring failures within the first five years. Therefore, mastering these nuanced aspects is essential for a flawless finish and longevity. Do you know the critical details that can save your installation from future headaches? Dive into resources like [this ultimate guide](https://tiletrendshop.com/the-ultimate-guide-to-floor-leveling-for-a-perfect-finish) and elevate your expertise. Remember, a small oversight today can lead to costly repairs tomorrow. Have you ever fallen into this trap? Let me know in the comments.Maintaining your flooring investments requires the right tools and a good understanding of their application. From regular inspections to precision repairs, investing in quality equipment can extend the lifespan of your tile and hardwood floors. One of my favorite tools is the laser level—specifically, the Bosch GLL 3-80 because of its accuracy and ease of use for checking flatness over large surfaces. Using a laser level ensures that any dips or humps are detected early, preventing costly issues down the line. For moisture testing, I rely on the Protimeter Aquant moisture meter, which provides quick, reliable readings crucial before any re-coating or refinishing. Drying and dehumidification also play vital roles; I recommend the Dri-Eaz Hurricane 3 dehumidifier, perfect for controlling humidity in enclosed spaces, especially in basements or during long-term maintenance projects.
To keep your floors looking their best, regular cleaning tools matter too. A microfiber mop paired with pH-neutral cleaners like Bona Hardwood Floor Cleaner can prevent buildup that causes scratches or dullness. For deep cleaning or spot repairs, a handheld buffer with soft pads helps remove stubborn stains or minor scratches without damaging the finish. Remember, consistent maintenance is about combining these tools with a regular schedule.
Looking ahead, I believe automation and smart sensors will become standard in flooring maintenance. Imagine sensors embedded beneath the surface that detect moisture levels or shifts in subfloor stability, alerting homeowners before problems escalate. This proactive approach can save money and preserve floor integrity for decades.
**How do I keep my floors in top shape over time?** Regular inspections using a laser level, combined with moisture monitoring and prompt repairs, form the foundation of effective floor maintenance. For detailed techniques on flooring care, check out [the hardwood floor care secrets to longevity and shine](https://tiletrendshop.com/hardwood-floor-care-secrets-to-longevity-and-shine).
To elevate your skills, I suggest trying out a comprehensive moisture test before any refinishing or sealing project. Accurate moisture assessment is vital for preventing future warping or delamination, and high-quality moisture meters like the Protimeter Aquant make this process straightforward. With consistent tool use and proactive care, your floors will stand the test of time and remain stunning for years to come.
The Hidden Lessons Behind My Floor-Leveling Fumbles
One of the most eye-opening realizations I had was how a small oversight—like neglecting to check moisture levels—could unravel months of work. It forced me to see that patience and thoroughness aren’t just virtues but necessities in flooring projects. I learned the hard way that rushing through subfloor prep often leads to cracks and buckling, really underscoring the importance of my first step: proper inspection and planning.
Another lightbulb moment was understanding that even minor dips—less than 1/8 inch—can cause major issues over time. The difference between a professional and a DIY project often boils down to attention to these tiny details. Proper tools and techniques, like using a laser level or moisture meter, have become non-negotiable in my process, saving me from costly repairs later on.
Lastly, I realized that shortcuts—such as skipping priming or sealing—might seem tempting initially, but they compromise the entire flooring’s longevity. A well-protected base ensures that your investment remains pristine for years. These lessons have transformed my approach, turning what was once a gamble into a predictable, successful craft.
My Go-To Arsenal for Floor Perfection
Over the years, I’ve curated a set of trusted tools that truly make a difference. The Bosch GLL 3-80 laser level is my go-to for instantly confirming flatness over large areas, ensuring no dips go unnoticed—check it out for precise leveling. For moisture assessments, the Protimeter Aquant is reliable and quick, preventing future surprises caused by hidden dampness. When it’s time to dry and dehumidify, I trust the Dri-Eaz Hurricane 3; controlling humidity levels is critical in basement installations and high-humidity zones. For maintenance, a microfiber mop paired with pH-neutral cleaners like Bona Hardwood Floor Cleaner keeps the surface gleaming without damaging the finish. Investing in these tools has dramatically improved my results and saved me from redoing work.
Looking ahead, I believe that smart sensors embedded beneath floors could revolutionize maintenance—detecting moisture or shifts in subfloor stability before problems become visible. Embracing innovation today can safeguard your installation and bring peace of mind. Want to enhance your flooring journey? Dive deeper into expert strategies with resources like this comprehensive guide for flawless results.
Seize Your Flooring Future Today
Remember, every successful flooring project rests on understanding the nuances and applying proven techniques. My experience has shown that meticulous prep, right tools, and a patient mindset are your best allies. Don’t let shortcuts undermine your efforts—your floors deserve the care that guarantees longevity and beauty. Now is the perfect time to take action and elevate your craftsmanship. Are you ready to implement these tips and create floors that truly stand the test of time? Share your plans or questions below—I’d love to hear your story.