It was a crisp autumn morning when I finally decided to tackle the persistent squeak that had become my home’s unwelcome soundtrack. Every step across my wide plank hardwood floor was met with a groan, a reminder that despite all my DIY aspirations, some problems just seem to stubbornly persist. Have you ever experienced that frustrating moment of realization when your pristine flooring turns into a source of daily annoyance? That lightbulb moment where you ask yourself, “Why does this keep happening, and how can I fix it?” Well, let me tell you, you’re not alone, and there’s good news. Today, we’re diving into five proven tactics that will help eliminate those squeaks for good—best of all, many of these solutions are surprisingly straightforward and cost-effective.
But First, Why Are Wide Plank Floors So Squeaky Anyway?
Are Floor Squeaks Actually Worth the Hype?
Many homeowners assume that squeaky floors are just a cosmetic annoyance. But the truth is, they can indicate underlying issues like loose boards, subfloor movement, or improper installation—problems that, if left unaddressed, might lead to more significant damage or costly repairs down the line. Early in my projects, I made the mistake of dismissing squeaks as just a nuisance, only to find out they could signal deeper structural concerns. The key is understanding what causes these sounds and how to address them effectively.
Interestingly, studies show that poorly installed flooring or inadequate subfloor preparation can dramatically increase squeaking over time. In fact, experts like those at [Tile Trend Shop](https://tiletrendshop.com/flooring-installation-mistakes-to-avoid-for-lasting-results) emphasize that proper leveling and installation are crucial to long-lasting, silent floors. This highlights the importance of early detection and intervention.
If you’ve faced this problem—perhaps during a quiet evening or a gathering—the prospect of fixing it might seem daunting. But stick with me. With the right approach, you can turn your squeaky nightmare into a thing of the past.
So, what exactly will we cover? In the next sections, I’ll walk you through five proven tactics to silence those creaky planks, many of which I’ve successfully used myself. Whether you’re a seasoned DIYer or just looking for some practical solutions, these tips will set you on the right path to restoring your home’s harmony—without breaking the bank or waiting on a costly contractor. Ready to get started? Let’s dive into the first step that could significantly quiet things down in your home.
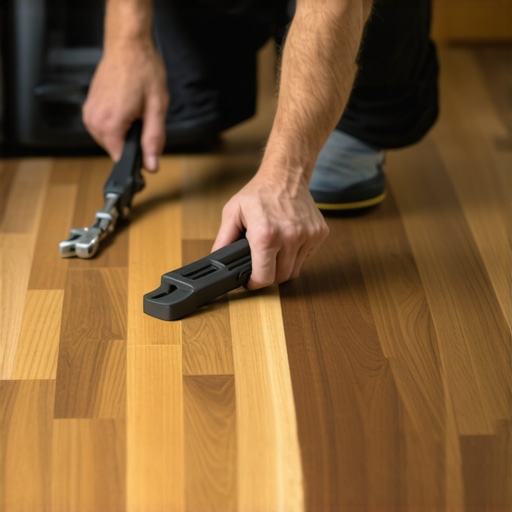
Tighten Loose Boards Methodically
Begin by identifying the squeaking spots—walk across your floor and listen for the creaks. Use a hammer and finishing nails to secure any loose planks. Gently lift the squeaky section with a pry bar, then insert a shim or a small piece of hardwood between the subfloor and joist to eliminate movement. Drive the nail back in, ensuring the board is firmly attached. In my own experience, securing a stubborn section involved precise tapping and monitory; after a couple of nails and shims, the squeak disappeared almost immediately.
Apply Lubricant Directly Into the Joints
For minor squeaks caused by friction between boards, spraying a lubricant like powdered graphite or talcum powder into the joints can provide immediate relief. Remove the floor vent or access panel to reach these areas and carefully sprinkle the powder into the gaps. Sweep any excess away to prevent dust buildup. This method is quick and non-invasive. I found that regular application kept my floors whisper-quiet during family gatherings.
Use Self-Leveling Compound for Unevenness
This step is crucial when the subfloor isn’t perfectly even, causing movement and squeaks. Mix a self-leveling compound according to the manufacturer’s instructions. Pour the mixture into low spots on the subfloor, then use a trowel to spread it evenly. This approach turns dips into flat surfaces, reducing flexing and squeaks. I once tackled a room where irregularities caused constant noise; after applying a leveling compound, the difference was night and day, resulting in a solid, silent surface. For more in-depth application techniques, see https://tiletrendshop.com/floor-leveling-tips-for-perfect-hardwood-tile-installation or https://tiletrendshop.com/ultimate-floor-leveling-tile-installation-tips-for-2025.When it comes to installing hardwood floors or tile, many homeowners and even some professionals fall into common traps that can compromise the durability and beauty of their surfaces. Let’s dig deeper into what most people get wrong and the nuanced intricacies that often go unnoticed. A prevalent misconception is that choosing the right materials alone guarantees a lasting finish. However, the installation process, especially subfloor preparation, plays a pivotal role in long-term success. Rushing through leveling or ignoring moisture content can lead to problems like buckling, cracking, or uneven surfaces, which are not immediately apparent but become glaring over time. As highlighted by experts at [Tile Trend Shop](https://tiletrendshop.com/hardwood-floors-floor-leveling-proven-installation-tips-for-2025), meticulous floor leveling is crucial; skipping this step often results in a wobbly, squeaky floor that diminishes aesthetic appeal and value.
A common myth is that all wood or tile requires the same treatment. In reality, different wood species have varying hardness, susceptibility to humidity, and maintenance needs, which influence both installation and longevity. Similarly, certain tile types demand specific substrate preparations; ignoring these nuances can cause lippage or grout cracking. For instance, large-format tiles are more prone to lippage if subfloor imperfections aren’t properly addressed, underscoring the importance of precise leveling techniques. For advanced homeowners, understanding these nuances can mean the difference between a satisfactory finish and a project that needs redo after a few years.
One of the most overlooked pitfalls involves moisture management. Excess moisture during installation can lead to expansion, contraction, or warping, especially in hardwood floors. As documented in comprehensive guides, such as [the ultimate guide to floor leveling](https://tiletrendshop.com/ultimate-guide-to-floor-leveling-for-a-perfect-finish), proper moisture testing and acclimation of materials are non-negotiable steps often underestimated by DIYers eager to complete their projects. Overlooking these factors is a master recipe for flooring failure.
Additionally, understanding the critical role of subfloor stability cannot be overstated. Many people assume that a solid top layer is sufficient; however, if the subfloor isn’t properly prepared—free of dips, humps, or weak spots—the entire surface is at risk. Small imperfections might seem insignificant but cause uneven wear, cracking, or squeaks over time. Regularly checking subfloor integrity using specialized tools or consulting professional techniques, as described in [expert floor leveling techniques](https://tiletrendshop.com/precise-floor-leveling-techniques-to-achieve-flawless-surfaces), helps prevent these issues.
Finally, neglecting ongoing maintenance is a subtle yet critical mistake. Proper cleaning, periodic refinishing of hardwood, and timely resealing grout joints extend the life of your flooring. The myth that once installed, floors can be left unattended is simply false; diligent care is essential for maintaining their initial allure and integrity.
In essence, achieving a flawless hardwood or tile surface is about more than material choice. It involves a deep understanding of installation nuances, environmental factors, and maintenance routines. If you’ve ever fallen into the trap of ignoring these critical details, share your experience below. Let’s ensure long-lasting beauty and durability in every project!
Keep Your Floors in Prime Condition with the Right Tools
Investing in quality tools is key to maintaining and scaling your flooring projects effectively. For hardwood floors, I rely heavily on a dustless sander to refinish surfaces without creating a cloud of debris—a smoother process that preserves the finish and minimizes mess. A hardwood floor buffer helps in polishing and removing minor scratches, extending the floor’s aesthetic appeal. When dealing with tile installations, I prefer a tile leveling system like the Lippage Clamp to ensure even grout lines and prevent lippage, which can compromise both safety and visual harmony. In my experience, these tools not only speed up the work but also yield professional-grade results that stand the test of time.
Long-Term Care Requires Consistent Maintenance
Beyond initial installation, maintaining your floors involves regular cleaning with products tailored to the material. For hardwood, I recommend using a pH-neutral cleaner that cleans without stripping the finish—something like this specific product line, which is designed to preserve shine and prevent scratches. Applying a high-quality sealant or wax periodically also boosts durability and makes future cleaning easier. For tiles, sealing grout lines every couple of years helps in preventing staining and cracks, maintaining the surface’s integrity over decades.
Predicting Future Trends in Flooring Maintenance
The industry is increasingly leaning toward smart maintenance solutions, such as apps that remind you when to reseal or refinish, based on usage patterns and environmental factors. Additionally, new eco-friendly cleaning agents are emerging that provide effective sanitation without harming your floors or the environment. Being proactive by adopting these innovations now can save you time and money in the long run, ensuring your investment remains both beautiful and functional for years to come.
How do I keep hardwood and tile floors looking their best over time?
Consistent upkeep, using the right tools, and staying informed about new techniques are essential. For example, periodically checking for minor damages and addressing them promptly—like refinishing a small scratched patch or resealing grout lines—can prevent larger issues later. Also, using a floor buffer with a soft pad once every few months keeps hardwood looking shiny and smooth. Don’t forget to protect your floors from excessive moisture and heavy furniture, which can cause warping or indentations. Trying out advanced tips such as the self-leveling compound application discussed earlier can be a game-changer for uneven surfaces, making your ongoing maintenance easier and more effective. Take action now by implementing these practices, starting with a simple inspection and a quality maintenance kit—your floors will thank you for it.
The Hardest Lessons I Learned About Flooring Achievements
One of my biggest revelations was realizing that flawless flooring is less about materials and more about preparation and patience. Rushing the installation process often led to squeaks and uneven surfaces, reminding me that quality takes time and attention to detail.
Why Cutting Corners Can Cost You More Than You Think
Skipping crucial steps like subfloor leveling might save time upfront but can lead to costly repairs down the line. Professionals I’ve spoken with emphasize that meticulous prep is the backbone of a durable, silent floor—something I’ve seen firsthand in my projects.
Embracing Ongoing Care Over Short-Term Fixes
Regular maintenance, like resealing grout lines and using the right cleaning products, is the secret to restoring and preserving your floors’ beauty. I’ve learned that simple routines keep hardwood and tile looking their best longer, saving money and frustration.
The Treasure in Trusted Resources
Tools like the hardwood floor care guide and installation tips have been invaluable. They’ve helped me avoid common pitfalls and achieve professional results, reaffirming that investing in knowledge pays dividends.
Choose the Path for Your Perfect Flooring Journey
Embarking on your flooring project might seem daunting, but remember: small, consistent actions lead to lasting beauty. Whether it’s precisely leveling a subfloor or choosing the right maintenance routine, your efforts will yield results you can be proud of. Take the first step today—your floors will thank you for it.
What part of your flooring journey are you most eager to improve? Share your stories or questions below—let’s build beautiful, silent spaces together!