Ever watched a floor warp or squeak months after installation and thought, “Did I mess this up?” I remember my first attempt at installing hardwood floors; I was proud but soon discovered uneven surfaces and gaps that made me regret rushing through the process. That lightbulb moment revealed how crucial proper leveling and installation techniques are — not just for aesthetics but for durability and long-term value. If you’ve faced similar frustrations, you’re not alone, and the good news is, with a little insider knowledge, you can avoid these pitfalls.
Why Proper Floor Leveling Is Non-Negotiable in 2025
Getting your hardwood floors perfectly level might seem like a small detail, but it’s the foundation of a beautiful, lasting finish. An uneven floor can lead to squeaks, creaks, and even damage over time. Trust me, the extra effort upfront will pay dividends in the long run. In fact, studies show that improperly installed flooring can reduce its lifespan by up to 30%, costing homeowners thousands in repairs or replacements. Today, I’ll share expert tips I’ve gathered over years of experience to help you master this crucial step.
Is Floor Leveling Only Necessary for New Homes?
If you think floor leveling is only for brand-new builds, think again. Existing floors often develop unevenness due to shifting foundations or past installations. Skipping proper leveling can cause your hardwoods to buckle or gaps to form, turning a dream renovation into a nightmare. Early in my journey, I made the mistake of ignoring subtle dips in the subfloor, which resulted in stubborn squeaks and uneven planks. That taught me that no matter the project age, levelness is key. For comprehensive guidance on achieving flawless surfaces, check out these expert leveling techniques.
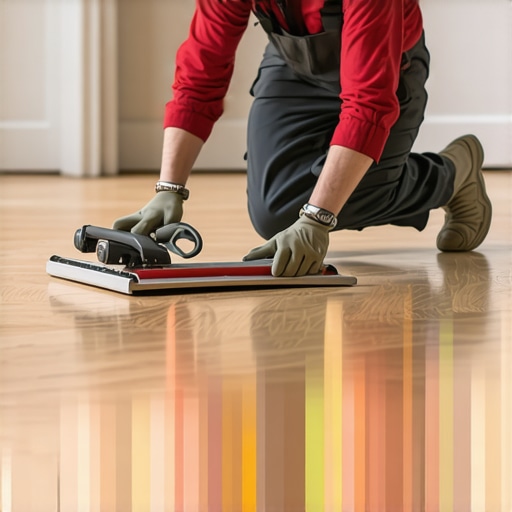
Start with the Right Tools and Assessment
Before lifting a hammer, gather a high-quality spirit level, a long straightedge, and a reliable measuring tape. My first real breakthrough came when I used a laser level instead of traditional tools—this allowed me to detect even minor dips that a regular level missed. Carefully inspect your subfloor, noting any irregularities or existing bumps. Mark these spots so you can address them systematically, rather than guessing, ensuring consistent results.
Prepare Your Surface for Success
Remove existing flooring and debris, then check for moisture issues that can warp your subfloor over time. If the subfloor is concrete, use a moisture barrier to prevent future damage. For wooden subfloors, tighten loose boards or screw down elevated sections. Think of your subfloor as the foundation of a house—skimp on it, and everything built on top risks future problems. Proper preparation is like laying a solid concrete slab beneath a skyscraper—crucial for longevity.
Use Self-Leveling Compounds Wisely
Mix with Precision
Follow manufacturer instructions meticulously when mixing self-leveling compounds. In my experience, a slightly thicker mix can be more forgiving, especially in deeper dips. Pour the mixture in small sections, starting from the highest point and working towards the lowest. This minimizes excessive flow and ensures a smoother finish, akin to pouring pancake batter into a pan to get an even surface.
Spread and Smooth
Use a gauge rake or trowel to spread the compound evenly; work quickly but carefully to avoid air pockets. I once neglected to work swiftly, resulting in uneven curing and a bumpy surface that ruined my first attempt at hardwood installation. Once poured, use a long straightedge, dragging it across the surface in a sweeping motion to flatten and smooth the compound. This step is critical for creating a truly level base, akin to smoothing frosting on a cake for a perfect finish. For detailed guidance, read these expert leveling techniques.
Address Persistent Unevenness Surface Repairs
After the compound cures, check the surface with your level. Small dips can be filled with additional compound, but for larger irregularities, consider rasping down high spots or replacing damaged sections. My mistake was ignoring deep dips—this led to uneven planks and excessive gaps later. Remember, a smooth, flat surface makes the entire installation process seamless and improves the lifespan of your floors.
Test and Confirm Before Installing
Once leveling is complete, squeegee or vacuum off any residual dust and debris. Conduct a thorough walk-through with your level and straightedge—trust me, standing on an uneven surface after hours of work is heartbreaking. Confirm that the entire area measures no more than 1/8 inch deviation over 10 feet, a standard for professional flooring. This extra step ensures confidence, preventing costly corrections at the final stage.
Achieving perfectly leveled floors might seem daunting, but by following these precise steps, you’ll set a durable foundation for your hardwood or tile projects. Remember, the key lies in patience, attention to detail, and using the right techniques. For a complete overview on this process, see this comprehensive guide.
Many homeowners assume that achieving a perfectly level floor is merely about using the right tools or following generic instructions. However, the real nuances lie in understanding subtle surface imperfections and the myths surrounding common installation practices. One prevalent misconception is that minor dips or bumps can be ignored, but in reality, these imperfections can lead to costly repairs or uneven flooring over time. For example, neglecting to address small cracks in the subfloor can result in squeaks, gaps, or even warping of your hardwood or tile surfaces. Advanced techniques involve inspecting and correcting even the slightest irregularities, which is crucial for long-lasting durability.
A common myth suggests that self-leveling compounds should always be poured in large sections for efficiency. In practice, experts advise pouring in smaller sections and working swiftly to avoid air pockets and uneven curing—details that significantly impact the final outcome. Moreover, many installers overlook the importance of moisture checks in the subfloor, especially for concrete slabs, which can cause severe issues later if not properly managed. Achieving flatness isn’t just about the surface; it requires understanding the underlying conditions and making precise adjustments.
How Can Advanced Surface Corrections Prevent Long-Term Damage
For seasoned professionals and meticulous DIYers, recognizing that surface imperfections are symptoms of deeper issues is essential. Small dips might indicate foundational shifts or moisture problems that require resolution before overlaying flooring. By employing techniques such as rasping high spots or installing proper vapor barriers, you can mitigate future problems. In fact, studies indicate that improper surface corrections can reduce the lifespan of your floors by up to 30%, leading to increased costs and dissatisfaction. To learn more about achieving resilient surfaces, explore expert leveling methods.
Let me know in the comments—have you ever fallen into the trap of ignoring tiny surface flaws, only to face bigger problems later? Sharing your experience might help others avoid costly mistakes. Remember, mastering the subtleties of floor leveling transforms a basic installation into a durable masterpiece, saving you time and money in the long run.
Keeping It Working: Essential Tools for Long-Term Floor Success
Maintaining your flooring over time is just as important as the initial installation. Investing in the right tools and adopting proven methods can significantly extend the life of your hardwood or tile surfaces. One tool I swear by is the digital moisture meter. Unlike traditional moisture tests, this device provides precise readings, helping you monitor humidity levels that could cause warping or buckling if left unchecked. Regularly checking moisture content in your subfloor and finish layers can prevent costly repairs and ensure your floors stay beautiful for years. For those who want a simple yet effective maintenance routine, a soft microfiber mop paired with specialized floor cleaners like pH-neutral solutions keeps surfaces free of dust and grime without damaging finishes.
How do I maintain my floors over time?
Beyond tools, establishing a routine cleaning schedule is vital. Sealants and protective coatings should be inspected and reapplied as needed; for hardwoods, consult resources like these care secrets to choose the best practices. For tile, inspecting grout lines and resealing prevents moisture infiltration, preserving structural integrity. I also recommend periodic professional inspections—think of it as a health check-up for your floors—that can catch issues early before they escalate.
Looking Ahead: What Trends Will Shape Floor Maintenance?
As technology advances, automation and smart monitoring are becoming increasingly prevalent. Imagine floor sensors that alert you to rising moisture levels or sudden temperature shifts indicating potential problems. Future tools may incorporate AI-driven analytics, predicting maintenance needs before visible problems arise. Staying ahead means adopting these innovations early, ensuring your floors remain durable and stunning over decades.
Optimizing Maintenance with Advanced Techniques
One game-changing approach I’ve adopted is integrating refinishing and sealing schedules tailored to your specific floor type and usage patterns. This proactive strategy prevents wear and tear from becoming irreversible. Additionally, maintaining a controlled indoor environment—regulating humidity and temperature—reduces expansion and contraction, which can lead to cracks and gaps. Implementing these practices not only preserves aesthetic appeal but also enhances safety by preventing slips and uneven surfaces.
Don’t hesitate to try out the use of a combination of high-quality cleaning tools and moisture monitoring devices—it’s a small investment that offers peace of mind knowing your floors are protected. Regular attention, coupled with technological aids, will keep your flooring looking great and functioning flawlessly for years to come.
Lessons I Never Saw Coming About Floor Leveling and Installation
- Overconfidence in quick fixes can lead to long-term headaches. I once skipped meticulous subfloor inspections, only to face stubborn gaps months later, teaching me that patience in prep work pays off.
- Misjudging moisture content isn’t just a small mistake—it can wreak havoc on your floors. Learning to accurately assess and manage humidity levels has saved me from costly repairs and re-installations.
- Tools matter more than I initially believed. Using laser levels and moisture meters transformed my workflow, making precise leveling achievable even in tricky spaces.
Tools and Resources That Changed My Approach
- The comprehensive guide to floor leveling offered step-by-step insights that elevated my technique and confidence.
- Investing in a digital moisture meter proved invaluable for detecting hidden issues before they escalated, ensuring my floors stayed durable and beautiful.
- Expert-level leveling techniques provided the nuanced adjustments needed for complex projects, saving me from rookie mistakes.
Your Opportunity to Elevate Your Flooring Skills
Taking the time to master proper floor leveling and installation not only results in stunning, long-lasting floors but also boosts your confidence and craftsmanship. Each step you perfect contributes to creating a foundation that withstands the test of time. Don’t wait for issues to appear—start integrating these insights today and turn your flooring projects into lasting masterpieces.
Have you ever faced a surprising challenge during flooring installation that changed your approach? Share your story below; your experience might inspire someone to avoid common pitfalls!
This post resonated with me deeply because I learned the hard way about the importance of proper subfloor assessment before installation. Earlier in my DIY journey, I overlooked subtle dips, thinking a quick fix would suffice. Fast forward, I faced squeaks and uneven planks that I had to repair later—definitely a costly lesson. It’s clear that thorough inspection with tools like laser levels and moisture meters not only saves time but also ensures a more durable finish. I’m curious, how do others balance the time invested in detailed prep work with project deadlines? Have any of you adopted new tools or methods that dramatically improved your workflow? I believe that understanding and addressing these small imperfections early on transforms the entire project, turning a potentially frustrating experience into a rewarding one.