I vividly remember the moment I stepped into a newly renovated home and immediately noticed the uneven, creaky floors—like a jigsaw puzzle improperly assembled. That realization hit me hard: no matter how beautiful the tiles or the hardwood, if the installation isn’t done right, all that aesthetic effort can be wasted. Early on, I made a common mistake—underestimating the importance of proper floor leveling before installation—and paid the price with cracks and squeaks that took years to fix.
Why Choosing the Right Installation Strategy Can Make All the Difference
Installing hardwood and tile floors isn’t just about laying materials; it’s about laying a foundation for enduring beauty and durability. Missteps like skipping the proper floor leveling process can lead to problems down the line, such as cracking, uneven surfaces, and even premature failure. From my experience, adopting effective strategies—like meticulous floor leveling and professional sealing—defines whether your floors will stand the test of time or become an ongoing repair nightmare. If you’re tired of replacing or fixing your floors just a few years after installation, you’re not alone. I’ve been there, and I want to share what I’ve learned to help you avoid those pitfalls.
Is Proper Floor Leveling Actually Worth the Hype?
Honestly, I once thought a quick fix was enough—until I learned how crucial a level base is, especially for intricate tile patterns or wide hardwood planks. Early in my projects, I overlooked the importance of getting the subfloor truly level, which led to uneven grout lines and visible dips. It wasn’t until I dove into expert tips—like those found in the comprehensive guide on [floor leveling techniques](https://tiletrendshop.com/the-ultimate-guide-to-floor-leveling-for-a-perfect-finish)—that I realized how small errors can snowball. The truth is, addressing floor unevenness from the start saves significant time, money, and frustration later.
If you’ve faced similar issues or are just starting your flooring project, understanding these foundational steps can dramatically improve the longevity and appearance of your floors. Stay tuned—I’ll walk you through the practical strategies that will elevate your flooring game, helping you achieve stunning, durable results that stand the test of time.
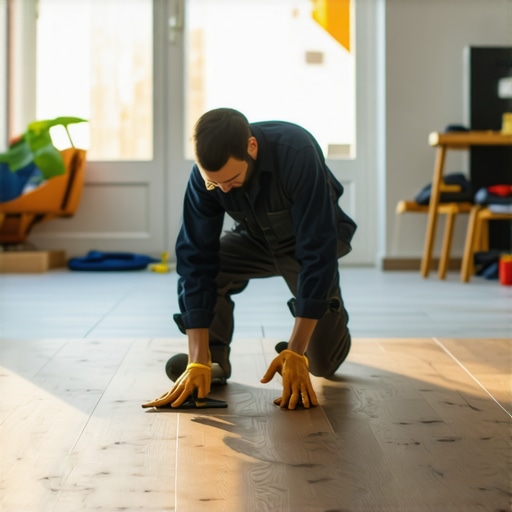
Prep the Subfloor with Precision
Start by removing all debris, dust, and old adhesive; a clean surface prevents future unevenness. Use a sturdy pry bar for loose boards and ensure the subfloor is free of rot or damage. Think of this step as preparing a canvas—you want a flat, stable base before painting. I once rushed through this phase, only to discover dips midway through my project; sanded and leveled again, I lost days. Don’t make that mistake.
Assess and Identify Uneven Spots
Use a long straightedge or a level placed across the entire floor to spot high and low points. Mark these areas with chalk or painter’s tape. This visual map guides your adjustments. During my first DIY, I skipped detailed assessment and ended up with cracked tiles. Detailed mapping in this stage is your best defense against costly fixes later.
Apply Floor Leveling Compounds Effectively
Mix the self-leveling compound according to manufacturer instructions—usually a 4:1 powder to water ratio. Pour the mixture onto the lowest spots, then use a trowel or squeegee to spread it evenly. Think of this as pouring pancake batter in a pan; the goal is a smooth, uniform layer. I once poured too much in one area and created a thick bump; careful spreading prevents this. Allow sufficient drying time before proceeding to tile or hardwood installation.
Use a Laser Level for Ultimate Accuracy
Set up a laser level once the compound has cured. Projects like installing hardwood floors need elevations consistent across the entire room. The laser acts like a painter’s guiding line, ensuring your leveling is flawless. I employed this technique for a large living room; the result was a perfectly flat surface that prevented squeaking and cracking. If your project demands high precision, investing in or renting a laser level is worth it.
Finish with Moisture and Expansion Gaps
Seal the edges with appropriate barriers to prevent moisture infiltration that can cause warping. Leave expansion gaps around the perimeter to accommodate temperature changes. These small details preserve your floor’s integrity over years. I once ignored expansion gaps, leading to buckling when seasons changed. Prioritizing these final touches helps your floors stay pristine. Regularly check local regulations and manufacturer recommendations; for more guidance, visit this resource.Many homeowners believe that choosing high-quality materials alone guarantees a long-lasting floor, but the real story lies in the nuances of proper installation. A prevalent myth is that leveling the subfloor is an optional step—this could not be farther from the truth. Skipping or rushing through floor leveling often results in uneven surfaces, cracked tiles, or squeaky hardwoods down the line. Professionals agree that meticulous subfloor preparation is the cornerstone of durable flooring, as emphasized in resources like the ultimate guide to floor leveling.
One hidden nuance that many overlook is the interaction between material expansion and environmental changes. Hardwood, especially, expands and contracts with moisture and temperature fluctuations, making the inclusion of expansion gaps not just recommended but essential. Neglecting this can lead to warping or buckling, issues that are often mistaken for poor quality but are truly installation oversights. While some assume adhesives alone can hold hardwood in place, expert tips advocate for floating installations or proper sealing techniques, especially in variable climates. Discover the finer points of this at hardwood flooring installation tips for lasting beauty.
A common mistake I see among DIY enthusiasts is underestimating the importance of tools like laser levels. Using a traditional bubble level might seem sufficient, but for large-scale projects, precision is non-negotiable. A laser level ensures consistent elevation across expansive areas, preventing subtle dips and high points that cause problems over time. In fact, experts highlight that employing advanced tools reduces rework and guarantees a flawless finish—saving both time and money in the long run. To deepen your understanding, check out professional tile flooring strategies.
Additionally, many focus on surface aesthetics without considering the structural foundation. Proper subfloor assessment and repair are crucial, yet often sidelined in favor of quicker, visual upgrades. Overlooking damaged or uneven sublayers can lead to costly fixes later, including tile cracking or squeaks in hardwood floors. My advice: treat the subfloor inspection as a priority, not an afterthought. Internalize expert insights at mistakes to avoid for lasting results.
Remember, successful flooring installation is not just about material selection but understanding and managing these hidden nuances. Each step, from precise leveling to accommodating environmental factors, contributes to an enduring, beautiful floor. So, the next time you plan a project, ask yourself: Am I overlooking these critical details that can make or break my results? Have you ever fallen into this trap? Let me know in the comments and share your experiences with fellow DIYers or professionals.Maintaining your professionally installed floors requires more than just regular sweeping; it involves using the right tools and techniques to ensure longevity. One of my go-to devices is a high-quality moisture meter, which I use monthly to monitor humidity levels in both hardwood and tile environments. Keeping moisture balanced prevents warping, buckling, or cracking, especially in climates with fluctuating weather. I personally rely on the Protimeter Surveymaster, a versatile tool praised for its precision in detecting subtle moisture variations, critical for early intervention and preventing long-term damage.
How do I maintain my floors over time?
The key to durability is implementing a routine maintenance plan utilizing specific products and methods. For hardwood floors, I recommend using a microfiber mop paired with a pH-neutral cleaning solution like Bona Hardwood Floor Cleaner—it’s gentle but effective. Ceramic tile and grout benefit from periodic sealing; applying a high-quality penetrating sealer using a grout sponge ensures that dirt and moisture don’t seep into tiny crevices, preserving the surface quality. To keep luster fresh, I apply a floor polish recommended by experts in hardwood floor care secrets, which restores shine and provides an extra barrier against wear. For routine upkeep, I also keep a small, ergonomic hand scraper to remove stubborn debris from grout lines without damaging the tiles or mortar, which is crucial since accumulated grime can accelerate deterioration. As I look towards the future, advancements like IoT-enabled sensors will likely evolve into routine monitoring devices, providing real-time health reports of your flooring system. Early adoption of such tech can save significant costs by catching issues before they become visible. Considering this, I encourage trying out an advanced maintenance tip: use a moisture meter monthly and record the readings; this proactive approach can catch potential problems early. For more robust strategies and to explore expert insights, visit mastering hardwood floor refinishing.
Unseen Pitfalls That Almost Cost Me Everything
My biggest mistake was assuming that choosing premium materials was enough. It turns out, neglecting subtle details like proper subfloor preparation and environmental considerations can undermine even the most beautiful floors. That lightbulb moment taught me that meticulous attention to these nuances is vital for durability and aesthetics.
How Small Tweaks Can Make Huge Differences in Your Floors
I discovered that using a laser level instead of a traditional bubble one drastically improved my precision, saving time and rework. Also, incorporating moisture meters into my routine helped catch issues early, preventing costly repairs down the line. These small tech upgrades boosted my confidence and the quality of my work.
Tools and Resources That Elevated My Skills
The comprehensive guide on floor leveling techniques was a game-changer, providing step-by-step strategies I now swear by. Additionally, trusted brands like Bona for cleaning solutions and the Protimeter Surveymaster for moisture detection have proven essential for maintenance routines I follow regularly.
Getting Comfortable with the Unknown Is Part of Growing
Embracing the learning curve meant accepting that perfection isn’t immediate. Each project taught me patience and the importance of double-checking every step. Now, I see mistakes not as failures but as opportunities to refine my craft, inspiring others to approach flooring projects with curiosity and resilience. Your journey in flooring mastery begins with daring to learn from every experience—what’s one lesson you’ve learned the hard way that changed your approach? Share below and let’s grow together.