I’ll never forget the moment I stepped into a client’s home, ready to install new hardwood floors, only to find the subfloor was so uneven that I almost laughed out loud. It was a classic rookie mistake—assuming the surface was ready when it clearly wasn’t. That experience was a lightbulb moment for me, revealing just how crucial proper floor leveling is to the entire project. If you’re like me, eager to see your dream floors come to life but frustrated by unexpected bumps and dips, then you’re in the right place. Today, we’re diving into proven strategies that will help you achieve a perfectly leveled surface and durable, stunning hardwood floors. No more guesswork. No more costly re-dos. Just solid, professional results that last.
Why Leveling the Floor Matters More Than You Think
Most homeowners and even some DIY enthusiasts overlook the importance of a perfectly leveled subfloor. They think, “It’s just a little uneven, it’ll be fine,” but that tiny difference can turn into a major headache down the line. Uneven floors can cause gaps, squeaks, and uneven wear, ultimately reducing the lifespan of your beautiful new surface. Plus, if you’re installing tiles or hardwood, the slightest slope can distort the entire aesthetic, making everything look off. According to flooring experts, poor leveling is one of the leading causes of flooring failure within just a few years of installation. That’s why investing time in mastering the right leveling techniques is a game-changer.
Is Floor Leveling Overhyped or Necessary?
Early in my career, I assumed a quick patch with some self-leveling compound would do the trick. Big mistake. I learned the hard way that skipping proper prep leads to uneven, problematic floors. The truth? Floor leveling isn’t just a step; it’s the foundation of a successful installation. If you want your floors to be durable and look impeccable, you need to get this right. Want to see the step-by-step process? I recommend checking out this comprehensive guide that breaks down the nuances and common pitfalls.
So, if you’ve faced issues like uneven surfaces or squeaky floors after installation, don’t worry. It’s a common problem — but one with a solution. Keep reading, and I’ll walk you through proven strategies that will give you a flawless finish and peace of mind.
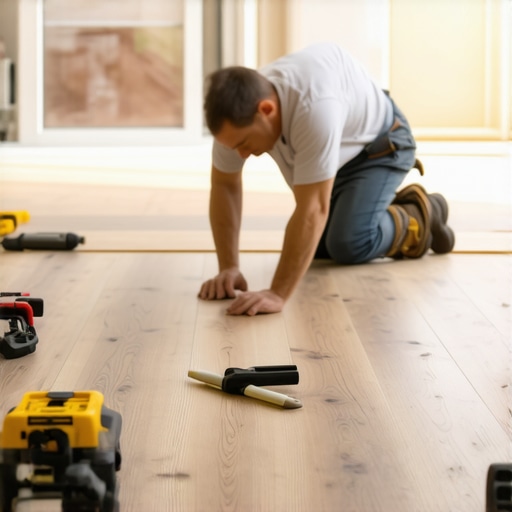
Start with a Solid Plan
Before grabbing tools, visualize your space as a terrain map. I remember my first time leveling a subfloor; I laid out a plan that included checking high and low spots with a long level and marking problematic areas with a pencil. This step prevents surprises mid-work and ensures you target the most uneven spots first. Use a laser level for precision, especially on larger areas, and double-check your readings for accuracy. If you’re unsure about how to interpret these measurements, refer to this comprehensive guide for detailed tips. This initial step sets the foundation for everything that follows.
Identify and Mark Problem Areas
Next, pinpoint the dips and high spots. I once spent hours trying to level a floor only to realize I hadn’t marked the deepest low point. Use a straightedge or a long level to find the high and low spots, then mark them clearly. Think of it like mapping a mountain range; understanding the peaks and valleys helps you decide where corrections are needed. For example, if you find a section that’s 1/2 inch lower than the surrounding area, that’s where you’ll focus your leveling efforts. Proper marking ensures that you address the right spots without unnecessary work.
Prepare Your Materials and Tools
Gather your supplies: self-leveling compound, floor patches, trowels, and a mixing bucket. When I tackled a living room with a stubborn dip, I started by cleaning the surface thoroughly, removing dust, debris, and loose material. This step is crucial because contaminants can weaken the bond of your leveling compound. For large dips, I used a concrete patching product, applying it with a trowel in layers, allowing each to cure before the next. For minor unevenness, self-leveling compounds are your best bet. Remember, the quality of your materials directly impacts the durability of your floor.
Apply Leveling Materials Precisely
Pour or spread your leveling compound over the marked areas. I once had a misadventure where I poured too much, causing an uneven surface rather than fixing it. To avoid this, pour the compound slowly into the low spots, allowing it to naturally flow and fill the gaps. Use a trowel or a smoothing tool to feather the edges, blending the patch into the existing surface. For self-leveling compounds, pour in the center of the low area and tilt your container to help the liquid spread evenly. The goal is a smooth, flush surface that’s as flat as a pancake—think of it like icing a cake evenly.
Allow Proper Curing and Double-Check
Patience is key. I learned this the hard way when I hurried a curing process, only to find the surface cracked later. Follow the manufacturer’s instructions for drying times, usually at least 24 hours. After curing, use a long level or straightedge to verify flatness. If you notice residual dips, repeat the process in those areas. This step guarantees your surface is truly ready for the final flooring layer. Don’t skip this; a perfectly cured and verified surface saves you time and money down the line.
Final Surface Preparation
Once your floor is level, clean the surface thoroughly to remove any dust or debris. For hardwood installation, lightly sanding the surface can improve adhesion. For tiles, ensure the surface is dry and free of contaminants. Remember, a well-prepped surface is the secret to a long-lasting, beautiful floor. If you need more insights, check out this expert guide for additional tips on achieving durable results. Your attention to detail now will pay off with floors that stand the test of time.
Many homeowners and even seasoned DIYers fall into traps when it comes to installing or maintaining hardwood floors, tile, or other flooring types. Let’s dig deeper into some of the most overlooked nuances that can make or break your project. For example, a widespread myth is that small imperfections in subflooring are negligible. In reality, even minor dips or high spots can cause squeaks, uneven wear, and aesthetic issues over time, especially if you’re installing hardwood or tile. This misconception often leads to skipping critical steps like thorough floor leveling, which I can attest from my own experience. Think of it like building a house on shifting sands—without proper foundation work, everything crumbles. To avoid costly mistakes, I recommend consulting comprehensive guides such as this ultimate floor leveling guide for advanced techniques and common pitfalls.
What advanced mistakes do many overlook during installation?
One common trap is neglecting moisture testing before installation. Moisture can cause hardwood to expand, contract, or even warp if not properly managed. Experts like those at this site highlight that failing to assess and control moisture levels is one of the leading causes of post-installation failures. Also, some installers underestimate the importance of acclimation. Wood needs to adjust to its environment for at least a week, or you risk gaps or buckling later. Have you ever fallen into this trap? Let me know in the comments. Additionally, many believe that floor leveling compounds are foolproof. But in reality, improper mixing or application can lead to cracks or uneven surfaces, especially if the substrate isn’t prepared correctly. This is why understanding the nuances of material preparation, as outlined in this resource, is crucial for lasting results.
In summary, the devil is in the details. Overlooking advanced factors like moisture control, proper acclimation, and surface preparation can turn a straightforward project into a costly headache. So, don’t just focus on the visible surface—dig into the technicalities that ensure durability and beauty. Want to master these subtleties? Check out this expert guide for in-depth insights. Remember, the goal is a flawless finish that lasts a lifetime. Have you encountered these pitfalls? Share your story in the comments and let’s learn together!
Maintaining your floors to keep them looking pristine and functioning flawlessly over the years requires more than just routine sweeping and mopping. The right tools and a strategic maintenance plan are essential for ensuring durability, especially when dealing with hardwood, tile, or complex flooring installations. Personally, I recommend investing in high-quality equipment that simplifies upkeep and prevents common issues like scratches, warping, or grout deterioration. For hardwood floors, a soft microfiber mop like the O-Cedar Microfiber Flip Mop is my go-to. It gently lifts dust and debris without scratching the surface, which is crucial for longevity. In addition, a vacuum with a soft brush attachment, such as the commercial-grade vacuum, helps remove embedded dirt without damaging the finish.
For tile and grout maintenance, a steam cleaner like the McCulloch MC1385 Deluxe Steam System can be a game-changer. It effectively cleans grout lines and tiles without harsh chemicals, extending their lifespan and maintaining their appearance. I personally use this tool because it reaches deep into the grout, preventing discoloration and mold buildup. Alongside cleaning tools, I recommend applying a high-quality sealant every few years to protect the surface from moisture and staining, especially in high-traffic areas. When choosing sealants, make sure they are compatible with your flooring material — for example, epoxy-based sealers are excellent for tiles, while water-based sealants suit hardwoods.
Thinking ahead, the trend in floor maintenance is leaning toward smart tools that monitor conditions in real-time. Moisture meters, like the Protimeter Surveymaster, help you check for hidden moisture issues that can cause warping or mold growth long before visible signs appear. I predict that in the future, flooring maintenance will become even more automated, with sensors integrated into the subfloor or flooring itself, alerting homeowners to potential problems before they escalate. Staying ahead of these issues will save you significant repair costs and keep your floors looking new for decades.
How do I maintain hardwood and tile floors over time?
Regular cleaning with the right tools, along with routine inspections for cracks or loose tiles, can significantly extend the lifespan of your floors. Be proactive about addressing minor damages—replacing cracked tiles or refinishing hardwood before wear becomes noticeable prevents bigger problems. For hardwood, periodic refinishing with a good quality floor buffer like the FLOTTE 7-inch Buffer can restore shine and remove surface scratches. In terms of long-term care, I recommend following expert advice such as this comprehensive guide which covers everything from cleaning schedules to protective pads for furniture. Consistent maintenance, coupled with the right equipment, is your best strategy for preserving the beauty and function of your floors over the years. Try implementing a scheduled cleaning routine with these tools, and you’ll notice a marked difference in how your floors age and shine over time.
Lessons I Wish I Had Learned the Hard Way About Floor Leveling and Flooring Durability
- One of my biggest lightbulb moments was realizing that even tiny dips in the subfloor can lead to squeaks and uneven wear over time. Skipping proper leveling isn’t just a cosmetic mistake—it’s a recipe for future headaches.
- Another lesson was understanding that moisture testing and acclimation are not optional. Ignoring these steps can cause wood to warp or gaps to appear, even years after installation.
- Applying leveling compounds correctly—slowly, in layers, and with patience—makes all the difference. Rushing this step often results in cracks or uneven surfaces, undermining your entire project.
- Finally, I learned that surface preparation sets the foundation for long-term durability. Clean, dry, and well-prepared surfaces help your floors stay beautiful and functional for decades.
Tools and Resources I Trust for Perfect Results
- Protimeter Surveymaster: This moisture meter helps me detect hidden issues before they become costly repairs, ensuring my floors stay stable and long-lasting.
- FLOTTE 7-inch Buffer: A reliable buffer that restores shine and smoothness during routine maintenance, extending the life of hardwood floors.
- McCulloch MC1385 Steam System: An effective tool for deep cleaning tiles and grout without harsh chemicals—keeping surfaces pristine and protected.
- Comprehensive guides like this expert resource: They’ve helped me avoid common pitfalls and understand advanced techniques for lasting results.
Push Yourself to Achieve Floor Perfection
The journey to flawless floors is as much about patience and attention to detail as it is about the right tools. Invest in learning the nuances of leveling, moisture control, and surface prep, and your floors will not only look stunning but will also stand the test of time. Remember, every professional started as a beginner—your dedication now will pay off for years to come. Are you ready to take the next step toward perfect flooring? Share your experiences or questions below, and let’s build beautiful, durable floors together!
Reading this detailed guide really resonated with me because I’ve come across many projects where overlooked floor leveling led to long-term issues. I remember installing hardwood in a client’s living room, only to have squeaks and small dips develop within a year. What I’ve learned from my experience is the importance of not rushing the surface prep, especially when it comes to drying and curing time. I also make it a point to double-check moisture levels, as hidden moisture can cause major warping down the line. Does anyone have recommendations for tools that are particularly accurate but still user-friendly for DIYers? I’ve been thinking about investing in a high-quality moisture meter but am curious about what others have found effective. Fully agree that patience during application and surface prep are crucial—rushing these steps almost always leads to problems. Would love to hear how others manage to stay meticulous through the process, especially when working on larger areas.
This post really highlights the critical importance of thorough floor leveling, something I’ve had to learn the hard way on my DIY projects. I once rushed the surface prep and ended up with uneven floors that caused squeaks and gaps after just a few months. It’s impressive how much impact small dips can have on the overall look and longevity of hardwood and tile installations. I’ve started investing in a good laser level and moisture meter, which has made my work much more accurate and less nerve-wracking. I’m curious, does anyone have recommendations for budget-friendly but reliable tools that can help hobbyists like me measure moisture and levelness effectively? I’ve found that patience and meticulous marking are key, but having the right tools really helps me stay on track. Also, I wonder how much extra time dedicated to surface preparation can save in rework or repairs later. Would love to hear others’ tips on balancing thorough prep with project deadlines.
I completely agree with the importance of thorough floor leveling, especially after seeing how even tiny dips can lead to squeaks and cracks down the line. My own experience with installing hardwood in my dining area taught me that patience during surface prep makes all the difference. I once tried to rush through the leveling process, hoping to finish quickly, but ended up with uneven sections that eventually needed rework, costing me more time and effort. Recently, I started investing in a good laser level and a reliable moisture meter, which really helped me be more precise. For DIYers, what are some tools that balance accuracy and ease of use? I’d love to hear recommendations, especially for those working on larger spaces where maintaining consistency can be challenging. Additionally, do you all have tips on how to stay focused on detail when working on a big project? Sometimes, the temptation to rush closer to the deadline can be tough to resist, but I’ve found that taking my time really pays off in the end.