I remember the moment vividly. I had just finished installing my first hardwood floor, feeling proud but then noticing a few uneven spots and tiny gaps that I had overlooked. Weeks later, those imperfections became even more apparent, and I realized I had skipped some crucial steps. That lightbulb moment made me rethink everything about floor installation. Since then, I’ve learned that proper strategies can mean the difference between a floor that lasts for decades and one that starts showing wear in just a few years.
Why Getting It Right the First Time Matters More Than Ever
Let’s be honest. Floors are the foundation of our homes’ beauty and functionality. A poorly installed floor isn’t just an eyesore; it can lead to costly repairs and replacements down the line. The good news? With the right techniques, you can ensure your hardwood or tile floors stay stunning for years to come. The secret is understanding the importance of preparation, precise installation, and ongoing maintenance. As a seasoned enthusiast, I can tell you that investing in these details now saves you time, money, and frustration in the future.
Have You Faced This Issue With Your Floors?
If you’ve ever dealt with uneven surfaces, cracked tiles, or floors that creak underfoot, you’re not alone. Many homeowners overlook the importance of proper installation strategies, which leads to these problems. But don’t worry — I’ll guide you through proven methods that guarantee long-lasting results.
In fact, a study by the National Association of Home Builders highlights that a significant percentage of flooring issues stem from improper installation rather than material defects. This underscores how critical the right approach is for durability and beauty. To avoid common mistakes like skipping floor leveling or rushing through the adhesive process, I recommend exploring expert tips such as those found here.
Now, let’s dive into the essential strategies that will help you create a flawless, durable floor in 2025 and beyond. Whether you’re a DIY enthusiast or hiring professionals, understanding these principles ensures your investment pays off for years to come.
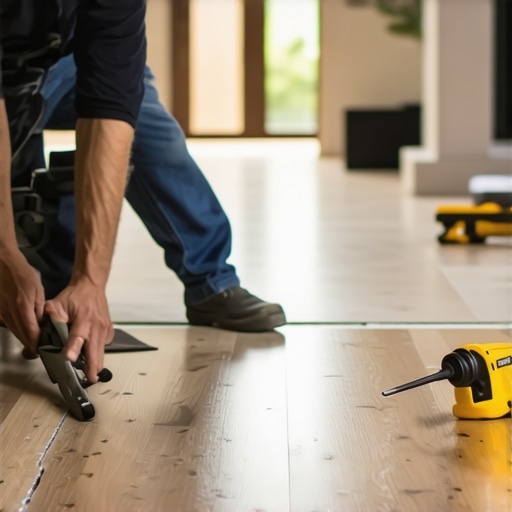
Prepare Your Surface with Precision
Start by assessing your subfloor. Use a high-quality level to identify uneven spots—think of it like a surgeon examining a patient before an operation. I once skipped this step and jumped straight into laying tiles; the result was a floor that cracked within months. To avoid this, apply a comprehensive floor leveling compound, following the instructions meticulously. This step ensures a perfectly flat surface, akin to a well-rolled dough ready for baking. For detailed guidance, check out this expert guide.
Level the Subfloor
Use a self-leveling compound to fill dips and smooth out high spots. Pour it like a waterfall into the low areas, then spread with a trowel. I remember pouring a batch and watching it spread out in a wave, erasing the imperfections beneath. Once dry, recheck with the level—your surface should resemble a calm lake, not a choppy sea. This careful step prevents future cracks and shifts, prolonging the life of your floor.
Lay Out Your Pattern Carefully
Before fastening anything, plan your layout. Measure the room and mark the center points, then arrange your tiles or planks to minimize cuts and awkward edges. Think of it like designing a mosaic—it’s all about balance and symmetry. I once spent hours adjusting the pattern, but the visual payoff made it worth every minute. Use spacers to maintain consistent gaps, especially for grout lines or expansion joints, and double-check measurements to avoid surprises during installation.
Use Proper Adhesives and Fasteners
Choose the right adhesive for your material—hardwood glue for wood, thinset mortar for tiles. Apply it with a notched trowel, creating ridges that grip the surface like a mountain range holds snow. I learned this the hard way when I used the wrong adhesive, which led to tiles shifting over time. For hardwood, ensure nails or staples are driven flush to prevent bumps. For tiles, tap gently with a rubber mallet for a snug fit.
Focus on Installation Technique
Install row by row, pressing firmly and using a beating block to ensure tight joints. When laying hardwood planks, stagger the seams, like a brick wall—this adds stability and visual appeal. I once hurried through a step, which resulted in squeaky floors months later. Take your time, double-check alignment frequently, and use a straightedge to keep everything in line. This meticulous approach is the secret to a professional finish that lasts.
Keep Moisture and Temperature in Check
Maintain consistent climate conditions during installation. Too much humidity can cause wood to swell, while dry air can lead to cracks. Use a hygrometer to monitor moisture levels, aiming for 40-60%. I once installed floors during a humid spell, only to see gaps form as the season changed. Post-installation, keep the room climate stable—think of it like tending a delicate plant. Proper environmental control ensures your floors stay beautiful over decades, not just years.
Finish with Expert Sealing and Care
Once installed, apply a protective finish suitable for your material—varnish for hardwood, sealant for tiles. Follow the manufacturer’s instructions precisely, spreading evenly to avoid bubbles or streaks. Regular maintenance, like cleaning with recommended products (here), will keep your floors gleaming. Remember, a well-sealed surface resists stains, moisture, and wear, extending its lifespan significantly.

While many DIY enthusiasts and even seasoned professionals assume they know the essentials of floor installation, there are nuanced pitfalls that often go unnoticed. Let’s dig deeper into what most people get wrong and how these mistakes can undermine your project’s durability and aesthetic appeal.
Why Rushing the Surface Prep Can Lead to Long-Term Failures
One of the biggest myths is that surface preparation is a quick step that can be glossed over if you’re pressed for time. In reality, skipping detailed assessment and proper leveling can cause uneven floors, cracking, and squeaks down the line. For example, many believe that applying a simple layer of leveling compound suffices. However, the quality of the substrate, moisture content, and curing process are critical. Proper surface prep, including moisture testing and thorough cleaning, is the foundation of a flawless installation. Neglecting this can lead to issues that are costly and labor-intensive to fix later. For comprehensive guidance, check out this expert guide.
Advanced Mistake: Ignoring Expansion Joints and Climate Control
Another common misconception is that once the floor is installed, no further adjustments are necessary. In fact, many overlook the importance of expansion joints and climate management. Failing to incorporate expansion gaps or ignoring seasonal humidity fluctuations can cause your flooring to buckle, warp, or develop gaps. Hardwood floors, in particular, are sensitive to moisture levels, which should be maintained between 40-60% to prevent movement. This nuance often trips up even experienced DIYers who think that setting the floor and walking away is enough. To learn how to manage these factors effectively, explore this detailed resource.
What Is The Most Overlooked Step That Ensures Longevity?
Many installers focus heavily on the visible aspects of the finish, but the real secret lies in the hidden groundwork—particularly, proper acclimation of materials. Allowing your flooring materials to adjust to the environment for at least 48 hours prevents post-installation expansion or contraction. This step is often skipped due to perceived urgency or lack of awareness but can be the difference between a floor that lasts decades and one that fails prematurely. For advanced tips on acclimation and installation strategies, consult this expert article.
Have you ever fallen into this trap? Let me know in the comments. Remember, mastering these nuances elevates your work from amateur to professional quality, ensuring your floors remain stunning and durable for years to come.
Keeping It Working: Essential Tools and Maintenance Strategies
Maintaining your flooring over time requires more than just regular cleaning; it demands the right tools and a proactive approach to prevent issues before they escalate. One must invest in high-quality equipment and adopt best practices to ensure your floors stay pristine and durable for decades. For example, I personally rely on a microfiber mop combined with gentle wood floor cleaners, which effectively remove dirt without scratching the surface. Additionally, using a humidity meter helps me monitor environmental conditions, crucial for preventing expansion or contraction in hardwood floors. These tools are part of my routine maintenance arsenal and significantly extend the lifespan of my investment.
How Do I Maintain My Floors Over Time
Long-term maintenance starts with consistent cleaning methods that avoid abrasive materials, which can damage finishes. I recommend using a soft-bristled broom or vacuum with a hardwood floor attachment to remove debris daily. Periodically, a damp mop with recommended cleaning solutions, like those found here, keeps the surface looking its best. It’s also wise to establish a regular inspection routine to identify early signs of wear, such as scratches or gaps, so you can address them promptly. Applying polish or sealant periodically, based on manufacturer guidance, helps maintain the protective layer and enhances shine.
Invest in Professional-Grade Equipment
For serious upkeep, I recommend tools like a floor buffer with a soft pad for polishing hardwoods, which restores gloss and smoothness without harsh chemicals. A quality steam cleaner can also be invaluable for deep cleaning tiled surfaces, removing grime from grout lines effectively. When it comes to refinishing, a drum sander with variable speed settings allows for precise removal of worn finish, preparing the surface for a fresh coat of finish. These tools, though an investment, drastically improve the efficiency and effectiveness of your maintenance routines, saving money and time in the long run.
Future Trends in Flooring Maintenance
Looking ahead, I predict that smart home devices will increasingly integrate with flooring care. Imagine sensors that monitor moisture levels or detect wear patterns, alerting you instantly via smartphone. Innovations like automated cleaning robots equipped with gentle scrubbers could revolutionize upkeep, making maintenance almost effortless. Staying ahead means embracing these technologies early; for instance, experimenting with IoT-enabled moisture meters can help prevent costly damage in humid climates.
What Are the Best Practices for Preserving Long-Term Results
To ensure your floors remain stunning, stick to a routine of gentle cleaning, timely repairs, and environmental control. I advise setting a schedule that includes weekly dusting, monthly deep cleanings, and semiannual refinishing if needed. Protect your floors from heavy furniture by using felt pads, and avoid dragging objects across surfaces. Regularly check for signs of damage and address them immediately—small scratches can be buffed out, and minor gaps filled before they worsen. Implementing these simple yet effective practices ensures your floors will not only look great but also perform well for many years, fulfilling your investment’s promise.
Try incorporating a smart moisture monitor into your maintenance routine today—it’s a small step that can prevent significant long-term issues. Remember, the secret to durable, beautiful floors lies in consistent care and the right tools. For comprehensive guidance on maintaining and enhancing your flooring, explore this resource.
The Hardest Lesson I Learned About Floor Installation
One of my biggest realizations was that rushing surface preparation can lead to years of frustration. Skipping detailed moisture testing or ignoring uneven subfloors caused me costly repairs later. Now I know that taking the time to assess and level the subfloor meticulously is the best investment in a durable floor.
My Essential Toolkit for Flawless Flooring
Over the years, I’ve discovered that quality tools make all the difference. A professional-grade moisture meter helps me monitor environmental conditions, while a high-quality trowel ensures even adhesive application. These tools, combined with trusted resources like hardwood floor care tips, keep my floors looking perfect for decades.
Your Turn to Try the Secrets of Lasting Floors
Remember, the key to floors that stand the test of time is deliberate preparation, careful installation, and ongoing maintenance. Don’t be afraid to take your time and learn from seasoned experts. With patience and the right strategies, your floors will become a stunning foundation for your home that lasts for generations.
Reading through this post really struck a chord with me. I recently completed a hardwood installation in my living room, and I now realize how crucial proper surface prep actually is. I skipped a thorough moisture test because I thought I could save time, and I ended up with small gaps appearing after a few months as the season changed and the humidity fluctuated. It was a costly lesson! Now, I always check environmental conditions and allow ample acclimation before installation. Has anyone else experienced issues due to moisture or climate changes after installation? It seems like these factors are often overlooked but can make or break the longevity of your floors. I’d love to hear some tips from the community on how they manage climate control during and after installation, especially in more humid environments.
This post really highlighted some key points that I’ve come to appreciate over the years, especially regarding the importance of detailed surface prep. I had a similar experience when I skipped thorough moisture testing before laying hardwood, thinking that environmental factors wouldn’t be a big deal. As a result, I faced gapping and minor shifting within the first year. Since then, I’ve started always using a moisture meter and giving the wood ample acclimation time, particularly during seasonal changes. I’m curious, has anyone here tried specific climate control systems—like portable dehumidifiers or humidifiers—in conjunction with their installation to stabilize indoor conditions? It seems like these tools could really make a difference, especially in more variable climates. Additionally, does anyone have recommendations for maintaining consistent humidity levels in a way that’s manageable and affordable? I believe paying closer attention to these details really pays off in the long run, reducing the risk of damage or premature wear. Would love to hear more about others’ experiences and strategies for climate management post-installation.