I remember the first time I laid down a tiled kitchen backsplash, only to see it crack and peel after just a few months. That lightbulb moment taught me a harsh lesson: even the most beautiful tiles can fail if proper installation strategies aren’t followed. As I dove deeper into the craft, I realized that mastering the right techniques isn’t just about aesthetics—it’s about ensuring our work lasts for years, even decades. Now, in 2025, I want to share what I’ve learned so you don’t have to go through the same frustrations I did.
Why Investing in Expert Installation Matters More Than Ever
With home improvement projects becoming more popular, many homeowners think they can save money by DIY-ing their flooring. But here’s the truth: even small mistakes can lead to costly repairs later. A study by the National Association of Home Builders suggests that improperly installed floors can decrease a home’s value and lead to premature failures. That’s why understanding and applying expert strategies is crucial. Today, I’ll walk you through some essential techniques that guarantee your floors remain durable and stunning well into 2025 and beyond.
Is It Really Worth the Extra Effort and Cost?
Honestly, I used to believe that a quick, budget-friendly installation was good enough. I made a mistake early on by rushing the prep work, skipping crucial steps like proper surface leveling. That mistake cost me more time and money fixing issues down the line. Since then, I’ve learned that quality installation isn’t optional; it’s the foundation of long-lasting results. If you’re skeptical, I get it—trust me, I’ve been there. But I can assure you that investing in expert techniques, like precise floor leveling and correct adhesive application, saves you headaches in the future. For a comprehensive guide on leveling surfaces, check out this resource.
In the next sections, I’ll share proven strategies that will elevate your flooring project from good to exceptional. Ready to avoid common pitfalls and achieve flawless results? Let’s dive in.
Prepare Your Surface with Precision
Start by thoroughly cleaning and inspecting your subfloor. Any debris, grease, or uneven spots can compromise adhesion. Use a high-quality primer if the surface is porous, ensuring a solid bond between the substrate and the adhesive. I once rushed this step, skipping proper cleaning, which led to tiles loosening after just a few months. Proper prep work is your foundation for durability. For detailed surface preparation techniques, visit this resource.
Level the Surface for a Flawless Finish
Use the Right Tools and Techniques
Apply a self-leveling compound where necessary, following the manufacturer’s instructions meticulously. I remember a time I underestimated a slight slope in my floor, which caused tiles to crack over time. I used a trowel and a straightedge to spread the compound evenly, then checked with a level multiple times. For expert-level surface leveling, review this guide. Achieving a perfectly flat surface prevents future cracking and ensures longevity.
Apply Adhesive Correctly and Consistently
Choose the right adhesive for your tile type and substrate. Spread it with a notched trowel, working in small sections to prevent it from drying out before tile placement. I once applied too much adhesive, which oozed out and caused alignment issues. Consistency is key—press tiles firmly and use spacers for even joints. Remember, a good adhesive bond is essential for durability. For tips on proper adhesive application, see this article.
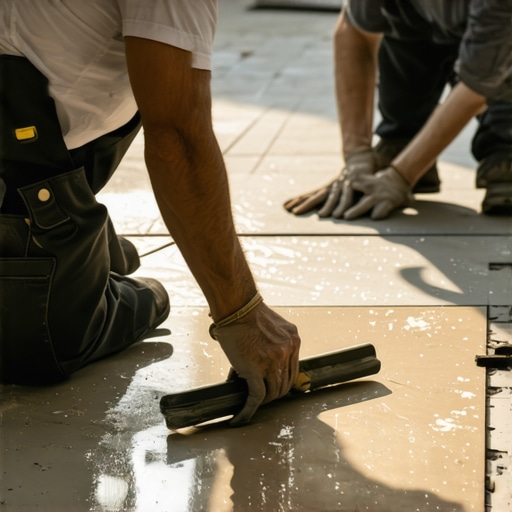
Lay Tiles with Precision and Care
Start in the center of the room or along a reference wall to maintain symmetry. Use a rubber mallet and a level to tap tiles into place, ensuring they sit flush. I once skipped this step, and the tiles ended up uneven, which I had to fix later. Regularly check your work with a level and a straightedge. For step-by-step guidance, check this resource. Patience and attention to detail here pay off in the long run.
Grout and Seal for Longevity
Allow the adhesive to cure fully before grouting, usually 24-48 hours. Mix grout thoroughly and apply it with a rubber float, pressing it into the joints at a 45-degree angle. I learned this the hard way when I left grout partially dry, leading to cracks. After cleaning excess grout with a damp sponge, seal the grout lines to prevent moisture ingress. Proper sealing is crucial for durability. For expert tips on grout and sealing, visit this guide. This extra step preserves your investment and enhances the lifespan of your floors.
Many homeowners and even some DIY enthusiasts assume that following basic steps guarantees a flawless and durable flooring result. However, there are nuanced pitfalls and misconceptions that can undermine your project’s success. One widespread myth is that surface leveling is always sufficient to achieve a perfect finish. In reality, incomplete or superficial leveling can lead to long-term issues like cracking and uneven wear. Advanced installers know that meticulous surface preparation and understanding the underlying structure are crucial for lasting results. For in-depth strategies, visit this comprehensive guide.
Another common mistake involves the choice of adhesive. Many think that any adhesive will do, but selecting the wrong type can compromise the bond, especially over time or with fluctuating temperature and moisture levels. Using high-quality, appropriate adhesives and applying them correctly is essential. Remember, the way you spread the adhesive significantly affects the longevity of your flooring. For expert tips on adhesive application, see this article.
Now, let’s address a question that advanced readers often ask:
Why is surface flatness not enough for long-lasting flooring?
While a perfectly flat surface is vital, it’s only part of the equation. Structural issues beneath the surface, such as uneven joists or subfloor movement, can cause tiles or planks to crack or loosen over time. Professionals frequently recommend a combination of surface leveling and structural reinforcement, especially in older homes. This comprehensive approach ensures durability and prevents costly repairs later. For detailed insights into structural considerations, explore this resource.
In addition, many overlook the importance of proper sealing and joint maintenance. Even with perfect installation, moisture ingress can damage the substrate and cause tiles to lift or crack. Regular sealing and prompt repairs of grout lines are often neglected but are critical for long-term performance. To learn more about maintaining your floors, visit this guide.
Don’t fall into the trap of assuming that an expert-quality installation requires only initial effort. It’s a continuous process that involves attention to detail at every stage. Have you ever fallen into this trap? Let me know in the comments.
Keeping your flooring installation in top shape requires more than just initial effort; it demands the right tools and ongoing maintenance. Over the years, I’ve discovered that investing in quality equipment makes a significant difference in achieving durable, flawless results that stand the test of time. Today, I want to share some of my favorite tools and maintenance strategies that have proven invaluable in my projects.
Precision Level and Laser Guides for Consistent Results
One of the most critical aspects of a lasting flooring job is ensuring surfaces are perfectly level. I personally rely on a high-quality laser level, such as the Bosch GLL 3-80, which provides precise, easy-to-read line projections. Unlike traditional bubble levels, laser guides help me identify even subtle unevenness across large areas, saving me countless hours of manual checking. Using a laser level ensures that tiles or hardwood planks sit flush, preventing future cracking or uneven wear. For more detailed leveling techniques, check out this resource.
Proper Adhesive Application Tools
Applying adhesive correctly is fundamental for durability. I always use a quality notched trowel suited for my specific material—whether it’s a 1/4-inch square-notch for tiles or a 1/8-inch for hardwood adhesives. A good trowel ensures even coverage, which I verify by checking for consistent ridges and no gaps. For larger projects, I recommend a manual or pneumatic notched trowel with adjustable settings, like the Marshalltown Trowel, which helps maintain uniform application over extensive areas. Proper adhesive application reduces the risk of tiles loosening or cracking over time. For detailed advice, visit this article.
Tile Spacers and Grout Floats to Enhance Precision
Maintaining consistent grout lines is essential for both aesthetics and longevity. I prefer stainless steel spacers that are durable and easy to clean. They help me keep uniform gaps, especially when working in irregularly shaped rooms. When it comes to applying grout, I use a rubber float with a comfortable grip, pressing the grout into joints at a 45-degree angle. This method ensures deep penetration and minimizes the need for rework. Sealing grout lines after curing is equally important—use a high-quality grout sealer like Miracle Sealants to prevent moisture ingress. Proper sealing extends the life of your flooring and maintains its appearance. For more insights, see this guide.
Long-Term Care and Trend Predictions
Maintaining your floors isn’t a one-and-done task. Regular cleaning with pH-neutral cleaners, prompt grout repair, and periodic resealing are vital. I also recommend investing in a good vacuum with adjustable suction and soft brushes to avoid scratches, especially on hardwood. Looking ahead, I believe the trend in flooring maintenance will shift toward smart sensors integrated into flooring materials, providing real-time durability feedback. This technological evolution could revolutionize how we approach long-term care, making it easier to identify issues before they escalate. To stay ahead, I suggest adopting current best practices and staying informed through expert resources like this article.
How do I maintain my flooring over time?
Consistent maintenance involves routine cleaning, avoiding harsh chemicals, and inspecting grout or sealant for wear. Periodic professional checkups can catch structural issues early, saving you money and preserving the beauty of your floors. Remember, a proactive approach is key to ensuring your investment endures for decades. Start by integrating a good quality vacuum and sealant into your maintenance routine, and you’ll see the benefits firsthand.
The Hardest Lesson I Learned About Flooring Longevity
Early in my DIY journey, I underestimated the importance of surface preparation, which led to cracked tiles and costly repairs. That experience taught me that rushing through steps like surface leveling and proper surface cleaning can sabotage even the most beautiful installations. Now, I always prioritize meticulous prep work, knowing it’s the foundation for flooring that lasts decades.
3 Myths About Flooring Installation That Held Me Back
One myth I believed was that surface flatness alone guarantees durability. I learned that underlying structural issues, like uneven joists, can cause problems over time. Additionally, I thought all adhesives were equal—wrong! Using the right adhesive and applying it correctly is crucial for long-lasting results. Finally, I used to think sealing was optional—yet, moisture ingress can ruin even a perfect installation if you skip proper sealing.
What Experts Won’t Tell You About Long-Term Flooring Care
Many overlook the importance of ongoing maintenance. Regular cleaning with pH-neutral products, prompt grout repairs, and periodic resealing are vital. I’ve adopted the habit of checking grout lines and using quality sealers, which has extended the life and beauty of my floors far beyond initial expectations. Embracing technology, like smart sensors, might soon revolutionize how we monitor floor health, but for now, consistent care remains key.
My Essential Toolkit for Flooring Success
I rely on a high-quality laser level, like the Bosch GLL 3-80, for ensuring surfaces are perfectly flat. A good notched trowel, such as the Marshalltown, helps me spread adhesives evenly. Stainless steel spacers keep grout lines uniform, and a rubber float ensures deep grout penetration. These tools, combined with expert resources like this guide, make a real difference in achieving durable, professional results.
Keep Your Floors Stunning for the Future
Your flooring journey doesn’t end once the installation is complete. Regular maintenance, prompt repairs, and choosing the right materials can preserve your floors’ beauty and durability for years. Don’t be discouraged by initial setbacks—every mistake is a learning opportunity. Now, it’s your turn to elevate your space with flooring that truly stands the test of time.
What’s the biggest challenge you’ve faced in flooring installation or maintenance? Share below—I’d love to help!