
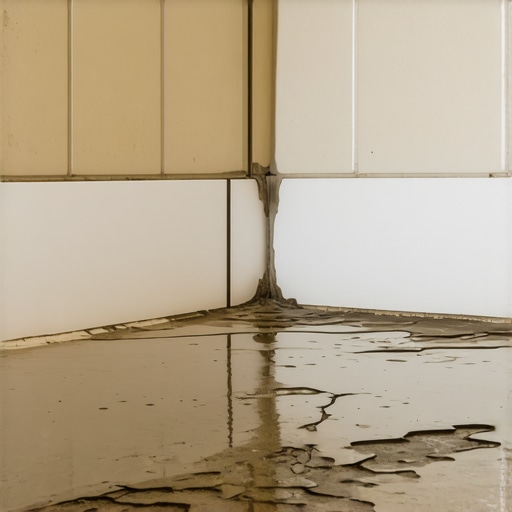
I remember the moment vividly—standing in my bathroom, eyes fixed on the cracked grout lines snaking along the base of my tiles. It was more than just an annoyance; it felt like a warning sign from my floor, whispering that something wasn’t quite right. That lightbulb moment made me realize how common this problem is and, honestly, how little most of us understand about its root causes. If you’ve ever found yourself wondering why your bathroom tile grout is cracking right near the baseboard, know you’re not alone, and there’s a reason behind it.
Uncovering the Hidden Reasons Behind Cracked Grout
Cracking grout at the base of your bathroom tiles isn’t just a cosmetic issue—it signals underlying problems that can compromise your entire flooring system. Moisture intrusion, improper installation, and floor movement are the usual suspects. When grout cracks, moisture seeps in, potentially leading to mold and further damage. Early on, I made a costly mistake: ignoring small cracks, thinking they would just stay cosmetic. That was a mistake. Over time, the cracks widened, and I faced expensive repairs. Trust me, paying attention early can save both time and money. Today, I’ll guide you through the common causes, how to identify them, and, most importantly, what steps to take to fix them right.
Is a Cracking Grout Sign of Major Floor Failure?
Many skeptics ask if grout cracking is just superficial or a sign of a bigger problem. The truth is, tiny cracks can be harmless if caught early—but they can also indicate significant movement or foundation shifts if they worsen over time. Early in my project, I overlooked a slight crack because I thought it was just a settling issue. That tiny crack grew into a major one, demanding professional intervention. This experience taught me that vigilance pays off. If you’re concerned about whether your grout cracks are superficial or serious, it’s wise to consult with a flooring expert or visit a trusted resource like [Floor Leveling Challenges](https://tiletrendshop.com/floor-leveling-challenges-common-mistakes-and-how-to-avoid-them) to understand the nuances.
Are you facing this problem now? Have you noticed cracks appearing where your floor meets the wall? If so, you’re probably wondering how to prevent this from escalating. In the following sections, I’ll walk you through effective strategies, from properly assessing the damage to professional repair techniques, so you can restore your bathroom’s beauty and longevity.
Prepare the Surface for Repair
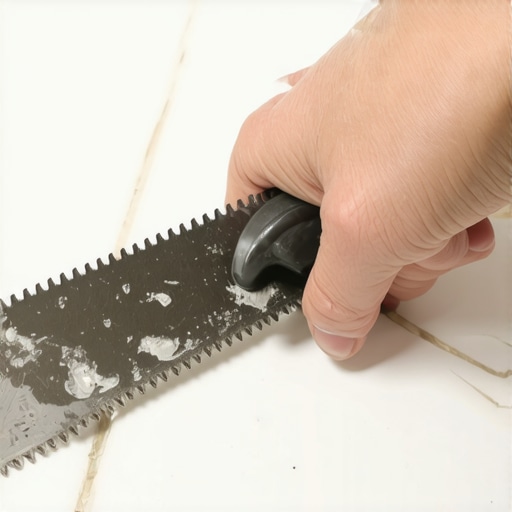
Begin by removing loose or crumbling grout using a grout saw or oscillating tool, ensuring the area is clean and free of debris. I once fought through stubborn old grout with a humble utility knife, which gave me better control to chisel out the damaged portions without harming surrounding tiles. This preparation creates a solid foundation for the new grout layer.
Assess Underlying Issues Before Filling
Check for moisture intrusion or cracks in the underlying substrate by inspecting for water stains or soft spots, as these can signal more serious problems. I learned that addressing the root cause, such as sealing leaks or repairing the substrate, prevents recurrence and saves future headaches. Use a moisture meter if necessary to determine if moisture is still present, and visit this guide for flooring fundamentals.
Choose the Right Grout and Mix Properly
Select an epoxy or cementitious grout suitable for bathroom environments, especially if moisture is a concern. Mix the grout to the consistency of peanut butter, ensuring it can be worked into tight spaces without air pockets—this is crucial for durability. I once over-thinned thinset, leading to cracks; learning proper mixing techniques makes all the difference.
Apply the Grout with Precision
Use a rubber float to press the grout into the joints at a 45-degree angle, ensuring complete filling without air bubbles. Wipe excess grout with a damp sponge before it hardens, keeping the surface smooth. Employ a painter’s tape around the base to protect surrounding tiles. In my experience, patience during this step results in a seamless repair, avoiding uneven surfaces or lingering grout haze.
Allow for Proper Curing and Seal the Surface
Let the grout cure for at least 24 hours, avoiding foot traffic or water exposure during this time. Once cured, apply a grout sealer to prevent moisture infiltration, especially near baseboards. I once neglected sealing, which caused grout stains to develop, highlighting the importance of this final step. Proper sealing prolongs the integrity of the repair and maintains your bathroom’s appearance.
Address Floor Movement and Structural Risks
If cracks reappear or worsen, consider floor leveling or structural repairs. Use self-leveling underlayment to smooth out uneven surfaces before regrouting, following detailed techniques from this expert guide. I once tried to patch a shifted tile without leveling first, only to find the crack returned shortly after. Investing in foundation stabilization or proper floor support ensures long-lasting results.
 When it comes to flooring, many assume that following step-by-step instructions guarantees a perfect result. However, as an experienced professional, I can tell you that misconceptions and overlooked nuances often lead to costly mistakes. For instance, a common myth is that flooring materials, like hardwood or tile, are completely interchangeable when it comes to installation — but in reality, each has unique requirements that demand tailored techniques. Ignoring these specifics can compromise the durability and aesthetics of your floor in the long run.
One trap I often see homeowners fall into is the belief that a level subfloor isn’t essential for tile installation. While it may seem like a minor detail, uneven surfaces cause grout lines to crack and tiles to pop over time. The truth is, proper floor leveling is the backbone of a successful install — neglecting it leads to recurring defects that are far more costly than investing in a professional prep stage. Advanced leveled substrates, like self-leveling compounds, require precise application, and skipping this step shows a misunderstanding of how foundational stability impacts final quality.
Make no mistake: using the wrong leveling products can be just as damaging. For example, applying a self-leveler without adequate mixing or over-thinning can trap air bubbles or cause soft spots. Studies suggest that improper leveling compounds can reduce the adhesive bond strength by up to 30%, increasing the likelihood of future failures (see expert analysis on floor leveling accuracy). I highly recommend consulting detailed guides such as this resource, which emphasizes correct techniques for flawless results.
Another misconception concerns hardwood floors. Many believe that all hardwoods are equally resistant to moisture, but species vary dramatically in their response to humidity changes. Engineered hardwoods are often thought to be as stable as solid wood, yet improper acclimation before installation can lead to cupping or gaps. A key advanced mistake is neglecting to perform moisture testing — a step that can prevent wood from expanding or contracting after installation. Take it from industry studies, which show that moisture imbalance is a leading cause of post-installation issues.
Finally, it’s crucial to recognize that quality installation isn’t just about tools and materials; it’s about understanding the structural nuances beneath the surface. Floor joist irregularities, for example, might not be obvious but can cause subtle shifts that crack grout or elevate tiles over time. Detecting these requires a keen eye and sometimes advanced equipment, underscoring the importance of a thorough structural assessment before beginning any project.
In conclusion, if you’re undertaking flooring installation, pay attention to these hidden details and avoid common misconceptions that could haunt you later. Proper leveling, material-specific techniques, and structural considerations aren’t optional extras — they’re the foundation of success. Do you know a mistake that caught you off guard? Share your experience and let’s learn together.Maintaining your flooring installation over time requires the right tools and consistent care. One essential item I rely on is a high-quality rubber grout float, which I use not only for applying grout smoothly but also for pressing it firmly into joints to prevent voids and ensure durability. Additionally, a calibrated moisture meter is indispensable for monitoring substrate conditions, helping me avoid issues like trapped moisture, which can compromise even the best hardwood or tile installations. Regularly inspecting for signs of movement or settling allows me to address minor issues before they escalate, saving time and money in the long run.
For tile maintenance, sealing surfaces with a reputable grout sealer extends the life of your work by preventing staining and moisture infiltration. I prefer penetrative sealers because they preserve the natural look of tiles and grout, making ongoing maintenance simpler. When dealing with hardwood floors, investing in a quality dust mop and gentle cleaning solutions tailored for wood ensures the finish remains intact over years. Neglecting these basic tools can lead to premature wear, scratches, and dullness.
Looking ahead, I predict that smart maintenance tools integrated with IoT technology will become more prevalent, providing real-time feedback on subfloor conditions or environmental factors affecting your floors. This advancement will empower homeowners and professionals to react proactively, maintaining their floors more effectively.
How do I keep my flooring in top shape over the years?
Routine inspections combined with targeted tools like moisture meters, specialized sealers, and soft cleaning equipment are key. Regularly reapplying sealers as recommended helps protect grout and tiles from moisture damage, especially in high-humidity areas. For hardwood floors, climate control is vital—maintaining consistent humidity levels minimizes expansion or contraction, reducing the risk of cracks or gaps. Investing in a humidifier or dehumidifier can be a game-changer, especially in fluctuating climates.
When it comes to long-term results, don’t forget to record maintenance schedules and observed issues. This documentation helps you plan proactive repairs or upgrades, ensuring your floors remain beautiful and functional for decades. Be sure to consult trusted resources like this guide for detailed techniques that can help you prepare for long-term care.
For those looking to scale their maintenance routines, consider professional-grade tools such as oscillating multi-tools with grout removal attachments or high-efficiency HEPA vacuums for dust control during routine cleaning. These investments can streamline upkeep and preserve your flooring investment.
Remember, consistent maintenance, proper tools, and a proactive approach are your best allies in ensuring your flooring stays pristine through years of use. Now, try implementing a moisture check every six months to catch early signs of issues—it’s a simple step that can prevent costly repairs down the line.
In my journey through countless flooring projects, I’ve uncovered that the true mastery lies not just in executing steps perfectly but in understanding the subtle nuances that ordinary guides often overlook. One lightbulb moment I cherish is realizing how critical proper substrate preparation is—skipping this step can turn a simple grout repair into an ongoing headache. Moreover, I learned that selecting the right grout type—whether epoxy for moisture-prone areas or cementitious for standard applications—makes all the difference in durability. The most profound lesson, however, was that floor movement and structural considerations shouldn’t be an afterthought; they’re the invisible forces that can undo even the most meticulous work. Embracing these lessons transformed my approach from purely technical to deeply strategic, ensuring my repairs stand the test of time.