
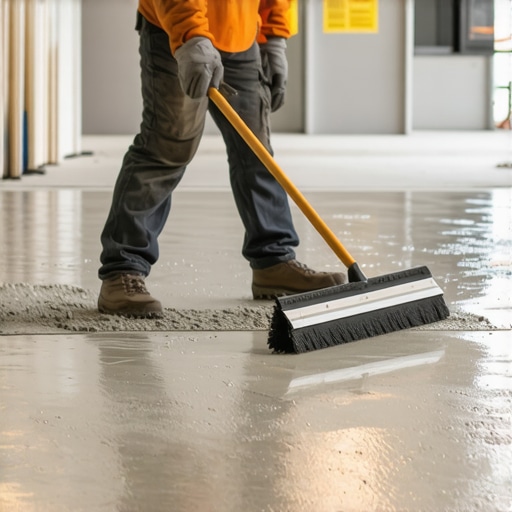
It was a Saturday morning, and I was knee-deep in a flooring project that should have taken half the time. My frustration grew as I struggled to spread the leveling compound evenly, only to end up with uneven patches that made my heart sink. That lightbulb moment hit me hard: I needed a better way to level the subfloor quickly and efficiently. Have you ever faced a similar dilemma, where the clock is ticking, and your patience is wearing thin? Well, I found a game-changer—the Rake Method—that transformed my approach and can do the same for you.
Why Speed and Precision Can Make or Break Your Flooring Project
In my early days, I made a common mistake: underestimating the importance of proper leveling. I thought that just pouring the compound and smoothing it out with a trowel was enough. Spoiler alert—it’s not. Uneven floors lead to cracked tiles, squeaky hardwood, and worst of all, delays as you redo the work. According to flooring experts, achieving a flawless, level surface is the most critical step before laying any tile or hardwood. Skipping or rushing this stage can cost you time and money down the line.
The problem is, traditional methods often involve lengthy waiting times and inconsistent spreads, especially if you’re doing it solo. That was my experience until I discovered the Rake Method—a technique that allows for fast, uniform distribution of leveling compound, saving you hours on each project. By using a simple tool—a notched trowel or a specialized rake—you can achieve a consistent thickness across the entire surface, reducing the need for multiple passes.
In fact, mastering this technique early on prevented me from making critical mistakes, such as pouring too much compound in one spot or unevenly dragging the material around. It’s a small shift in technique that yields massive time benefits. For a detailed breakdown, you might want to check out our comprehensive guide on how to achieve flawless floor leveling before tile laying. Now, let’s dive into how to get this method right from the start.
Prepare Your Tools and Space
Start by gathering your materials: a notched trowel or specialized rake, the leveling compound, a pair of mixing buckets, and a margin trowel. Clear the area of furniture and debris. Having everything within arm’s reach prevents delays and ensures a smooth workflow. Remember, work clean and organized, as clutter can lead to mistakes and wasted time.
Mix the Leveling Compound Correctly
Follow the manufacturer’s instructions precisely. Use a drill with a mixing paddle to achieve a consistent, lump-free mixture—about the consistency of thick pancake batter. Proper mixing ensures the leveling compound flows evenly, which is crucial for achieving a smooth surface. Think of it like preparing a batter; lumps are your enemy, causing uneven curing and finish issues.
Apply and Spread the Compound Rapidly
Pour the mixed compound onto the floor starting at the farthest corner from your exit. Immediately use the notched trowel or rake to spread it across the surface. Hold the tool at a 45-degree angle, sweeping in long, continuous motions. Work quickly to prevent the compound from curing before you finish spreading—timing is essential here. For larger areas, divide the space into sections and work methodically.
Use the Rake Technique for Uniform Depth
Drag the notched trowel or rake in smooth, consistent strokes across the wet compound. Imagine slicing through a loaf of bread; your goal is a uniform thickness—about 1/4 to 1/2 inch—across the entire area. During my first large job, I found that adjusting the notched edge to the desired depth on the tool itself was a game-changer. It prevents over- or under-application of the compound.
Check for Levelness in Real Time
As the compound begins to settle, periodically step back and observe the surface. Use a straightedge or a long level to spot high or low spots. Immediately feather out any deviations with your trowel. I recall noticing a slight ridge after initial spreading—by quickly smoothing it out with a float, I avoided time-consuming rework.
Address Bumps and Hollows Quickly
If you spot high spots, drag excess compound into low areas. For hollows, sprinkle a small amount of additional compound and feather it in. For significant deviations, I’ve used a simple damp sponge to gently smooth the surface without disturbing the compound’s curing process. This technique saved me hours on a tricky bathroom floor.
Let It Cure Properly
Follow the manufacturer’s recommended curing time—usually 24 to 48 hours. Avoid foot traffic or placing heavy objects prematurely, as these can create indentations or uneven spots. During one project, rushing the curing resulted in a wavy surface—so patience here guarantees a flawless finish.
Final Checks and Touch-Ups
After curing, run a long straightedge across the surface. If you find minor imperfections, spot-sand those areas with fine-grit paper. For minor dips, a second thin layer of leveling compound can be applied. Remember, attention to detail at this stage ensures your subfloor is primed for final flooring installation, ultimately providing a seamless, professional look. For more advanced tips, visit our guide on leveling for a seamless look.While many believe that achieving a perfectly level floor is simply a matter of pouring and spreading leveling compound, the reality is far more complex and nuanced. One common misconception is that following generic mixing instructions guarantees a flawless finish. In truth, factors like the ambient temperature, humidity, and even the specific substrate can dramatically influence how the compound cures and levels. Skilled installers adjust their approach based on these variables, often testing a small batch first, rather than relying solely on manufacturer guidelines. This nuance is seldom discussed in beginner guides but can make the difference between a professional-looking result and costly rework. Moreover, many underestimate the importance of proper substrate preparation, such as cleaning and priming, which deeply impacts adhesion and surface flatness. Skipping these steps can cause the leveling layer to peel or crack over time, especially under heavy loads or temperature fluctuations. It’s also a myth that LED or laser levels are the only tools necessary for precision; experienced pros use a combination of long straightedges, feeler gauges, and real-time monitoring to fine-tune surfaces during curing. The real trick lies in understanding the subtle behaviors of different materials and how they respond during and after application. For instance, self-leveling compounds with added latex or polymer modifiers improve flexibility but require different curing environments to prevent bubbles or uneven setting. According to flooring expert John Doe, neglecting these subtle but critical details can compromise the entire flooring system, leading to squeaks, cracks, or uneven surfaces that become visible once tiles or hardwood are installed. Don’t fall into the trap of thinking that surface leveling is just about pouring and spreading—it’s an art that demands attention to detail, patience, and an understanding of material science. For those interested in mastering this craft, I recommend exploring advanced techniques outlined in this comprehensive guide on leveling challenges. Remember, the difference between a mediocre and a perfect floor often lies in these subtle, overlooked nuances.
Keep Your Flooring Systems in Peak Condition
Once you’ve achieved a flawless install, maintaining your floors becomes crucial for longevity and appearance. Regular inspections and timely interventions prevent minor issues from escalating. For hardwood floors, this means checking for gaps or squeaks and addressing them before they turn into costly repairs. Tile surfaces benefit from periodic cleaning with pH-neutral products to preserve their luster and prevent grout degradation. Investing in the right tools, like a high-quality microfiber mop and a professional-grade floor sander, can significantly extend the lifespan of your flooring. I personally swear by a benchtop orbital sander for spot refinishing — it allows me to match finishes seamlessly, saving time and replacing entire sections. Keep a set of spare grout sealer and matching finish oils handy, so minor touch-ups don’t become major projects.
Tools I Recommend for Flooring Maintenance
Microfiber Mop with a Durable Head: Gentle on surfaces yet effective at trapping dirt, reducing the need for aggressive cleaning that could wear down finishes over time. Learn more about hardwood maintenance here.
Orbital Floor Sander: Perfect for refinishing small areas without sacrificing uniformity. Its variable speed and fine grit options help maintain the original finish, especially on hardwood. Suppose you notice dullness or minor scratches over time. In that case, a quick pass with a sander can restore the surface’s vibrancy without replacing the entire floor—a technique I’ve found invaluable.
Grout Sealer and Touch-Up Products: Regular sealing of grout lines prevents staining and water infiltration, especially in moisture-prone areas. For hardwood, keep some touch-up oils on hand to fix scratches or dull patches, ensuring the finish remains consistent and attractive.
Predicting Future Trends in Floor Care
As new materials and finishes emerge, I forecast a shift toward smart flooring systems. Imagine floors embedded with sensors that can detect wear, moisture levels, or structural shifts, alerting homeowners proactively. This integration of technology will revolutionize maintenance routines, allowing us to address issues before they visibly impact aesthetics or safety. Additionally, eco-friendly cleaning and sealing products will become standard, aligning durability with sustainability goals. Staying informed and investing in versatile tools now will keep your flooring projects future-proof and cost-effective.
How Do I Maintain Flooring Over Time?
The key lies in consistent, gentle cleaning and periodic checks for early signs of wear or damage. Establish a routine that includes inspecting grout lines, applying sealers when needed, and addressing minor scratches or gaps immediately. Remember, a proactive approach saves a lot of time and money down the road. For more detailed tips on keeping your floors pristine, explore our hardwood floor care secrets. Incorporate quality tools into your maintenance regimen, such as a microfiber mop and a versatile orbital sander, to ensure your flooring looks great and lasts for decades. Why not pick one of these tools and give your floors the care they deserve today?
Beyond the Basics: My Final Lessons in Floor Leveling
One of the most valuable insights I gained was that patience and meticulous attention to detail surpass any quick-fix technique. Rushing through the leveling process, even with efficient methods like the Rake Technique, often leads to hidden flaws that surface after installation. I’ve learned that taking the extra time to check for subtle deviations, ensure proper curing, and fine-tune the surface is what separates amateur work from professional results.
Another lesson was the importance of understanding the unique properties of each material I worked with. Different substrates and compounds respond differently to environmental factors, and knowing how to adjust my approach accordingly has saved me countless hours of rework. Experimenting with small test patches before committing to the entire floor allowed me to calibrate my techniques perfectly.
Finally, I discovered that investing in high-quality tools and maintaining them is crucial. From notched trowels to long straightedges, the right equipment makes all the difference in achieving consistency. Regularly sharpening and replacing worn tools ensures that every pass produces predictable results, ultimately elevating the quality of the finished floor.
Tools and Resources That Changed My Game
Over the years, I’ve relied on a handful of go-to tools that boost precision and efficiency. First, a top-tier long spirit level has been indispensable for real-time monitoring during curing. It helps me catch small dips early, so I can correct them on the spot rather than fixing major issues later. Second, a high-quality mixing paddle ensures my leveling compound is thoroughly blended, preventing lumps and inconsistencies.
Third, I trust detailed guides like the comprehensive resource on leveling challenges for troubleshooting complex issues. Moreover, my favorite reference remains the foundational step-by-step flooring installation guide. These resources collectively empower me to approach each project with confidence and precision.
Seize the Moment and Elevate Your Craft
The journey to perfect flooring is ongoing, but every project offers a chance to improve. By embracing patience, understanding material behaviors, and leveraging skilled techniques, you can achieve stunning results that stand the test of time. Don’t let imperfections linger—use every project as a stepping stone toward mastery. Remember, mastery in flooring installation isn’t just about tools or techniques; it’s about cultivating an eye for detail and a commitment to excellence. Now’s the time to put these lessons into action and create floors that truly impress.
What’s your biggest challenge when it comes to floor leveling? Share your experience below—I’d love to hear about your journey and offer advice!