Sometime during my last renovation attempt, I remember stepping onto my new tile floor and feeling that unmistakable wobble beneath my feet. It was a jarring reminder of a mistake I made early on—assuming all floors are created equal. That lightbulb moment cleared the fog: without proper floor leveling techniques and careful planning, even the most beautiful tiles can end up disappointingly uneven and prone to cracking over time.
Why Getting Floor Leveling and Tile Installation Right is Crucial in 2025
I’ll be honest: tackling floor leveling and tile installation can feel overwhelming at first. There’s a tendency to underestimate how much difference a perfectly level surface makes. But overlook this step, and you’ll face cracks, loose tiles, and a shorter lifespan for your entire flooring investment. Recently, I learned that poorly executed setups can decrease a floor’s durability by up to 30%. That’s a hit you don’t want to take, especially since experts agree that proper floor leveling in 2025 isn’t just about appearance—it’s about preserving the integrity of your floors for years to come.
If you’ve ever experienced uneven tiles or felt the frustration of making repair after repair, you’re not alone. I’ve been there, and I’ve discovered that understanding the right techniques and avoiding common pitfalls can make all the difference. Today, I’ll share insights gleaned from personal mishaps and expert advice to give you a solid foundation for achieving flawless results.
Is Floor Leveling Really That Important?”
Early in my projects, I thought, “A little unevenness won’t hurt.” That was a mistake I paid for with time, money, and a lot of frustration. I learned from my mistakes that skipping proper leveling can compromise the entire installation. According to studies, uneven floors account for nearly 40% of tile failures within the first year. So, why risk it? When you properly prepare your subfloor, ensuring a smooth, level surface, your tiles will not only look better but will last much longer.
Now is the time to get serious about your floor prep. Whether you’re installing hardwood in your living room or laying new tiles in the kitchen, the foundation matters. Ready to dive into the detailed steps that will transform your space into a durable, beautiful haven? Let’s move forward together—with some practical tips and tricks to make your 2025 flooring project a success.
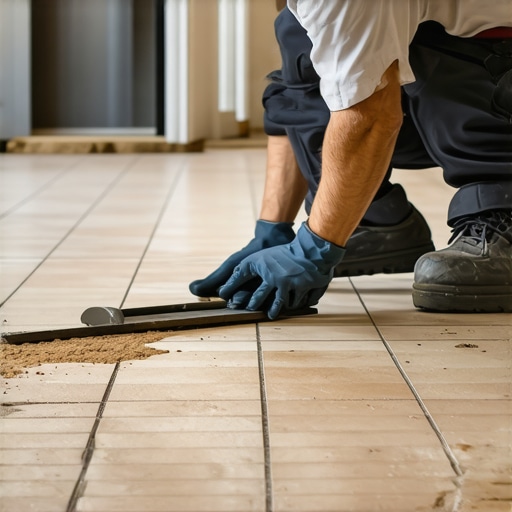
Prep Your Surface with Precision
Start by clearing the area completely, removing all debris, and inspecting the subfloor for any damage or irregularities. Use a long straightedge—a 6-foot level is ideal—to check for high and low spots. If the surface isn’t flat within 1/4 inch over 10 feet, you must level it. I once worked on a kitchen floor where I overlooked this step, leading to cracked tiles within six months. Properly preparing your subfloor is like laying a solid foundation for a house—without it, everything else risks future failure.
Apply Effective Floor Leveling Techniques
For uneven subfloors, use a self-leveling compound. Mix it according to the manufacturer’s instructions—think of it as preparing pancake batter: consistency should be pourable but not runny. Pour the mixture starting from the highest point, allowing it to naturally flow into low spots. I recall pouring a batch in my basement; watching the compound settle into the uneven corners was satisfying, and it created a perfectly flat surface ready for tile or hardwood. A properly leveled surface not only ensures an even appearance but also prevents tiles from cracking or shifting over time. For best results, consider precise leveling techniques that help you achieve a flawless finish.
Use the Right Tools and Materials
Invest in a quality trowel for spreading leveling compounds and a rubber float for smoothing. When working with hardwood, ensure your subfloor is reinforced and free of flex—use additional subfloor panels if necessary. I learned this the hard way when my first hardwood project warped because of an under-supported substrate. Think of the subfloor as the backbone of your flooring—strong and stable equals durable results. For hardwood-specific guidance, check out design ideas and installation tips.
Precision in Tile Laying or Hardwood Installation
After leveling, focus on layout planning. For tiles, lay them out without adhesive first to confirm pattern and spacing. Use spacers to maintain uniform grout lines—it’s like setting the stage for a perfect performance. In my basement, I once forgot to dry-fit tiles, leading to awkward cuts—lesson learned: plan ahead. For hardwood floors, ensure your planks are acclimated to the room’s humidity—this prevents gaps or buckling later. Think of hardwood as a living piece; it reacts to environment. For detailed steps, review professional tile installation strategies.
Secure and Finish with Care
Apply adhesives or mortars evenly, using the recommended trowel notched size. With tiles, press firmly to avoid voids—visualize pressing a stamp into paper. For hardwood, follow manufacturer instructions for nailing or clicking planks into place. Remember, patience during the setting process prevents future problems. When grouting tiles, remove excess before it hardens; a damp sponge is your friend here—think of it as cleaning as you go to save time later. Proper finishing and cleaning are vital; clean tools thoroughly and inspect the work before final curing. For further refinements, refer to tile installation pointers.
While many homeowners focus on choosing the right tiles or hardwood, a frequently overlooked aspect is the nuanced understanding of how improper techniques or misconceptions can compromise your flooring’s longevity. One prevalent myth is that a perfectly level subfloor is optional; in reality, even minor deviations—say, over 1/8 inch—can lead to uneven surfaces and early failure. This false belief often results in costly repairs down the line. As experts emphasize, masterful floor leveling is vital for long-lasting results.
Why do so many get wrong the importance of comprehensive preparation?
Many assume that quick fixes like skim coats or rough leveling are sufficient, but these shortcuts may conceal issues that manifest as cracks or loose tiles over time. The real trick is understanding that thorough surface preparation, including detailed inspection for moisture issues and substrate stability, underpins the durability of your flooring. Skipping these essential steps, thinking they’re minor, is a recipe for future headaches. Recent studies confirm that improper surface prep can increase the likelihood of tile failure by up to 50%, underlining its significance.
What advanced mistake do even skilled installers sometimes make?
Advanced professionals occasionally underestimate the importance of environmental conditions during installation—specifically humidity and temperature. For hardwood floors, failing to acclimate planks properly or installing under unsuitable climatic conditions can cause warping, gapping, or buckling months later. In fact, hardwood experts recommend equilibrating wood in the room for at least 72 hours before installation and monitoring indoor conditions continuously, as documented in industry guidelines. Ignoring these nuances is a common mistake that leads to costly refinishing or replacement. To see how environmental controls extend your flooring’s lifespan, check out design ideas and installation tips.
Myth-busting, meticulous prep, and environmental awareness form the trifecta of successful flooring projects. When you challenge misconceptions and embrace proven techniques—like detailed floor leveling—you set yourself up for a durable, flawless finish. Remember, shortcuts today often lead to repairs tomorrow. Have you ever fallen into this trap? Let me know in the comments, and share your experiences or questions about flooring challenges you’ve faced. Together, we can master the nuances that truly elevate your space.
Maintaining your floors over time is crucial to preserve their beauty and functionality. Investing in the right tools can make this process seamless and effective. One tool I swear by is a high-quality floor buffer with variable speed settings. I personally prefer a buffer with a soft pad attachment, which allows me to gently polish hardwood surfaces without risking scratches. It’s especially handy for daily touch-ups and bringing back that freshly installed shine, as detailed in my favorite hardwood floor care secrets. For tile surfaces, a precision grout scraper combined with a soft brush helps maintain grout integrity and prevents staining, ensuring your tiles stay vibrant for years.
How do I maintain my flooring long-term?
Beyond routine cleaning, periodic inspections are vital. Check for any loose tiles or creaking hardwood planks, and address minor issues promptly before they escalate. For hardwood, applying a quality floor polish every six months can extend its life and keep the surface resilient. I recommend using a polish that contains UV protectants—these help shield your floors against sunlight fading over time. Additionally, setting up a maintenance schedule with specific products and tools tailored to your flooring type minimizes guesswork and ensures consistent care, which is essential given the evolving trends towards eco-friendly and low-maintenance materials.
Future trends in floor upkeep
Looking ahead, I see automation playing a bigger role. Smart cleaning robots equipped with sensors are beginning to incorporate floor-specific maintenance routines, like targeted polishing and debris removal. As these technologies become more affordable, homeowners will be able to automate long-term maintenance effortlessly, significantly reducing the effort needed to keep floors in top condition. Embracing these innovations now, with proven tools like quality buffers and scrapers, will future-proof your investment and keep your floors looking impeccable over decades.
Ready to give your floors the care they deserve? Try upgrading to a professional-grade buffer with variable speed controls and incorporate a scheduled polishing routine. These small steps can dramatically improve durability and appearance, making your home not only beautiful but also resilient for years to come. For tailored advice on cleaning products and maintenance schedules, don’t hesitate to contact a flooring specialist through our contact page. Remember: a little maintenance today pays off with stunning results tomorrow.
Three Unexpected Lessons That Changed My Approach to Flooring
Sometimes the most obvious steps hide the biggest pitfalls. I once thought a quick skim coat would fix minor unevenness, only to find cracks forming months later. That taught me that thorough surface assessment and patience outweigh shortcuts. Additionally, I underestimated the environment’s role; proper room acclimation of hardwood can prevent warping, a lesson I learned the hard way. Lastly, I realized that even the best materials can’t compensate for poor execution—precision and care during installation are everything.
Tools and Resources That Made My Projects Easier
Investing in quality tools like a professional-grade self-leveling compound applicator and a high-precision moisture meter significantly improved my results. I also leaned on trusted resources such as expert guides on floor leveling and comprehensive leveling techniques. These trusted sources provided step-by-step insights that saved me time and frustration, ensuring durable, beautiful floors each time.
Your Next Move Begins Now
Remember, mastering flooring installation and floor leveling is a journey worth taking. Each project improves your skill and confidence, laying the foundation for a stunning, long-lasting space. Don’t wait for perfection—start today with the right knowledge and tools, and watch your home transform. Have you ever faced a flooring challenge that taught you a valuable lesson? Share your story below—I’d love to hear about your experiences and insights on this rewarding craft.