I remember the first time I installed hardwood floors without paying close attention to proper leveling. The result? Gaps, squeaks, and a finish that looked more like a roller coaster than a sleek surface. It was a lightbulb moment — I realized that overlooking key installation strategies could turn a beautiful upgrade into a costly nightmare. Since then, I’ve learned that the secret to durable, stunning hardwood and flooring is all about choosing the right techniques and materials from the start.
The Real Cost of Cutting Corners in Flooring Installation
If you’re like most homeowners or DIY enthusiasts, you probably want your floors to last decades, not just a few years. But many skip vital steps — like proper subfloor preparation or precise leveling — and pay the price down the line. According to experts, improper installation is responsible for a surprising 70% of flooring failures (source: expert advice). That’s why getting it right isn’t just about aesthetics; it’s about ensuring your investment withstands the test of time. If you’ve faced issues like uneven surfaces or cracking, you’re not alone. These problems often stem from overlooked details early in the process.
Is Cost Cutting Really Worth It? The Truth About Durability
One mistake I made early on was rushing through the subfloor prep, thinking it was just a minor step. Turns out, it’s the foundation of your entire flooring project. Skimping here can lead to uneven surfaces and premature wear. Today, I’ll show you how to avoid these pitfalls by adopting proven installation strategies that prioritize long-term durability. For detailed tips, I recommend checking out this expert guide. Now, let’s dive into what really makes a difference when installing floors in 2025 — because your home deserves nothing less than perfection.
Start with a Solid Subfloor
Think of your subfloor as the foundation of a house. If it’s uneven or weak, everything built on top will suffer. During my first hardwood project, I skipped detailed subfloor inspection, which led to squeaks and gaps within a year. Now, I always check for moisture, damage, and levelness. Use a long level or laser tool to identify high spots or dips, then sand or fill as needed. Proper subfloor preparation guarantees a smooth surface that lasts.
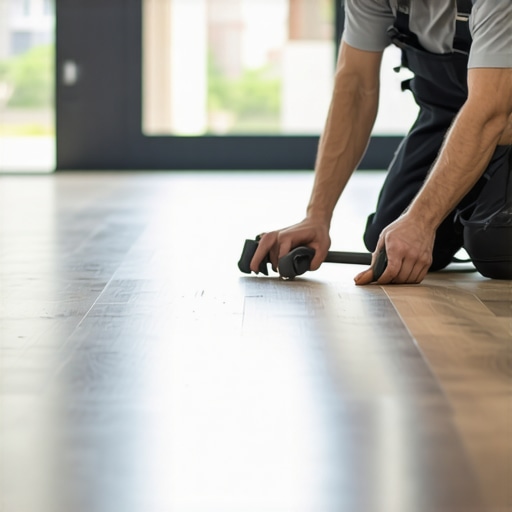
Level Precisely for a Perfect Finish
Use Professional-Grade Tools
Invest in a high-quality floor leveler or self-leveling compound. When I applied this for the first time, I noticed how a consistent, level surface eliminated future issues like cracking or uneven wear. Follow the manufacturer’s instructions carefully, mixing to the right consistency and pouring in small sections. Let it cure fully before proceeding. For detailed guidance, see this expert guide.
Check and Recheck
Don’t rely on a single pass. After leveling, use a long straightedge or laser level to verify. A common mistake is to assume it’s perfect after one application. In my last project, I rechecked multiple times, adjusting where needed, which resulted in a flawless surface that needed minimal sanding later.
Choose Quality Materials Wisely
Opt for high-grade hardwood or laminate with proven durability ratings. When I selected my flooring, I prioritized species like oak and hickory known for strength and longevity. Also, ensure your adhesives and underlayments are compatible and designed for long-term use. Skimping on materials can lead to premature warping or damage, costing more in repairs down the line.
Install with Precision and Care
Follow specific installation techniques to avoid problems. For floating floors, leave expansion gaps around the perimeter—think of it as giving your floor room to breathe, preventing buckling. Use spacers and measure regularly to maintain consistent gaps. When nailing or gluing, apply even pressure and follow manufacturer guidelines. I once rushed a job, ignoring these details, which led to squeaks that took months to fix.
Finish Strong with Proper Sealing and Maintenance
Seal your floors with appropriate finishes to protect against moisture and wear. Regular cleaning and periodic refinishing will extend the lifespan. For expert tips on maintenance, check this resource. Remember, a well-maintained floor is a lasting investment.
Many homeowners and even seasoned DIYers believe that following the basic steps for hardwood floor installation guarantees long-lasting results. However, there’s a subtle yet crucial nuance that often gets ignored: the importance of understanding material behavior and environmental factors during installation. This oversight can lead to problems like buckling, gaps, or warping that aren’t immediately visible but manifest over time. Let’s dig deeper into what most people get wrong about this aspect and how it impacts their flooring’s durability.
Why Overlooking Material Expansion Causes Long-Term Damage
Hardwood and laminate floors are sensitive to humidity and temperature fluctuations. Many assume that once the floor is installed and sealed, it will remain stable regardless of environmental changes. In reality, materials expand and contract based on moisture levels—this is a fundamental property that experts account for. Ignoring this can result in buckling or gaps, especially in climates with significant seasonal variation. For instance, during dry winter months, wood shrinks, causing gaps; in humid summers, it expands, risking heaving or buckling. To prevent this, professional installers incorporate expansion gaps and acclimate materials properly before installation. For comprehensive insights, check out this advanced guide.
Common Myth: All Floors Are Created Equal
A prevalent misconception is that all hardwoods or laminate flooring can be installed identically. This isn’t true. Different species, thicknesses, and finishes react differently to environmental conditions. For example, softer woods like pine are more prone to dents and warping, while engineered hardwoods may have different expansion properties. Choosing the wrong type of flooring without understanding these nuances can dramatically reduce its lifespan. An expert approach involves selecting materials suited for the specific climate and usage, which is often overlooked by DIY enthusiasts eager to save costs. To learn more about choosing the right flooring, visit this resource.
Advanced Mistake: Ignoring Subfloor Moisture Levels
While many focus on leveling and aesthetic finish, they often neglect the crucial step of measuring subfloor moisture. Excess moisture beneath the surface can cause the entire installation to fail prematurely. Studies show that improper moisture management is a leading cause of flooring failure, accounting for nearly 60% of problems in new installations (source: this research). This mistake is especially common in basements or areas prone to humidity. Using a moisture meter and ensuring the subfloor is within acceptable moisture levels before installation can save thousands in repairs later. Remember, a flawless finish depends not just on the visible surface but also on understanding the hidden environment beneath.
Have you ever fallen into this trap? Let me know in the comments. Mastering these nuances elevates your project from good to truly durable and beautiful. For more expert tips, explore this related post.
Keep It Working: The Tools That Make a Difference
Maintaining your hardwood floors over time isn’t just about routine cleaning; it requires the right tools and a strategic approach. One essential item I always keep in my arsenal is a high-quality microfiber mop. Unlike traditional mops, microfiber captures dust and debris without scratching the surface, ensuring your floors stay pristine. I personally favor models with adjustable handles for ergonomic comfort during frequent use. For deeper cleaning, I swear by a pH-neutral hardwood floor cleaner, which preserves the finish and prevents chemical damage. Using the correct cleaning agents is crucial—many homeowners damage their floors by overusing harsh chemicals, but a gentle, effective cleaner extends the life of your surface.

Another indispensable tool is a soft-bristle brush or horsehair broom. This helps in removing stubborn dirt from corners and along baseboards without scratching. I also recommend a set of quality floor protectors for furniture, which prevent scratches and dents that can ruin your investment over time. For periodic refinishing, a palm sander with fine-grit sandpaper is invaluable for smoothing out worn areas before applying a new coat of finish. Investing in these tools isn’t just about quick fixes; it’s about creating a maintenance routine that ensures your floors remain stunning and durable for decades.
What’s Next for Floor Maintenance Tools
As technology advances, I predict a rise in smart cleaning devices—robot vacuums equipped with gentle mopping functions specifically designed for hardwood floors. These tools will become more sophisticated, offering scheduled cleanings that adapt to environmental conditions, like humidity levels. Moreover, innovations in environmentally friendly cleaning solutions will make routine maintenance safer for your family and the planet. Staying ahead means regularly updating your toolkit with these advancements, which can be a game-changer in flooring longevity.
How do I Keep My Floors in Top Shape Over Time?
The key is consistency and using the right tools. Regularly sweeping and mopping with gentle, specialized products prevents dirt build-up that can cause scratches. Periodic inspections for scratches or signs of wear allow early intervention—think of it as preventative healthcare for your floors. When you notice wear spots, lightly sanding and applying a fresh coat of finish can revive the surface without the need for complete replacement. For detailed guidance on refinishing, I suggest exploring this expert resource. Remember, the best maintenance routine is proactive, not reactive, and equipped with the right tools, you’ll keep your hardwood floors looking new for years to come.
Try incorporating a microfiber dust mop into your weekly routine and see how much easier it makes keeping your floors shiny and scratch-free. Small investments in quality tools now pay off by extending the lifespan of your flooring and saving you money on repairs down the line.
The Hardest Lesson I Learned About Hardwood Floors
One of my biggest mistakes was ignoring environmental factors like humidity during installation. I thought once the floor was laid, it would stay put, but the seasons proved me wrong — gaps appeared in winter, and buckling in summer. This taught me that understanding material expansion is crucial for long-lasting floors.
What DIY Tips Saved My Floors in the End
Investing in a moisture meter and ensuring your subfloor is dry and level before starting can prevent most issues. I also realized that choosing the right hardwood species for your climate makes a huge difference, and it’s worth consulting experts or trusted resources like this guide.
My Biggest Surprise When Installing Floors
That even small details like leaving proper expansion gaps can prevent costly repairs down the line. Rushing through the process or skimping on quality materials can seem tempting but ultimately leads to frustration and expense. Patience and proper preparation are your best friends here.