Ever laid down a new floor and immediately noticed that it wobbles, creaks, or just doesn’t look quite right? I’ve been there, and I know how frustrating it can be. The lightbulb moment for me was realizing that the secret to a truly durable and beautiful floor isn’t just about choosing the right material—it’s about proper preparation, especially floor leveling. Skipping this crucial step can turn a promising project into a long-term headache.
Why Proper Floor Leveling Matters More Than You Think
When I first started my DIY flooring projects, I underestimated the importance of a perfectly leveled surface. I thought, “How hard can it be?” Turns out, very hard. An uneven subfloor can cause tiles to crack, hardwood to warp, and laminate to click loudly every time someone walks by. Not to mention, it compromises the entire look of your finished floor. According to experts, a level foundation can actually extend the lifespan of your flooring by years. In fact, poorly installed floors are a common cause of repair and replacement, often due to avoidable leveling mistakes. If you want your floors to last and look fantastic, investing time in proper leveling techniques is non-negotiable. Curious how to do it right? Stick around. We’ll walk through the essentials that can save your project—and your sanity.
Is Floor Leveling Really That Critical? Or Just a Fancy Tip?
Early in my journey, I made the mistake of assuming that a little unevenness wouldn’t matter much—until I faced tiles that cracked after just a few months. That was a wake-up call. The truth is, skipping proper leveling can lead to costly fixes down the line. For a comprehensive approach, check out this ultimate guide that breaks down the process step-by-step. With the right techniques, you’ll ensure your floors are not just beautiful but also built to last. Ready to learn how to get this right from the start? Let’s dive into the core strategies that will make your flooring project a success.
Start with a Clear Assessment of Your Subfloor
Before you begin, take a close look at your existing surface. Use a long level or a straightedge to identify high and low spots. Mark these areas so you know where to focus your leveling efforts. Remember, a thorough assessment saves time and prevents surprises during installation.
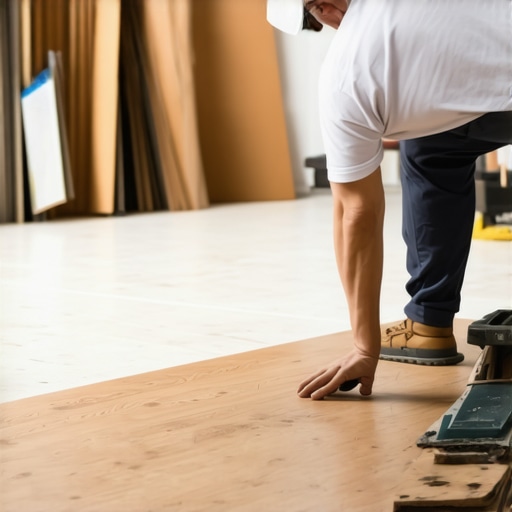
Prepare the Surface Properly
Remove any debris, old adhesives, or loose materials. Sweep and vacuum the area to ensure a clean working surface. For concrete subfloors, fix any cracks or holes with a suitable patching compound. This step is crucial, like preparing a canvas before painting, to ensure your finish is smooth and durable.
Choose the Right Leveling Material
Select a high-quality self-leveling compound if your subfloor has significant unevenness. For minor dips, a patching compound may suffice. Think of it as choosing between a thick pancake batter and a smooth icing—each suited to different degrees of unevenness. For detailed guidance, check out this comprehensive guide.
Mix and Pour with Precision
Follow the manufacturer’s instructions carefully for mixing. Use a drill with a paddle attachment for a consistent mix. Pour the compound starting from the low spots, allowing it to naturally flow into the uneven areas. Use a trowel or squeegee to spread the material evenly, ensuring it fills all gaps without creating air pockets. Think of it like smoothing icing on a cake—gentle and even.
Level and Smooth the Surface
Use a long straightedge or a leveling screed to drag across the surface, removing excess material and achieving a flat plane. For best results, work in a back-and-forth motion, pressing the compound into low spots. For complex surfaces, consider using a laser level for extra precision. Wait for the compound to cure fully, as specified by the manufacturer, which typically takes 24-48 hours.
Double-Check the Result
Once cured, recheck with a level or straightedge. Minor imperfections can be sanded or patched as needed. This extra step guarantees a flawless foundation, preventing issues down the line. Proper curing and verification can extend the lifespan of your flooring, much like a solid foundation supports a building.
Prevent Common Mistakes
Avoid rushing the process or overloading areas with too much compound at once. Applying too thick a layer can lead to cracking or uneven drying. For detailed tips on avoiding pitfalls, visit this resource.
In the world of flooring, many homeowners and DIY enthusiasts fall prey to misconceptions that can sabotage their projects. One of the most prevalent myths is that minor unevenness in the subfloor doesn’t matter much. However, this belief can lead to significant problems down the line, such as cracked tiles, squeaky floors, or even premature failure of your flooring material. The truth is, even slight imperfections can compromise the integrity of your installation, especially if you’re working with delicate or high-traffic surfaces.
Another widespread misconception is that self-leveling compounds are foolproof and can be applied haphazardly. In reality, these materials require precise mixing and application techniques. Overloading areas with too much compound or rushing the curing process can result in cracks, bubbles, or uneven surfaces. For advanced projects, I recommend consulting specialized resources like this guide to master the nuances of application. Proper preparation and technique are key to achieving a perfectly flat foundation that can support your flooring for years to come.
Why Do Many Mistakes Happen During Floor Leveling?
One of the less obvious pitfalls is neglecting to double-check the cured surface with a laser level or long straightedge. Many assume that a visual inspection suffices, but small deviations can be easily missed. These imperfections, although seemingly minor, can cause uneven wear, cracking, or shifting over time. The best practice is to verify your work meticulously after curing, and make adjustments if necessary. This extra step can save you from costly repairs and headaches later, as highlighted in this detailed resource.
In addition, rushing the process or applying thick layers of leveling compound in a single pass is a common mistake. Thin, multiple layers with adequate curing time produce a more durable and even surface. Remember, patience and precision are your best tools for success in floor leveling projects. Have you ever fallen into this trap? Let me know in the comments.
Keep It Working: Tools I Recommend for Durable Flooring
Maintaining your flooring over time requires the right tools and a proactive approach. From cleaning to repairs, having specialized equipment can make all the difference in preserving the beauty and longevity of your floors. Personally, I swear by a few key tools that streamline maintenance and help catch issues early before they become costly repairs.
Invest in a Quality Vacuum and Soft Broom
A powerful vacuum with adjustable settings is essential for removing dust and debris without scratching the surface. I prefer models with HEPA filters to trap fine particles, which is especially important for hardwood and tile floors. A soft-bristled broom can be a quick fix for daily dusting, preventing dirt from scratching the surface over time. Regular cleaning with these tools keeps your floors looking pristine and reduces the buildup of grit that can cause wear.
Use a Microfiber Mop for Routine Cleaning
Microfiber mops are my go-to for gentle, effective cleaning. They pick up dust and dirt without the need for harsh chemicals, which helps maintain the finish’s integrity. For deeper cleaning, I recommend a damp microfiber mop with a pH-neutral cleaner designed for your flooring type. This routine not only keeps your floors shiny but also minimizes the risk of damage from abrasive cleaning methods.
Apply a Floor Protector and Maintenance Products
To safeguard your investment, I recommend using floor protectors on furniture legs and area rugs in high-traffic zones. Additionally, periodic use of a quality hardwood or tile floor polish can restore shine and add a protective layer. Check out this guide for expert tips on maintaining your floors’ luster and durability.
Tools for Repairs and Leveling
Over time, minor damages or uneven spots may appear. For quick fixes, a putty knife, wood filler, or a tile repair kit are indispensable. When it comes to addressing uneven floors, a laser level or long straightedge is crucial for diagnosing issues accurately. I personally rely on laser levels for their precision—these devices can reveal subtle dips or high spots that might escape the eye. Investing in a good laser level, like the model recommended here, ensures you can monitor the floor’s condition over time and plan necessary adjustments.
Future Trends in Floor Maintenance
Looking forward, I believe technology will continue to advance with smart sensors and IoT devices that monitor floor health in real-time. Imagine sensors embedded in your floors that alert you to moisture, temperature changes, or uneven wear—allowing for preventative maintenance before problems escalate. Staying ahead with these innovations will be key for long-term durability.
How do I maintain my floors over time?
The secret to lasting floors is regular cleaning, prompt repairs, and using the right tools to catch issues early. Incorporate routine inspections with laser levels or straightedges, and don’t hesitate to seek professional help for complex repairs. Remember, a little investment in quality maintenance tools pays off in the form of beautiful, durable floors that stand the test of time. Try integrating a laser level into your maintenance routine this year; it’s an advanced step that can truly make a difference in how your floors age and perform.
When I first started my DIY flooring projects, I underestimated the importance of a perfectly leveled surface. I thought, “How hard can it be?” Turns out, very hard. An uneven subfloor can cause tiles to crack, hardwood to warp, and laminate to click loudly every time someone walks by. Not to mention, it compromises the entire look of your finished floor. According to experts, a level foundation can actually extend the lifespan of your flooring by years. In fact, poorly installed floors are a common cause of repair and replacement, often due to avoidable leveling mistakes. If you want your floors to last and look fantastic, investing time in proper leveling techniques is non-negotiable. Curious how to do it right? Stick around. We’ll walk through the essentials that can save your project—and your sanity.
Why Proper Floor Leveling Matters More Than You Think
Proper leveling is the backbone of any durable flooring installation. I learned this lesson the hard way when I skipped some crucial steps, leading to unsightly cracks and squeaks. A well-leveled subfloor provides a stable, smooth surface that prevents future issues and saves money in repairs. Trust me, taking the time to assess and correct uneven spots pays off in the long run. For comprehensive guidance, I recommend checking out this ultimate guide. It highlights how meticulous preparation and precision can transform your project from average to professional-grade. Ready to master the art of floor leveling? Let’s dive into the core strategies that will set your project up for success.
Is Floor Leveling Really That Critical Or Just a Fancy Tip?
Early on, I dismissed minor unevenness as insignificant—until I saw tiles cracking after just a few months. That was my wake-up call. The reality is, even slight imperfections can cause major problems down the line, especially with delicate or high-traffic surfaces. The key is to ensure your subfloor is as flat as possible before laying your finish flooring. For detailed technical steps, this comprehensive guide offers invaluable insights. With proper leveling, your floors will not only look stunning but will also stand the test of time. Ready to learn how to get it right from the start? Let’s explore the best techniques together.
Start with a Clear Assessment of Your Subfloor
Before you lay down any flooring, take a long, hard look at your existing surface. Use a straightedge or long level to identify high and low spots. Mark these areas so you know where to focus your leveling efforts. I’ve found that a thorough assessment upfront saves a lot of headaches later, preventing surprises during installation. This step is like mapping out your route before a long journey—crucial for a smooth ride.
Prepare the Surface Properly
Remove all debris, old adhesives, or loose materials. Sweep and vacuum thoroughly to create a clean work area. For concrete subfloors, fix any cracks or holes with suitable patching compounds. Think of this as preparing a blank canvas—clean, smooth, and ready for the masterpiece. Proper surface prep is the foundation of a flawless finish.
Choose the Right Leveling Material
Select a quality self-leveling compound if your unevenness is significant. For minor dips, a patching compound might suffice. Like choosing between pancake batter and icing, pick the right material for your specific needs. For detailed guidance, this resource can help you decide which to use.
Mix and Pour with Precision
Follow the manufacturer’s instructions carefully when mixing. Use a drill with a paddle attachment for a consistent mix. Pour starting from the low spots, allowing the compound to flow naturally into uneven areas. Use a trowel or squeegee to spread the compound evenly and avoid air pockets. It’s like smoothing icing on a cake—gentle, even, and deliberate.
Level and Smooth the Surface
Use a long straightedge or a leveling screed to drag across the surface. Remove excess material and ensure a flat plane. For complex surfaces, a laser level can provide added precision. Wait for the compound to cure fully—typically 24-48 hours—before proceeding. Patience here guarantees a durable, even foundation that supports your flooring for years.
Double-Check the Result
Once cured, recheck the surface with a level or straightedge. Minor imperfections can be sanded or patched. This extra step is like a quality check—ensuring your foundation is truly perfect. Proper curing and verification significantly extend your flooring’s lifespan, much like a sturdy base supports a building.
Prevent Common Mistakes
Avoid rushing or overloading areas with too much compound at once. Applying thin layers and allowing proper curing produces a more durable, flat surface. For more tips, this resource offers helpful advice. Remember, patience and attention to detail are your best allies in achieving flawless floor leveling.
Many homeowners fall prey to misconceptions that can sabotage their projects. One common myth is that minor unevenness doesn’t matter—until cracks or squeaks appear. The truth is, even small imperfections can cause big problems, especially with high-traffic or delicate surfaces. Another misconception is that self-leveling compounds are foolproof. In reality, they require careful application and patience. Rushing or applying too much at once can lead to cracks or bubbles. For expert tips, check out this guide to mastering the application process.
Why Do Many Mistakes Happen During Floor Leveling
One often overlooked mistake is neglecting to double-check the cured surface with a laser level or straightedge. Small deviations can cause uneven wear and early failure. Meticulous verification after curing prevents costly repairs later. Rushing the process or applying thick layers in a single pass is another common error. Multiple thin layers with adequate curing produce a more durable, flat surface. Patience and precision truly make the difference in achieving professional results.
Investing in quality tools and taking your time with each step can make your flooring project a success. Regular inspections and proper maintenance tools, like a laser level, can help you catch issues early. Looking ahead, smart sensors might someday monitor your floors in real-time, alerting you to problems before they escalate. But for now, careful planning and execution are your best bets for long-lasting, beautiful floors.
Insider Wisdom That Changed My Approach
- Patience is key: Rushing curing or applying too much compound at once can ruin the surface. Taking your time pays off in durability.
- Double-check your work: Always verify the level after curing. Minor imperfections can lead to major problems if ignored.
- Proper surface prep matters: A clean, smooth foundation is essential. Skipping this step can cause unevenness and future repairs.
- Use the right tools: Investing in a laser level and quality patching compounds makes a difference. They’re worth every penny for precision and peace of mind.
- Learn from mistakes: Every project is a learning experience. Embrace the process and refine your technique with each attempt.
My Essential Toolkit for Floor Leveling and Maintenance
- Laser level: For pinpoint accuracy in verifying flatness, I recommend a quality laser level.
- Patching compounds: Use high-quality patching and self-leveling compounds. They provide a smooth, durable base if applied correctly.
- Trowels and squeegees: Essential for spreading leveling materials evenly and removing excess.
- Fine-grit sanding tools: For minor corrections after curing, to ensure a perfectly flat surface.
- Cleaning tools: A powerful vacuum and microfiber mop help maintain your floors and prevent damage from debris or dust buildup.
Inspiring Action for Your Flooring Journey
Remember, mastering the art of floor leveling transforms your space into a beautiful, durable environment. With patience, the right tools, and attention to detail, you can achieve professional results even as a DIYer. Every successful project builds confidence and brings you closer to the perfect finish. Don’t be afraid to start—your floors will thank you for it. Now, take that first step towards leveling up your flooring skills today!
What part of the floor leveling process do you find most challenging? Let me know below!
Reading through this comprehensive guide, I can definitely relate to how tricky floor leveling can be for DIY projects. I remember my first attempt at leveling a concrete subfloor—I thought a quick patch would do the trick, but I ended up with squeaky, uneven floors after just a few months. It taught me that patience and proper tools are essential. I now use a laser level religiously to double-check my work before moving forward. One thing I’d add from my experience is that sometimes, taking a step back to assess the entire space with a long straightedge or laser can reveal small high or low spots that might not be obvious otherwise. It’s these minor imperfections that can cause big problems later, especially with delicate finishes like tiles or hardwood. How have others found the best way to ensure total accuracy during curing? I’ve found multiple thin layers with proper curing make a huge difference in durability.