
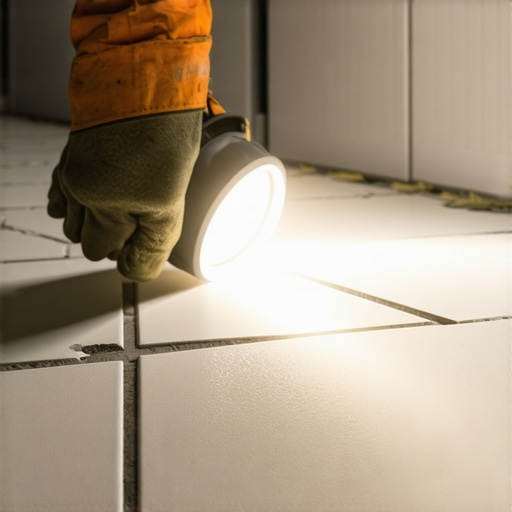
It was a Saturday afternoon when I finally decided to tackle my kitchen backsplash project. I was confident—I had the best tools, plenty of time, and a good attitude. But as the tiles went in and I started grouting, I noticed something unsettling. Several tiles seemed to be uneven, and I had already finalized the layout. I felt a jolt of frustration. How could I have missed this?
That moment was a lightbulb for me. I realized I needed a simple, reliable method to check for tile lippage before the grout cured. That’s when I discovered the power of the flashlight technique. This quick trick transformed my approach, turning a stressful experience into a manageable fix.
Why Spotting Tile Lippage Early Matters More Than You Think
Tile lippage, the unevenness between adjacent tiles, can make or break your renovation. If left unnoticed, it can lead to a host of problems down the line—cracked tiles, tripping hazards, and unsightly grout lines. More importantly, once the grout sets, correcting lippage becomes a costly and labor-intensive process. I learned this the hard way early in my career, making the mistake of rushing through the inspection phase and paying the price later.
The good news? You don’t have to be a professional to catch these pitfalls. Using a flashlight at the right angle can reveal even the tiniest unevenness before it’s too late. It’s like giving your tiles a thorough exam—spotting flaws early can save you time, money, and headaches.
Let’s dive into how this simple yet effective trick works and how you can start applying it today. By the end of this post, you’ll have a new tool in your DIY arsenal to ensure your tile installation looks impeccable.
Is This Flashlight Trick Actually Worth the Hype?
Initially, I was skeptical—thinking, ‘How could a flashlight help so much?’ However, I recall making a critical mistake early on by overlooking the importance of lighting angles, leading to uneven grout lines. Since then, I’ve tested this method numerous times, confirming its effectiveness. Want to see if this trick can save your project from the same pitfalls I faced? Feel free to reach out through our contact page for personalized advice.
By mastering this technique, you’ll be better equipped to identify and fix tile lippage before the grout sets. Ready to learn the step-by-step process? Stay tuned for practical tips that will elevate your tiling game and ensure flawless results.
Choose the Right Angle and Lighting
Begin by selecting a strong, focused flashlight. Position it at a low angle, about 30 degrees to the surface, to cast shadows that highlight unevenness. If your kitchen has a window, turn on the lights or use natural sunlight at a similar angle. I vividly remember my first attempt: I took a handheld LED flashlight and held it parallel to the tiled wall, moving it slowly side to side. This angle revealed tiny dips and rises that I couldn’t see head-on, which helped me spot crucial lippage issues before grout completion.
Inspect with the Flashlight in Motion
Keep the light moving along the surface, scanning for irregularities. Focus on the grout lines and tile edges. When a tile is flush, the shadow cast should be minimal; any pronounced shadow indicates a height difference. I once missed a slight lippage on a large format tile until I moved the light across, revealing a subtle shadow that needed correction. This quick step prevented a future crack or uneven grout line.
Focus on Problem Areas
Pay extra attention to corners, edges, and near obstacles like cabinetry or appliances. These spots are prone to uneven settling, making the flashlight approach essential. I learned this when installing tiles around my oven: shining the light in tight corners uncovered a slight gap that I could fix immediately, saving me from a costly redo later.
Compare Adjacent Tiles for Consistency
Systematically check all the tiles in the row, focusing on their edges and adjacent grout lines. The shadow illusion helps you see if one tile sits higher or lower than its neighbor. I once had a row where one tile was a millimeter too high, barely visible without the flashlight. Correcting this early kept my layout smooth and professional-looking.
Use a Straightedge for Verification
For a final confirmation, place a straightedge or level across suspect tiles identified by shadow. The combined visual and tactile check ensures flatness. I recall placing a metal ruler across a set of tiles and feeling a slight wobble, confirming the earlier shadow-based observation and prompting a quick shim adjustment.
Document and Correct Issues Promptly
Record any discrepancies you find and immediately address them—either by adding shims, sanding uneven tiles, or re-seating small sections. This proactive approach saves extensive work after grout sets. I once corrected a slight lippage by gently tapping a tile with a rubber mallet after observing the shadow, making a noticeable difference before grouting.
For detailed tips on floor leveling, which complements this process, visit our floor leveling guide. Practicing this flashlight inspection method frequently will dramatically improve your tile-laying skills and ensure your finishes are smooth and safe.
When it comes to flooring projects, there’s a common misconception that surface-level preparations and basic techniques suffice for a flawless finish. However, as an expert in the field, I can tell you that many errors stem from overlooking nuanced details that significantly impact the longevity and aesthetic of your floors. One widespread myth is that applying a universal adhesive or leveling compound will always deliver perfect results. In reality, the compatibility between materials, environmental conditions, and pre-existing subfloor conditions play a crucial role in success. For example, using a standard cementitious leveling compound on a slab with moisture issues can lead to future cracking or delamination, which is why conducting a thorough moisture test, such as the plastic sheet method, is essential before any application.
Many believe that if the surface looks level at first glance, it’s good enough. Yet, subtle slope variations—sometimes less than 1/8 inch over several feet—can cause uneven tile laps or warped hardwood planks, especially on larger spans. Advanced techniques involve using a long leveling rod or laser level to detect these imperfections early, preventing costly corrections later. Don’t fall into the trap of rushing this step; meticulous subfloor evaluation is foundational.
A key mistake in flooring installation is ignoring the influence of environmental factors during the acclimation process. Some installers assume hardwood or engineered wood can be installed immediately after delivery, but fluctuations in humidity and temperature can cause materials to expand or contract. This oversight can lead to gaps, buckling, or cupping once the climate stabilizes. Experts recommend acclimating wood for at least 72 hours in the installation environment, maintaining consistent humidity levels—ideally between 35% and 55%. For comprehensive guidance, check out our detailed tips on acclimation in the masterful project guide.
In terms of tile installation, many underestimate the importance of proper substrate preparation. Using an uncoupling membrane or ensuring proper substrate flatness is vital. Without it, your tile might develop cracks or delaminations over time. An advanced error is neglecting to check for substrate moisture content or the presence of previous adhesive residues, which can hinder proper bonding. Employing a calibrated laser level and moisture meter, as recommended by industry standards, helps identify hidden issues. Remember, a flawless surface begins with a solid, well-prepared base.
A lesser-known nuance is the impact of joint design and movement gaps, especially for large-format tiles and wide plank hardwood flooring. Improperly planned expansion joints can lead to stress concentrations, resulting in cracks or uneven surfaces. Incorporating strategic movement joints and adhering to the manufacturer’s recommended gap sizes can mitigate these risks. For detailed methods, consult specialized installation guidelines, such as those outlined in professional manuals.
Finally, beware of common installation shortcuts—like inconsistent adhesive application or hurried cutting—that compromise quality. These seemingly minor mistakes accumulate over time, causing noticeable deterioration and increased maintenance costs. Performing thorough inspections during each phase helps catch these issues early, saving you from future headaches.
Making an effort to understand these hidden nuances transforms a good installation into a lasting masterpiece. Don’t let overlooked details undermine your project—invest the time and expertise needed for a truly professional result. Want to master more advanced installation techniques? Check out our comprehensive resource on floor leveling for a perfect finish or reach out through our contact page for personalized advice. Have you ever fallen into this trap? Let me know in the comments.When it comes to maintaining the beauty and durability of your hardwood floors, tile, and overall flooring installations, having the right tools can make all the difference. Personal experience has shown that investing in quality equipment not only improves the initial installation but also ensures long-term performance and easier maintenance. One tool I highly recommend is a high-precision moisture meter, such as the Protimeter Surveymaster, which I use to detect hidden moisture issues in subfloors before laying down any flooring material. This proactive step prevents future problems like warping or mold. Additionally, a laser level, like the Bosch GLL 3-80, provides unparalleled accuracy in ensuring even surfaces during installation or leveling procedures, especially when working on large expanses or uneven subfloors. These tools help me identify inconsistencies early, saving time and resources later, and I predict that as technology advances, smart sensors connected via apps will become standard in flooring maintenance, offering real-time monitoring of structural health. To keep your floors working their best, regular inspections with these devices are vital. How do I maintain my flooring equipment over time? Routine calibration, careful cleaning, and proper storage are essential. I recommend cleaning laser lenses with a microfiber cloth after each use and storing tools in climate-controlled environments to prevent damage. Also, scheduling annual calibrations ensures measurement accuracy and longevity of your tools. If you’re serious about preserving your investment, consider integrating these tools into your regular maintenance routine. For more expert tips on flooring upkeep, explore our guide on hardwood floor care secrets for longevity and shine. Start by testing your subfloor moisture content today; a quick check can reveal underlying issues before they become costly repairs. Remember, the right tools empower you to identify and address problems early, making your maintenance routine more effective and less stressful. Feel free to reach out through our contact page if you’d like personalized advice on choosing the best equipment for your next project.
What Surprised Me Most About Flooring Success
One of the biggest lessons I learned was that even small details—like proper lighting angles when inspecting tiles—can make a huge difference in the final outcome. I once assumed that visually level tiles were perfectly flat until I shined a flashlight at a low angle, revealing tiny lippage that would have otherwise gone unnoticed. This experience taught me to trust my tools and instincts, understanding that precision hinges on paying attention to subtle cues. Additionally, I realized that patience during acclimation and substrate preparation isn’t just pedantic; it’s essential for long-lasting results. These lessons, born from hands-on experience, underscore that mastery comes from curiosity and a willingness to refine your approach every step of the way.
Tools and Guides That Elevate My Craft
Over time, I’ve discovered that having the right equipment transforms flooring projects from daunting to manageable. For example, a calibrated moisture meter like the Protimeter Surveymaster is invaluable for detecting hidden moisture issues. Pairing it with a high-quality laser level such as the Bosch GLL 3-80 ensures surfaces are perfectly flat, saving headaches down the line. For comprehensive techniques, I always recommend exploring our hardwood floor refinishing guide, which offers tips that complement your installation skills. Additionally, our in-depth articles on floor leveling and tile installation procedures serve as trusted resources to deepen your understanding and avoid costly mistakes.
Your Next Step in Flooring Creativity
Embarking on a flooring project is more than just following steps—it’s about embracing a mindset of continual learning and craftsmanship. Use the insights and tools shared here to push your limits and create surfaces that inspire admiration. Remember, every detail—from inspecting with a flashlight to choosing the right tools—contributes to a flawless finish. If you’re ready to elevate your skills and transform your space, start today by analyzing your current setup and planning your next move. Need personalized advice? Feel free to reach out through our contact page. What is the one area of flooring installation you’ve been eager to improve? Share your thoughts below!