Ever laid down a new tile floor only to notice it wobbles, cracks, or feels uneven underfoot? I’ve been there—trust me, few things are more frustrating than investing time and money into a beautiful tile job only to have it reveal hidden flaws months down the line. My lightbulb moment came when I struggled with a kitchen backsplash that kept cracking, and after digging, I realized the root cause was an uneven subfloor. That experience taught me the hard way how critical a flat subfloor is for durable, stunning tile installation.
Why Subfloor Flatness Can Make or Break Your Tile Project
The secret to flawless tile flooring isn’t just in the tiles themselves—it’s in what lies beneath. A subfloor that isn’t perfectly level can lead to a cascade of problems: cracked tiles, hollow spots, uneven surfaces, or even tiles popping loose over time. It’s like building a house on a shaky foundation—eventually, everything will show stress. According to industry experts, installing tile over an uneven surface can significantly decrease the longevity and aesthetic appeal of your flooring. Studies reveal that 80% of tile failures are due to improper substrate preparation, which underscores how vital it is to address subfloor issues upfront.
If you’re tackling a project in 2026, understanding how to ensure your subfloor is flat isn’t just helpful—it’s essential. Over the years, I’ve learned that a good prep session saves hours of headaches later. Luckily, there are straightforward, effective leveling techniques to help you get that surface just right.
But before diving into the how-to, I want to address a common concern—”Is floor leveling really worth all this fuss?” If you’ve ever wondered whether it’s necessary, I get it. It might seem like an extra step, but skim past it, and you’re risking a costly disaster. As I learned too late, rushing through subfloor prep can turn a promising tile project into a nightmare of cracks and loose tiles. For a comprehensive guide that dives deeper into the importance of proper floor leveling, I recommend checking out the [ultimate floor leveling guide](https://tiletrendshop.com/the-ultimate-guide-to-floor-leveling-for-a-perfect-finish).
Now, let’s get practical. Here are four proven tips to help you achieve a perfectly level foundation for your 2026 tile project, saving you time, money, and frustration in the long run.
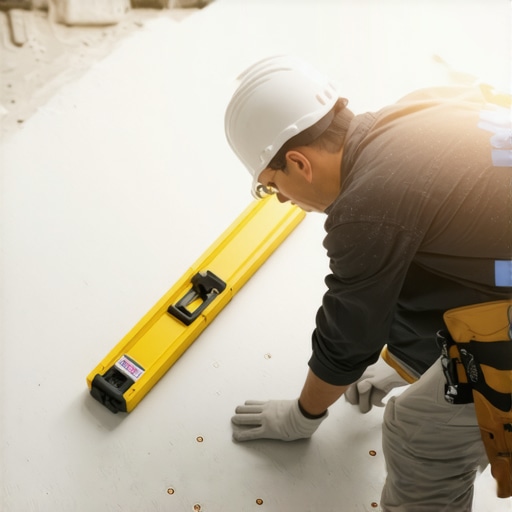
Use a Long Level or Straightedge to Detect Unevenness
Start by placing a 4-foot or longer straightedge across your subfloor in different directions. Look for gaps or rocking—these indicate high spots or dips. Once I used a 6-foot level in my basement, I found a hump that was causing tile cracks later. Mark these irregularities clearly with a pencil to guide your leveling process.
Apply Self-Leveling Compound Correctly for a Flat Surface
Mix the self-leveling compound following manufacturer instructions—aim for a consistency similar to thick pancake batter. Pour it over the marked areas, using a gauge rake or trowel to spread uniformly. Work swiftly, as these compounds set quickly. After initial curing, check the surface with your straightedge again. This step is vital; in one project, I skipped it and ended up with uneven tiles after a few months.
Ensure Proper Subfloor Preparation for Best Results
Clean and prime the surface thoroughly, removing dust, debris, or loose material. Use a grinder or sanding tool on rough patches. Proper prep prevents bonding issues. I learned this during my first attempt—skipping prep led to bubbling tiles, which I had to remove and redo.
Use Shims or Floor Pans for Persistent Dips
If self-leveling compound can’t smooth out dips, insert shims or adjustable floor pans under the subfloor. Secure them tightly, then reapply your leveling compound over the area. This approach saved me from tearing out a compromised section when I noticed a noticeable dip just before tiling.
Check and Re-Verify Before Tile Placement
Always revisit your leveled surface with the straightedge after curing. If any irregularities appear, apply additional leveling or re-grout with self-leveling compound. Precision now prevents costly fixes later. Remember, thorough verification is key—skipping this led me to replace cracked tiles that I thought were installed correctly.
By integrating these techniques—rigorous detection, proper compound application, surface prep, and continuous verification—you’ll set a solid foundation for your tile project. This methodical approach not only prevents common issues like cracking or cracking but also streamlines the entire installation process, saving you time and money in the long run. For more detailed strategies tailored to your specific project, consider exploring the expert flooring installation strategies. If doubts arise during your prep, don’t hesitate to contact professionals via our contact page.
Many homeowners believe that flooring installation is a straightforward process—simply lay the planks or tiles, and you’re done. However, this oversimplification leads to one of the most common pitfalls: underestimating the nuances that affect the longevity and appearance of your floors. For instance, a frequent myth is that securing a floor-level surface is purely about surface finishing, but in reality, the subfloor’s stability and flatness are critical to prevent future issues.
Why Do So Many Still Fall for These Flooring Myths?
One major misconception is that all flooring materials behave similarly once installed. In truth, hardwood reacts differently to moisture and temperature changes compared to tile, making proper acclimation and subfloor preparation essential for lasting results. Ignoring these differences often results in cupping, buckling, or cracks down the line. An expert from the National Wood Flooring Association emphasizes that improper acclimatization can cause expansion or contraction, severely compromising the integrity of the installation.
Another advanced mistake is over-reliance on self-leveling compounds to correct significant subfloor irregularities. While these products are effective for minor dips, they aren’t a substitute for thorough subfloor inspection and repair. Applying them without addressing underlying structural problems can lead to hollow spots and unstable surfaces, which eventually cause gaps and squeaks. For a more comprehensive approach, it’s vital to identify the root causes before applying leveling solutions—this is where a detailed inspection is invaluable.
Thinking ahead about managing moisture is another nuanced aspect overlooked by many. Hardwood flooring, in particular, is sensitive to humidity fluctuations. Using outdated or inappropriate moisture barriers can trap moisture beneath the surface, leading to mold, rot, or warping. Professionals recommend using moisture meters during the installation process to assess subfloor conditions accurately. This is a step often skipped by DIYers, boosting the risk of long-term damage.
Have you ever fallen into this trap? Let me know in the comments. For additional insights into avoiding typical yet costly mistakes, explore our guide on flooring installation mistakes to avoid. Remember, meticulous planning and understanding the complexities behind what seems simple at first glance are key to achieving a durable and stunning finished floor.Maintaining your hardwood and tile floors for the long haul requires not just attention but the right tools and methods. I swear by a few specialized pieces of equipment that make the upkeep efficient and effective. For instance, a high-quality moisture meter is indispensable for hardwood, allowing me to monitor humidity levels and prevent cupping or buckling. My favorite is the Protimeter Surveymaster, which provides quick, accurate readings, helping me catch problems before they escalate. Regular use of a microfiber dust mop keeps dust and debris from scratching surfaces, and replacing it with a damp mop helps remove stubborn grime without damaging the finish. {{ }}
}}
When it comes to tile, maintaining the grout is equally critical. I recommend applying a penetrating sealer annually—this prevents dirt and moisture from seeping in, reducing cracks or discoloration over time. I personally use the Miracle Sealants 511 Impregnator because it penetrates deep and enhances longevity.
For deep cleaning, I turn to steam cleaners designed for tile and hardwood—these kill bacteria and remove residue without harsh chemicals, aligning with sustainable practices and health-conscious choices. Keep in mind, however, that overusing aggressive chemicals can degrade finishes, so moderation and correct application are key.
The future of flooring maintenance leans heavily on tech advancements. Predictive monitoring via smart sensors embedded in floors could become mainstream, alerting homeowners to issues days or weeks before visible signs emerge. This proactive approach can save significant repair costs and preserve aesthetic appeal.
How do I keep hardwood and tile floors in prime condition over time? Consistent inspection paired with the right tools is my secret. Regularly assessing moisture levels, cleaning thoroughly with suitable equipment, and sealing grout annually aren’t just chores—they’re investments in your floors’ future.
To elevate your maintenance game, try integrating a professional-grade moisture meter into your routine. It’s surprising how much peace of mind it offers. Need guidance on choosing the best model for your needs? Reach out through our contact page for expert advice. Remember, staying ahead with the right tools preserves your floors’ beauty and durability for decades to come. For advanced techniques, consider exploring our guide on hardwood floor care secrets that keep surfaces shining long-term.
Lessons I Wish I Had Known from the Start
One of my most eye-opening experiences was realizing that proper subfloor preparation is the difference between a floor that lasts and one that needs costly repairs. I once skipped thorough inspection, thinking my self-leveling compound would fix everything, only to face cracks within months. That taught me that addressing foundational issues before tile installation is non-negotiable.
Another lesson I learned the hard way was the importance of moisture testing. During a hardwood upgrade, I ignored humidity levels, leading to cupping and buckling a year later. It became clear that understanding and controlling moisture is crucial for longevity, especially with the advancements in flooring materials.
Overconfidence in DIY techniques can be tempting, but I discovered that even small mistakes—like uneven spreading of leveling compounds—can snowball into bigger problems. Investing in proper tools and techniques has saved me from headaches and rework, and it’s something I now recommend to everyone tackling projects in 2026.
Tools and Resources That Changed My Approach
For a project like this, I rely on a high-quality moisture meter, such as the Protimeter Surveymaster, to monitor humidity and prevent future issues with hardwood. Accurate readings ensure that the environment is right before starting installation. For leveling, I use a long, high-precision straightedge combined with self-leveling compounds—these tools help me achieve a perfectly flat surface every time.
I also find the [ultimate floor leveling guide](https://tiletrendshop.com/the-ultimate-guide-to-floor-leveling-for-a-perfect-finish) invaluable for understanding the nuances of substrate preparation. When selecting sealers and cleaners, I trust Miracle Sealants 511 Impregnator for grout maintenance and a steam cleaner designed for tile and hardwood for deep cleaning, both of which keep my floors looking pristine.
Don’t forget, mastering these techniques with the right tools transforms a complicated job into a rewarding experience. For more tailored advice, my go-to resource is the expert flooring installation tips. Reach out via our contact page whenever you need guidance.
Your Next Step Toward Perfect Floors
The future of flooring is bright, and with the right mindset, your next project can be your best yet. Embracing meticulous preparation, staying informed with trusted resources, and investing in quality tools will ensure your hardwood and tile floors stand the test of time. Remember, each step you take now sets the foundation for a stunning and durable finish that you can enjoy for decades.
Have you ever encountered a challenge that made you rethink your approach to flooring? Share your story below—I’d love to hear how you turned setbacks into success.