One morning, I stepped into my living room, coffee in hand, only to notice a fresh scratch rippling across my beloved hardwood floor. That sharp, unsightly line felt like a betrayal—my heart sank. I had spent years caring for my floors, only to have a careless moment turn into a lasting mark. That lightbulb moment made me realize—if I didn’t find quick, effective fixes, they’d become permanent eyesores, diminishing the beauty and value of my home.
Why You Can’t Ignore Those Hardwood Scratches Any Longer
Hardwood floors are a showcase of sophistication and warmth, but scratches can sneak in easily—stained by pet claws, furniture movement, or just everyday wear and tear. What often surprises homeowners is how rapidly these minor imperfections can turn into stubborn problems if left unchecked. As I learned early on, neglect can lead to costly refinishing, which is far more invasive and expensive than simple repairs.
According to flooring experts, quick touch-ups not only preserve your floors’ appearance but also extend their lifespan. A study published by the Hardwood Floor Care Secrets emphasizes that timely maintenance significantly reduces long-term damage. So, why wait for scratches to deepen or dirt to settle in? Addressing these issues promptly can save you time and money, keeping your floors stunning for years to come.
Is a DIY Fix Always the Best Route for Scratches?
In my early days, I made the mistake of applying generic scratch filler without proper preparation. The result? A patchy, uneven finish that looked worse than the scratch itself. This taught me a crucial lesson: understanding your floor’s finish and properly assessing the damage is vital before attempting a fix. Sometimes, professional refinishing is necessary, but often, quick DIY solutions do the trick—if done correctly. For detailed guidance, check out my favorite strategies on precise floor leveling techniques.
Now, let’s dive into three simple and effective fixes you can try today. Whether you’re dealing with minor scratches or more noticeable marks, these methods will help restore your hardwood’s beauty—fast and affordably. Ready to give your floors a fresh new look? Let’s get started.
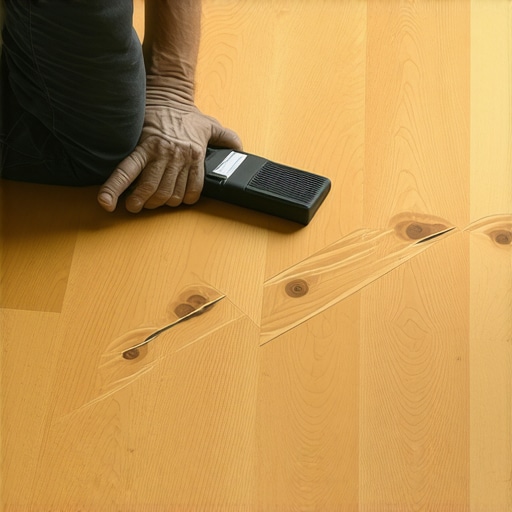
Assess the Damage and Gather Tools
Before diving into repairs, identify whether the scratch is superficial or deep. Superficial scratches usually appear as surface marks, while deep ones penetrate the finish and wood. I once tried to fix a light scratch by applying a wax filler without inspecting the depth; the result was a visible patch. For tools, you’ll need a clean cloth, wood stain or marker matching your floor, fine-grit sandpaper, and a clear finishing sealant. Having everything ready ensures a smooth process.
Clean and Prepare the Surface
Start by removing dust and debris from the scratch area with a damp cloth. This step is crucial because dirt can interfere with adhesion. I remember using a slightly damp toothbrush to access tight spots after cleaning the surface, which prevented dirt from being trapped under the repair product. Wait until the area dries completely to avoid trapping moisture beneath the finish.
Apply a Wood Filler or Marker
For minor surface scratches, a wood touch-up marker matching your floor’s shade works wonders. Dab it directly into the scratch, similar to coloring in a small drawing. For deeper scratches, use a matching wood filler; press it into the groove with a plastic putty knife, then smooth the surface. I once overfilled a deep scratch, but quickly wiped excess with a damp cloth before it cured. Allow the filler to dry as per product instructions.
Finish and Seal the Repair
Once the filler is dry, gently sand the area with fine-grit sandpaper to level it with the rest of the floor. Be careful not to damage surrounding finish. After sanding, apply a clear finish or topcoat to blend the repair seamlessly. I used a small brush for precision, and a light coat made the patch nearly invisible. This sealing step is vital to protect against future wear and tear. For more advanced refinishing techniques, visit this guide, which covers detailed sanding and sealing methods.
Many homeowners think they understand tile, floor leveling, or hardwood installation, but the truth is, there’s a lot of overlooked complexity that can trip up even seasoned DIYers. One common misconception is the belief that following generic instructions guarantees a perfect finish. Everyone says “just level the floor and lay the tiles,” but in my experience, the devil is in the details. For example, verifying the substrate’s moisture content and consistency is crucial because unnoticed moisture can cause tiles to loosen over time. According to industry pros, ignoring subtle surface irregularities often results in cracks or uneven grout lines down the line, which are costly to fix later. A common trap is underestimating the importance of proper substrate preparation; small dips or high spots are more than cosmetic issues—they compromise durability. If you skip extra steps like performing spot level checks or using a professional-grade leveling system, you risk needing major repairs much sooner. This is why I advocate for a meticulous approach—checking floor flatness with a laser level, assessing moisture barriers, and investing in quality leveling compounds. When it comes to hardwood floors, the mistake many make is assuming that a standard sanding process will fix all issues. But each species of wood has different expansion rates, and neglecting to account for these nuances can lead to gaps or buckling over time. An advanced step that I recommend involves acclimating the wood properly before installation and performing a thorough moisture measurement, as highlighted by experts in perfect floor leveling. Another myth is that larger tiles are always better for speed. In reality, oversized tiles are trickier to install due to increased weight and substrate requirements. Without proper preparation, these tiles can crack or crack the installation, reducing your investment’s lifespan. Additionally, the common idea that all adhesives are equal is false; high-quality, flexible adhesives tailored for specific materials are critical for longevity. My experience shows that understanding these nuances can make or break your project. Have you ever fallen into this trap? Let me know in the comments. For more detailed insights, don’t forget to explore expert tile and hardwood installation tips.
Keeping your hardwood and tile floors in top condition requires more than just a few basic supplies. Investing in the right tools not only makes maintenance easier but also ensures professional-looking results that stand the test of time. One essential piece of equipment I rely on is a detailed laser level, such as the Bosch GCL100-50G. Its precision helps me identify uneven surfaces before repair, preventing future issues like cracking or uneven grout lines. Using a laser level regularly, especially during re-levelling projects, keeps the substrate flat and prepares your floors for successful installation or refinishings—learn more about floor leveling techniques.
Another tool that has upgraded my maintenance routine is a high-quality oscillating multi-tool paired with a precision sanding attachment. This combo allows me to sand down deep scratches or uneven spots without risking damage to surrounding areas, which is a common mistake among DIYers. For long-term results, I also recommend a fine-grit sanding pad and a durable wood filler that matches your floor’s finish. Applying these with a steady hand ensures a smooth surface that seamlessly blends with the original finish—consider reviewing hardwood refinishing strategies.
To protect your investments, I use a high-performance, water-based polyurethane sealant. Its advantages include quick drying times and excellent durability against daily wear, which is especially vital for high-traffic areas. Applying a thin, even coat with a professional-grade brush like the Purdy White Dove helps prevent bubbles and uneven finishes. Future trends lean toward eco-friendly sealants that provide superior durability while reducing VOC emissions, so staying updated on these options will benefit your long-term maintenance plan.
How do I maintain hardwood and tile floors over time?
Regular cleaning with a soft microfiber mop combined with pH-neutral cleaners is key. Avoid harsh chemicals that can erode finishes or cause discoloration. Also, periodically inspect areas prone to damage, such as entryways and near furniture, and address scratches or chips immediately, using techniques I’ve discussed here. Incorporating these practices extends the lifespan of your floors dramatically. For a detailed step-by-step, see floor care secrets.
Have you tried using a professional-grade leveling system during installation? It might seem like a small step, but it significantly enhances the durability and appearance of your floors. Give it a shot, and don’t forget to consult expert strategies to perfect your process—discover more at precise floor leveling techniques.

Lessons You Never Expect to Learn from Scratched Floors
- The biggest mistake I made was thinking small scratches didn’t matter—until they became permanent eyesores. Now, I understand every tiny flaw is an opportunity to act before it mounds into costly damage.
- DIY fixes seem straightforward, but without patience and proper assessment, you risk making the problem worse. The real secret is knowing when to call in the pros and when to trust your tools.
- Over time, I realized that understanding the subtle differences in wood finishes and grain directions saved me from unintentional damage—it’s all about respecting the material’s unique nature.
- Investing in quality tools like a laser level and fine abrasives drastically improved my repair results. Cheap alternatives can make your floors look worse—quality pays off in durability and appearance.
- Most importantly, consistent maintenance and timely repairs preserve the beauty and value of hardwood floors far beyond initial expectations, proving that small efforts yield long-term gains.
Tools and Resources That Elevated My Flooring Skills
- Bosch GCL100-50G Laser Level: Precision alignment is critical; this laser keeps my floor flat and guides accurate repairs.
- Multi-Tool with Fine Sanding Attachments: Perfect for gentle sanding without damaging surrounding areas, ensuring seamless repair blending.
- Matching Wood Filler and Markers: For quick touch-ups that restore the original look without noticeable patches.
- This guide on floor leveling helped me understand the importance of substrate preparation—an often overlooked step.
- Expert refinishing tips minimized my trial-and-error and boosted my confidence in tackling larger projects.
Your Next Step Toward Floor Perfection
Don’t wait for those small scratches or uneven patches to become major headaches. With the right knowledge, tools, and a proactive attitude, you can keep your hardwood floors stunning and resilient for decades. Remember, every scratch is just a reminder that your home’s beauty is worth protecting—so get started today, and transform your flooring care routine into a rewarding experience.
Have you ever hesitated to tackle a floor repair? Share your experiences below, and let’s learn together how best to keep our floors flawless!
.
Reading about quick remedies for hardwood scratches really resonated with me, especially after noticing a few minor marks on my own floors. I’ve learned that addressing scratches promptly can make a huge difference in maintaining the overall aesthetic and longevity of the wood. I particularly appreciate the emphasis on assessing whether the scratch is superficial or deep before jumping into repairs—that’s a step I often overlook, leading to less satisfying results. I’ve found that using a matching wood stain or marker is surprisingly effective for surface scratches, but for deeper gouges, a good quality filler coupled with light sanding makes a huge difference. Have others found that specific tools or techniques work better for their particular wood types or finishes? I’d love to hear more about how you all approach tailored fixes—sometimes what works for one type of wood might not be as effective for another, right? It’s such a satisfying feeling to restore a scratched area yourself and keep those floors looking new.