Ever spent hours installing new hardwood floors only to find they creak, warp, or look uneven? I’ve been there. That sinking feeling when you step back and realize your beautiful new floor isn’t as flawless as you imagined. I made a crucial mistake early on—assuming that a subfloor was perfectly flat without checking—and it cost me dearly in time and frustration. But let me tell you, once I cracked the code on proper floor leveling, everything changed. Your project can be the same way. Today, I’ll share the secrets to achieving a perfectly level surface, so your floors look stunning and last for years.
Why Floor Leveling Is the Secret Sauce to Beautiful Floors
When it comes to hardwood, tile, or any flooring, the foundation matters. A level subfloor isn’t just about aesthetics; it’s about durability, safety, and ease of installation. An uneven surface can cause your flooring to develop gaps, cracks, or even buckle over time. Plus, it’s a nightmare trying to hide uneven seams or transitions. Honestly, I used to think that minor dips didn’t matter—until I saw my floors warp and my confidence waver. Now, I know better. Properly leveling the subfloor makes all the difference. If you want your floors to be the envy of your neighbors and last decades, mastering the art of floor leveling is non-negotiable. Want to avoid the costly mistakes I made? Keep reading. I’ll walk you through the process step by step.
Have You Faced This Common Floor Installation Dilemma?
If you’ve ever laid a seemingly perfect floor only to discover it’s uneven, you’re not alone. It’s a widespread issue that can turn a weekend project into a months-long headache. But here’s the good news—most problems are preventable with the right approach to subfloor prep. And that’s exactly what I want to help you with today. Before we dive into the how-to, I want to share a quick story about a mistake I made early in my career that could’ve been avoided. I skipped checking my subfloor’s levelness and ended up with a floor that was a nightmare to fix. That experience taught me the importance of precise floor leveling techniques. For trusted advice, you might want to check out the comprehensive guide on [the ultimate guide to floor leveling for a perfect finish](https://tiletrendshop.com/the-ultimate-guide-to-floor-leveling-for-a-perfect-finish). Now, let’s get into how you can do it right from the start, saving yourself time, money, and frustration. This article will equip you with practical tips and expert strategies to ensure your floors are perfectly level—every time. Ready to become a floor leveling pro? Let’s go.
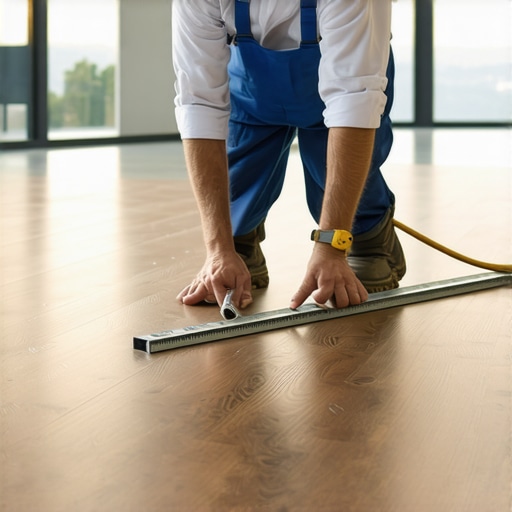
Start with Precise Measurements
When I first tackled floor leveling, I learned the hard way that assumptions can lead to costly mistakes. I used a long spirit level across the entire room without checking multiple points, which gave me a false sense of accuracy. Instead, I now use a laser level or a long straightedge and a high-quality carpenter’s level to identify high and low spots. Measure every corner, along the walls, and in the middle of the room. Mark these spots clearly with chalk or masking tape. This comprehensive assessment helps you understand the extent of unevenness and plan your approach effectively.
Prepare the Subfloor Thoroughly
Before applying any leveling compound, clear the area of debris, dust, and loose particles. I found that a clean, dry surface ensures better adhesion. If there are loose boards or damaged sections, replace or secure them firmly. For wooden subfloors, ensure all nails and screws are flush with the surface to prevent uneven spots. Think of the subfloor as the foundation of a house; if it’s shaky or uneven, no amount of leveling compound will fix it permanently.
Choose the Right Leveling Material
Not all leveling compounds are created equal. For minor dips (less than 1/4 inch), a self-leveling underlayment works well. For larger dips or cracks, you might need to apply a patch or use a combination of patching compounds and self-levelers. During my project, I used a fast-setting self-leveling compound, which allowed me to move quickly and proceed with flooring installation in a single day. Always read the manufacturer’s instructions carefully and mix the compound to the specified consistency to ensure optimal flow and bonding.
Apply the Leveling Compound Methodically
Pour the self-leveling compound in the low areas first, then spread it evenly using a gauge rake or a trowel. Imagine pouring syrup onto a pancake — you want it to flow naturally into the dips without trapping air bubbles. Use a long broom or a squeegee to help the compound settle and spread uniformly. During my last project, I worked in sections, pouring the compound in small batches to prevent it from setting before I finished spreading. This technique guarantees a smooth, level surface ready for the final flooring layer.
Watch Out for Air Bubbles and Thin Spots
After pouring, gently tap the sides with a broom handle or use a spiked roller to release trapped air bubbles. These can cause weak spots or future cracks. Also, check for thin spots or areas where the compound didn’t settle properly. If needed, apply a second layer after the first has cured, focusing on those problem areas. I learned this the hard way when I ignored air bubbles, which later led to cracks in my tile installation. Precision now saves me time and money.
Allow Adequate Curing Time
Patience is key. Even the fastest-setting compounds need time to cure fully. Rushing the process can cause the surface to crack or shift. I always follow the manufacturer’s recommended curing time—usually 24 to 48 hours—before proceeding with flooring. During that period, keep the area free of foot traffic and moisture. Proper curing ensures a solid, level base that will support your flooring and prevent future issues.
For more detailed techniques and troubleshooting tips, visit this comprehensive guide. Ensuring your subfloor is perfectly level is the foundation of a beautiful, durable floor that lasts for decades.
Many homeowners and even some pros fall into traps when tackling flooring projects, often based on misconceptions that can lead to costly mistakes. Let’s dig deeper into what most people get wrong about hardwood floors, floor leveling, and tile installation, and uncover some hidden nuances that can elevate your craftsmanship.
Why the Fixation on Levelness Can Be Misleading
It’s widely believed that a perfectly flat subfloor is necessary for flawless flooring. While an overly uneven surface can cause issues, obsessing over absolute perfection can be counterproductive. Sometimes, minor dips are tolerable and won’t affect the long-term durability of your floors. In fact, excessive grinding or over-leveling can weaken the subfloor structure or introduce new problems, especially if it involves removing too much material. Instead, focus on addressing significant high or low spots that impact installation, and remember that a bit of natural variation is normal, especially in older homes.
Myth of Universal Leveling Materials for All Situations
Another common misconception is that one type of leveling compound suits every scenario. In reality, choosing the right material depends on the subfloor type, the extent of unevenness, and your specific flooring material. For example, self-leveling compounds are ideal for large, shallow dips but may not work well on plywood or damaged surfaces. Patching compounds are better for filling cracks or deep dips. Rushing to use a generic product without understanding its limitations can result in future cracks or uneven surfaces. Always tailor your approach by consulting expert sources like this ultimate guide.
Advanced Mistake: Underestimating the Impact of Subfloor Stability
Many overlook the importance of subfloor stability beyond just levelness. A subfloor that is not properly secured or is prone to movement can cause flooring to shift, warp, or crack over time — regardless of how flat it is. Loose nails, squeaks, or rotting wood can undermine the entire project. This is a nuanced aspect often missed by DIYers eager to move quickly. Ensuring the subfloor is solid, well-secured, and free of moisture issues is crucial for lasting results. For detailed strategies, check expert installation tips.
What about the Fine Details of Transition and Expansion Gaps?
Many focus solely on the main surface and ignore the subtleties like expansion gaps and transitions. These seemingly minor details actually protect your floors from future buckling or cracking caused by temperature and humidity fluctuations. Properly planning and installing these gaps can be the difference between a professional finish and a DIY disaster. Advanced installers often use specialized tools and techniques to ensure these gaps are precisely placed and finished, a nuance that’s often overlooked. For more insights, visit long-lasting strategies.
Have you ever fallen into this trap? Let me know in the comments. Mastering these hidden nuances can dramatically improve your flooring results, making your space not just beautiful but also durable for decades to come.
Once you’ve achieved a beautifully leveled subfloor and installed your hardwood or tile flooring, the journey doesn’t end there. Proper maintenance and having the right tools can extend the life of your floors and ensure they stay stunning for decades. In this article, I’ll share my top recommendations for tools that I personally rely on and maintenance strategies that keep your floors in prime condition. Whether you’re a DIY enthusiast or a seasoned pro, these insights will help you preserve your investment and even scale your projects with confidence.
Invest in Quality Maintenance Tools
Maintaining hardwood floors and tiles involves routine care that, if done correctly, prevents costly repairs down the line. I always keep a few essential tools within reach. A microfiber dust mop is my go-to for daily cleaning because it traps dust and debris without scratching surfaces. For deeper cleaning, I prefer a pH-neutral wood floor cleaner or a gentle tile cleaner—harsh chemicals can damage finishes over time. Remember, regular cleaning prevents dirt buildup that can scratch or dull your floors, so don’t skip this step.
For periodic deep cleaning, a steam mop is effective on tile but should be used cautiously on hardwood to avoid water damage. Always check your flooring manufacturer’s guidelines before using such equipment. To maintain the integrity of your finish, I recommend applying a quality floor polish or wax every few months—this adds a protective layer and enhances shine. When choosing products, opt for those recommended by industry experts or your floor manufacturer to avoid voiding warranties. For more detailed advice on hardwood care, check out this comprehensive guide.
Tools I Use for Long-Term Maintenance
Beyond cleaning, I rely heavily on a few specialized tools to keep my floors in top shape. A soft-bristle brush or a microfiber pad attached to a cordless vacuum is excellent for removing dust from corners and along baseboards. For scratches or minor imperfections on hardwood, a touch-up kit with color-matched stain and a small applicator brush is invaluable. I also invest in a high-quality buffer to restore shine during periodic refinishing, especially for high-traffic areas. For tiles, a grout cleaning brush and a steam cleaner help prevent discoloration and mold buildup, especially in grout lines.
When it comes to repairs, having a small set of putty knives, a touch-up pen, and spare grout or sealant can save you time and money. These small investments in tools allow for quick fixes that prevent small issues from turning into major problems. Also, I recommend maintaining a detailed record of your flooring’s installation, including products used and maintenance dates—this helps when troubleshooting or planning future renovations. Want to stay ahead of the curve? Keep an eye on emerging tools like robotic vacuums with mopping capabilities that are becoming more sophisticated and floor-friendly.
How do I maintain my floors over time?
The key to long-lasting floors is consistency. Schedule regular cleaning, avoid dragging heavy furniture, and place protective pads under legs and furniture feet. Keep humidity levels stable—too much moisture can warp wood, while too little can cause cracking. For tile, sealing grout lines every 1-2 years prevents staining and mold growth. Additionally, monitor for signs of wear or damage, and address issues promptly. If you notice scratches or dullness, consider professional refinishing or re-sealing to restore the original beauty. As trends point toward smart home integrations, future maintenance may include automated systems that monitor humidity and surface cleanliness, making upkeep even easier.
Remember, a little preventive care goes a long way. For in-depth strategies on preserving your floors, visit this expert guide and try implementing one advanced tip today, like regular application of protective finishes. Your floors will thank you for it, maintaining their beauty and durability for years to come.
The Hardest Lesson I Learned About Floor Leveling and Installation
One of my biggest lightbulb moments was realizing that ignoring the stability of the subfloor can undo all your hard work. No matter how carefully you level, if the subfloor isn’t solid, your floors will eventually suffer. This taught me that thorough inspection and securing the subfloor are non-negotiable steps before applying any leveling compound.
Why DIY Guides Only Take You So Far
Early on, I relied solely on online tutorials, thinking I could shortcut the process. But I quickly learned that every space has its quirks—like moisture issues or existing structural problems—that generic advice won’t cover. Investing in a few expert resources, like the comprehensive ultimate guide to floor leveling, saved me from costly mistakes and gave me a deeper understanding of what truly works in real-world projects.
The Value of Patience and Precise Application
Rushing the curing process was my undoing in past projects. I discovered that patience isn’t just a virtue; it’s essential for a durable, perfectly level surface. Carefully following manufacturer instructions and allowing proper curing time directly translates into floors that stay flat and look professional, even years later. This discipline transformed my results from average to exceptional.
Curated Recommendations for Continued Success
- Laser Level: I trust a laser level for its accuracy and ease of use, especially in large rooms where traditional levels fall short. It ensures you identify every high and low spot precisely.
- Self-Leveling Compound: My go-to for minor dips, this compound simplifies the process and guarantees a smooth finish. Always choose a reputable brand to avoid future cracks.
- Moisture Meter: Detecting moisture issues early can prevent future warping or mold growth. It’s a small investment that pays off over time.
- Professional Repair Tools: Small tools like putty knives and grout repair kits are essential for quick fixes, keeping your project flawless without extra trips to the store.
Step Up Your Floor Game Today
Your journey to perfect flooring starts now. With the right mindset, tools, and patience, you can achieve stunning, durable floors that stand the test of time. Remember, every successful project is built on a solid foundation—literally. So, why not take that extra step today and elevate your space? For ongoing tips and expert advice, don’t forget to visit our contact page. And if you’ve faced specific challenges or have questions about your project, I’d love to hear your story—share below and let’s learn together!
Reading through this post reminded me of my own frustrations with uneven floors early on in my DIY projects. One thing I learned the hard way is how critical it is to spend extra time on the initial measurement process. I used a basic level and thought I was good, but I soon discovered the extent of the dips and irregularities once I started laying the flooring. Since then, I’ve invested in a laser level, which made such a difference in accuracy and efficiency. It’s surprising how small discrepancies can lead to visible issues later, especially in larger rooms. I’m curious—what do others prefer for checking for high and low spots? Do you find mechanical or digital tools better for quick assessments, or is a long straightedge enough? Personally, I find that combining multiple tools—laser, level, and visual checks—gives the most confidence that the subfloor is truly ready for the next step. Would love to hear some tips from other experienced DIYers on their go-to measurement techniques for ensuring a perfectly level subfloor.
This post really hits home for me, especially the emphasis on thorough measurement and preparation before starting to level the floor. I used to rely solely on a traditional spirit level, thinking that was enough, but I quickly learned that it doesn’t catch all the dips and bumps. Investing in a laser level was a game changer—being able to see high and low spots from a distance helped me plan my approach much more effectively. I also found that checking multiple points across the room, especially along the edges and center, gives a better overall picture. It’s interesting how small discrepancies can cause major issues over time, especially with large open spaces.
One challenge I’ve encountered is dealing with uneven plywood subfloors where some areas seem stable but have underlying moisture issues. Have others had experience with moisture affecting leveling? If so, what techniques or tools do you recommend to address moisture before proceeding? It’s something I want to incorporate into my prep process to ensure long-term durability. Would love to hear others’ strategies—sometimes, the smallest detail can prevent future headaches.