I remember the first time I rolled out a new tile, only to step onto it and immediately feel that unsettling bounce beneath my feet. It was a lightbulb moment—subfloors that aren’t properly braced can turn a beautiful tile job into a nightmare of cracks and loosened grout. If you’ve ever experienced that squishy, unstable feeling under your tile, you’re not alone. That bouncy sensation isn’t just an annoyance; it’s a warning sign of underlying issues that, if left unaddressed, can cost you time, money, and frustration.
Why a Stable Subfloor Matters More Than Ever
In the world of flooring installation, a solid base is everything. With the surge in demand for durable, long-lasting tile projects in 2026, understanding how to secure your subfloor properly has become critical. A bouncy subfloor doesn’t just compromise the integrity of your tile; it invites problems like cracking, uneven surfaces, and premature wear. According to industry experts, failure to brace or correct a loose subfloor can reduce the lifespan of your entire flooring system by up to 50%. That’s a staggering statistic that underscores the importance of tackling this issue head-on.
Is Bracing Your Subfloor Actually Worth the Hype?
When I first started, I thought a little extra reinforcement wouldn’t make much difference. I made the mistake of underestimating how vital proper bracing is, especially for larger formats or high-traffic areas. Early on, I learned the hard way that cutting corners on subfloor prep often leads to costly repairs later. Proper bracing might seem tedious initially, but it’s the foundation of a flawless tile job. If you’re curious about how to do it right, I highly recommend checking out [this guide on floor leveling techniques](https://tiletrendshop.com/precise-floor-leveling-techniques-to-achieve-flawless-surfaces) for comprehensive tips.
So, have you faced the challenge of a wobbly, unstable subfloor? If so, don’t worry—we’re about to explore four effective bracing tactics that will set your project on the path to success. These methods have helped me and countless others turn shaky floors into rock-solid foundations, ensuring our tiles stay perfect for years to come. Let’s dive into these tried-and-true strategies and get your flooring project moving in the right direction.
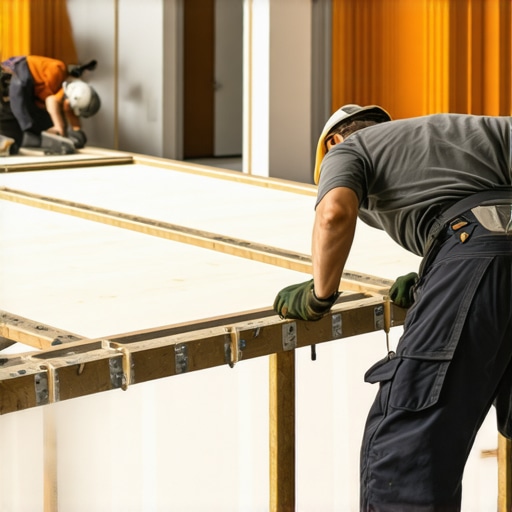
Start with a Thorough Inspection of Your Subfloor
Begin by assessing the current state of your subfloor. Use a straightedge or a level to check for flatness; uneven areas will need correction before any bracing. Walk across the surface and listen for hollow sounds, which indicate looseness or voids. This initial step is crucial—if the subfloor isn’t solid, no amount of bracing will guarantee a durable tile installation. I once ignored this step and proceeded, only to have tiles loosen within months, leading to costly repairs. Always remember: a solid foundation is key to a successful project.
Remove and Replace Any Damaged Sections
If inspection reveals rotten wood, cracked plywood, or areas with mold, remove these sections entirely. Use a pry bar or saw to carefully detach damaged material, then replace with new, high-quality subflooring. Securing these parts properly creates a uniform base for bracing. Skipping this can create weak spots, causing bounce and cracks later. I learned this the hard way when a patched section failed under the tile, prompting me to redo the entire subfloor. Don’t cut corners—ensure every segment is sound.
Apply Subfloor Adhesive for Additional Bonding
Before adding braces, seal the subfloor with a high-quality adhesive. Spread the adhesive evenly with a notched trowel to enhance bonding and reduce movement. This step acts like a glue that holds everything together, reducing susceptibility to bounce. I once neglected this step, and my tiles lasted only a year before loosening. Incorporate adhesive to improve the overall rigidity of the subfloor—think of it as giving your base a strong, unshakeable foundation.
Install Cross-Bracing or Floor Joist Reinforcement
Use cross-bracing techniques, such as adding diagonal braces between joists, to prevent flexing. For joists spaced more than 16 inches apart, install additional blocking or sistering of joists for increased support. Secure braces with screws or nails rated for load-bearing applications, ensuring they are tightly fitted. When I tackled a large high-traffic area, I installed cross-braces between joists, which dramatically reduced bounce. This method turns a spongy floor into a solid platform, preventing tile movement. Remember, the goal is to distribute weight evenly and eliminate any flexing.
Add Additional Support with Blocking and Shims
For stubborn weak spots, insert blocking—solid wood pieces cut to fit between joists or beneath subfloor panels. Use shims to raise low areas, ensuring a flat surface. Fasten blocking securely to create a stiff support grid. While working on a basement floor, I used shims and blocking to level uneven sections, turning a wavy surface into a nearly perfect plane. Precise support minimizes bounce, leading to a professional-looking, long-lasting tile surface.
Ensure Proper Fastening and Sealing
Finally, fasten everything thoroughly with appropriate screws, not nails, to prevent future loosening. Use a drill to sink screws just below the surface, avoiding damage to the subfloor. Seal seams with construction adhesive or sealant to prevent moisture ingress, which can weaken supports over time. During a DIY job, I overlooked sealing, and water intrusion caused some support joints to rot, leading to instability. Always double-check your fasteners and seals—they are your last line of defense against future bounce and failure. Implementing these steps transforms a questionable subfloor into a fortress, giving your tile project a stable, lasting foundation. For more detailed insights on leveling techniques, check out [this guide](https://tiletrendshop.com/precise-floor-leveling-techniques-to-achieve-flawless-surfaces), which I found invaluable during my last remodel.Many homeowners and DIY enthusiasts believe that laying tile, hardwood, or performing floor leveling is merely about following basic steps. However, true mastery requires understanding nuanced aspects that often go unnoticed. For instance, a common myth is that a perfectly flat surface guarantees a successful installation. In reality, subtle variations in subfloor porosity or moisture levels can cause long-term issues if overlooked. Advanced installers pay close attention to these details, as even minor oversights can lead to cracks or buckling down the line.
Another frequent mistake is relying solely on leveling compounds without addressing the underlying causes of unevenness. Many skip thorough subfloor inspections, which can mask problems like moisture intrusion or inadequate framing. This oversight often results in repairs that are more costly and time-consuming later. It’s essential to analyze the root causes before applying quick fixes.
Why do some floors still fail despite following all standard procedures?
Often, the answer lies in hidden factors like subfloor porosity or unforeseen structural shifts. A study published by the National Tile Contractors Association highlights that neglecting subfloor moisture content is a primary contributor to post-installation failures. Ensuring proper moisture testing and choosing compatible materials tailored to subfloor conditions is crucial for durability.
Moreover, many overlook the importance of proper fastener selection and technique. Using nails instead of screws, or failing to pre-drill, can cause fastening issues that compromise the entire system. Paying attention to these finer points—like sealing seams correctly—makes a significant difference in longevity. For expert guidance, I recommend exploring [floor leveling techniques](https://tiletrendshop.com/precise-floor-leveling-techniques-to-achieve-flawless-surfaces), which delve into subtleties often missed by beginners.
If you’ve ever experienced popping tiles or uneven hardwood, chances are these hidden nuances played a role. Mastering these details transforms your project from basic to professional-grade. Have you ever fallen into this trap? Let me know in the comments.Maintaining your tile and hardwood floors is crucial for ensuring they stay beautiful and durable over the years. Investing in the right tools and adopting a consistent maintenance routine can significantly extend the life of your flooring. One indispensable tool I rely on is a high-quality microfiber dust mop; it effectively traps dust and debris without scratching sensitive surfaces, making daily cleaning quick and gentle. For deeper cleaning, I recommend a steam mop specifically designed for hardwood floors, as it sanitizes without the harsh chemicals that can damage finishes. Regularly inspecting and resealing grout lines and hardwood surfaces helps prevent moisture intrusion, which is a common cause of long-term damage. Using a pH-neutral cleaner formulated for your specific flooring type will preserve the finish and shine, avoiding the dulling effects of acidic or alkaline solutions. Additionally, consider investing in a moisture meter to monitor subfloor conditions periodically, especially if you live in an area prone to humidity fluctuations. Properly maintaining your floors requires consistent effort, but the payoff is a surface that not only lasts longer but also continues to elevate your home’s aesthetic.
How do I keep my flooring installation in top shape over time?
Adopt a proactive maintenance routine by scheduling biannual inspections, during which you check for signs of wear, loose tiles, or shifting hardwood planks. Address minor issues promptly—tightening loose tiles with a grout sealer or re-staining scratched wood can prevent larger problems down the line. Applying a fresh coat of finish or sealant every few years maintains the protective barrier against dirt, moisture, and scratches. For tile, ensuring the grout lines remain sealed prevents water seepage that can compromise the subfloor. Incorporate tools like a rotary grout cleaner or a power buffer with appropriate pads for efficient upkeep. Remember, using professional-grade tools enhances both the quality and safety of your maintenance efforts. For comprehensive guidance on maintaining specific flooring types, explore [this expert guide on hardwood floor care](https://tiletrendshop.com/hardwood-floor-care-secrets-to-longevity-and-shine). Before embarking on your maintenance routine, test your floor’s moisture levels with a reliable moisture meter—neglecting this step can lead to unanticipated damage, as highlighted in recent research by flooring specialists. Try integrating a moisture check into your spring cleaning schedule to catch hidden issues early and keep your floors looking pristine for years to come. Regular maintenance might seem time-consuming, but with the right tools and a strategic approach, it becomes a manageable part of homeownership that pays dividends in longevity and style.Every seasoned flooring professional has faced unexpected challenges that reveal the true complexity behind achieving flawless results. One of my most eye-opening lessons came from realizing that no matter how perfect your tile layout appears, a hidden unstable subfloor can silently sabotage your efforts. That moment of discovery underscored the importance of thorough inspection and preparation, lessons I now wish I had embraced sooner. Another insight I cherish is the power of proper moisture testing—ignoring this step can lead to cracks and buckling that undo months of meticulous work. These experiences have taught me that patience, attention to detail, and respecting the unseen layers beneath the surface are what truly separate amateur results from professional finishes. Embracing continuous learning and staying vigilant about the foundational elements can save time, money, and frustration, ultimately elevating your craftsmanship and confidence in every project.