Ever spent hours on a flooring project, only to step back and see uneven seams, crooked tiles, or an imperfect finish? I remember my first big tiling job, thinking I had everything down pat—until I saw the uneven grout lines and realized I’d overlooked the importance of proper leveling and preparation. That lightbulb moment hit hard. It’s frustrating, right? But here’s the truth: with the right strategies, you can avoid these pitfalls and achieve professional-quality results every time.
Why Precision Matters More Than Ever in 2025
In recent years, the standards for flooring quality have skyrocketed. Homeowners now expect a sleek, durable finish that lasts decades, not just a quick fix. And let’s face it—poor installation can ruin the look and longevity of your entire space. According to flooring experts, a common mistake early in the process is neglecting proper surface preparation, which can lead to cracking, uneven surfaces, and costly repairs down the line. That’s why mastering precise techniques is no longer optional; it’s essential.
If you’ve faced the disappointment of uneven floors or crooked tiles, you’re not alone. Many DIY-ers and even seasoned pros underestimate just how crucial it is to start with a perfectly leveled and prepared surface. But don’t worry—I’m here to share the tried-and-true strategies that will get your project on the right track from the beginning.
Is Perfect Leveling Really Worth the Hype?
Early on, I made the mistake of rushing through surface prep, thinking it was just a preliminary step. Turns out, skipping detailed leveling and not following expert techniques like those outlined in this guide cost me dearly. Cracks appeared within months, and I wished I had taken the time to do it right from the start. This experience taught me that investing in proper leveling and surface prep isn’t just a good idea—it’s the foundation of lasting beauty and durability.
In the upcoming sections, I’ll walk you through the key steps to elevate your installation game. From choosing the right materials to mastering leveling techniques, you’ll learn how to avoid common mistakes and ensure your floors look flawless for years to come. Ready to transform your space with confidence? Let’s dive in and get started!
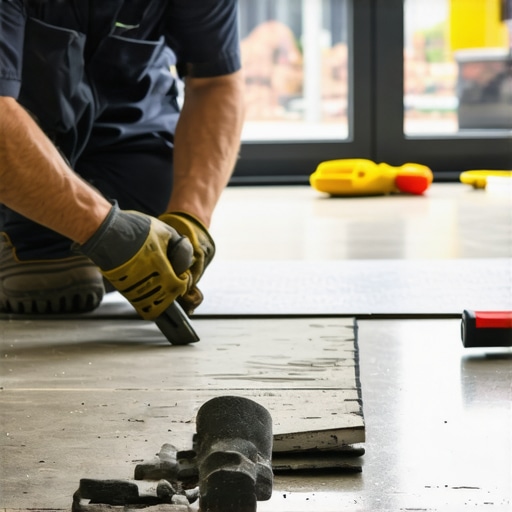
Start with a Solid Foundation
Achieving flawless flooring begins long before the first tile or plank is laid. It’s crucial to ensure your subfloor is clean, dry, and free of debris. I once learned this the hard way when I skipped thorough cleaning, and my tiles cracked within weeks. To avoid this, remove all dust, grease, and loose material, then verify the surface is level using a reputable level or laser tool. For uneven patches, apply a self-leveling compound following instructions from this guide. Proper surface prep is the cornerstone of lasting results.
When it comes to flooring, many DIY enthusiasts and even seasoned pros often fall prey to misconceptions that can sabotage their projects. One of the most common myths is that surface preparation is less critical than the actual laying of tiles or hardwood. In reality, skipping or rushing through the surface prep stage can lead to uneven floors, cracks, and costly repairs down the line. Proper surface leveling, using techniques outlined in this guide, is the secret sauce for durability and a flawless finish.
Another trap many fall into involves the choice of materials. For example, choosing a self-leveling compound without verifying the existing subfloor’s moisture levels can cause long-term issues like mold and warping. Advanced installers know that moisture testing is a step that must never be overlooked—something often underestimated by beginners. According to industry expert hardwood flooring specialists, ignoring moisture levels can reduce the lifespan of your flooring by years.
Why Do So Many Get Surface Leveling Wrong Despite Easy Tips?
Many assume that applying a quick layer of self-leveling compound will solve unevenness. But this approach is flawed because surface imperfections often stem from structural issues like joist sagging or subfloor rot. Addressing these problems requires a deeper diagnostic process—using a laser level or professional moisture meter—and sometimes structural reinforcement. If these underlying issues are left uncorrected, no amount of leveling compound will give you a truly smooth surface. For detailed strategies, check out this comprehensive guide.
Furthermore, one common misconception is that all leveling compounds are created equal. In truth, choosing the wrong product—such as one not rated for the specific subfloor type—can lead to adhesion failure and future cracks. Remember, the right product combined with proper application techniques is key. Advanced tips include mixing to the precise consistency and applying in thin, even layers, as detailed in this resource.
In conclusion, the devil is in the details. Surface prep, material choice, diagnostic steps, and application techniques are all crucial for a long-lasting, beautiful floor. Don’t fall into the trap of believing that flooring is just about aesthetics; it’s equally about structural integrity and durability. Have you ever fallen into this trap? Let me know in the comments, and stay tuned for more expert tips to elevate your flooring projects!
Keeping your flooring in top shape over the years requires more than just initial installation skills. It involves using the right tools, establishing solid maintenance routines, and understanding how to scale your efforts as your space evolves. As someone who’s been in the game for years, I can tell you that investing in quality equipment and knowing how to maintain it makes all the difference in achieving lasting, professional results.
Investing in Precision Tools for Longevity
One of the most crucial tools I rely on is a high-quality laser level. Unlike traditional bubble levels, a laser level provides a much more accurate reference point for leveling surfaces, especially in larger areas. For example, when I was working on a kitchen overhaul, using a laser level helped me identify subtle dips that a regular level could have missed. This ensured my tiles and hardwood planks sat perfectly flat, preventing future cracking or uneven wear. For the best results, I recommend models that feature self-leveling capabilities, which automatically adjust for minor surface irregularities, saving time and reducing user error.
Another indispensable tool is a moisture meter. Moisture levels can make or break your flooring’s durability, especially with materials like hardwood or certain tiles. I personally use an pin-type moisture meter because it provides precise readings directly from the subfloor, helping me avoid installations over damp surfaces that could lead to warping or mold. Regularly checking moisture levels during and after installation ensures your floors stay resilient over time.
Why Proper Maintenance Tools Matter
Once your floors are installed, maintaining their beauty and integrity is a continuous process. I swear by a microfiber mop paired with a pH-neutral cleaner designed specifically for your flooring type. This combo prevents scratches and buildup, keeping your surface looking fresh. For hardwood floors, I also recommend a soft-bristled broom for daily dust removal, as dirt particles can scratch the finish if left unchecked.
For deeper cleaning or repairs, I turn to a hand-held vacuum with gentle suction and soft attachments. It’s perfect for corners and edges that are hard to reach with a mop. Additionally, applying a quality polish or sealant periodically can extend your flooring’s lifespan, especially in high-traffic areas.
Future Trends in Flooring Maintenance
The trend I see heading into the future is the integration of smart technology. Devices that monitor humidity, wear, and even surface integrity in real-time are becoming more affordable. Imagine a self-monitoring system that signals when your floors need cleaning, polishing, or repair—saving you time and costly repairs in the long run. Staying ahead means investing in these innovative tools now, which will pay off over the lifespan of your flooring.
How do I maintain my floors over time?
Regular upkeep is key. Schedule routine inspections using your moisture meter and laser level to catch issues early. Keep cleaning tools in top shape—such as replacing worn brushes or recalibrating laser devices—to ensure ongoing accuracy. Additionally, document your maintenance routine and any repairs, so you can identify patterns or recurring issues that might need professional intervention. Remember, a proactive approach preserves your investment far better than reactive fixes.
Try implementing a monthly check using your moisture meter and a quick visual inspection with your laser level. It’s a simple yet powerful way to extend the life of your floors and maintain their stunning appearance for years to come. For detailed maintenance strategies, you can explore more at this resource.

The Hardest Lesson I Learned About Floor Leveling
One of the toughest lessons I encountered was underestimating the complexity of subfloor issues. I once thought a quick application of self-leveling compound would fix uneven surfaces, but it only masked deeper structural problems that caused cracks months later. The realization taught me that diagnosing underlying issues like joist sagging or moisture problems is crucial before leveling. This insight dramatically improved my approach and saved me from costly repairs down the line.
3 Myths About Floor Leveling That Held Me Back
First, I believed all leveling compounds were the same—until I learned that selecting the wrong type could lead to adhesion failure. Second, I thought surface prep could be rushed—neglecting this step almost always results in uneven floors. Third, I assumed moisture testing was unnecessary, which is false; moisture levels can make or break your project’s durability. Busting these myths has transformed how I prepare and execute flooring installations, ensuring lasting beauty and durability.
What Experts Won’t Tell You About Achieving a Perfect Finish
Many professionals keep silent about the importance of diagnosing structural issues before leveling. They also emphasize that choosing the right tools, like a laser level and moisture meter, is vital for accuracy. Additionally, proper application techniques, such as thin, even layers of leveling compound and correct mixing, are often overlooked but essential for long-lasting results. Learning these insider secrets has elevated my flooring projects from mediocre to professional-grade.
My Essential Toolkit for Floor Leveling
I rely heavily on a high-quality laser level because it provides precise, consistent measurements over large areas, avoiding subtle dips. A moisture meter is indispensable to prevent installing over damp surfaces that could cause future warping. I also trust a reputable self-leveling compound rated for my specific subfloor type, ensuring adhesion and stability. These tools, combined with knowledge from trusted resources like this guide, make my projects smoother and more reliable.
Don’t Be Afraid to Start Your Flooring Journey
Embarking on a flooring project with the right techniques and tools can be incredibly rewarding. Remember, the key is investing time in proper surface prep and diagnostic steps—these are the foundations of lasting beauty. With patience and the right knowledge, you can achieve flawless results that stand the test of time. So, why not take that first step today? Your perfect floor is within reach.
Have you ever struggled with diagnosing subfloor issues or choosing the right leveling tools? Share your experiences below—I’d love to hear your story!
I completely agree with the emphasis on surface prep—it’s often overlooked but can make or break a project. Personally, I’ve learned the hard way that rushing this step leads to cracks and uneven floors down the line. Using a laser level has been a game changer for me, especially in larger spaces where subtle dips are hard to detect visually. I also recommend testing moisture levels directly from the subfloor before proceeding, as dampness can cause a lot of long-term problems, particularly with hardwood. One thing I’ve found helpful is marking problem areas with chalk and then addressing those spots with additional reinforcement or leveling before laying the tiles or planks.
Does anyone have tips for diagnosing and fixing joist sagging or subfloor rot early on? Those structural issues can be sneaky but are critical to address upfront, right? I’d love to hear how others have successfully tackled these challenges before they impact the finished look.
This post really hits home about the importance of surface preparation. I remember a project where I skipped thorough leveling, thinking I could fix small dips after the fact, but it led to uneven grout lines and, ultimately, a lot of frustration. Using a laser level has definitely elevated my game; it’s surprising how many subtle imperfections can be detected that a standard spirit level might miss. Also, moisture testing is often overlooked, yet I’ve experienced firsthand how dampness can cause issues down the line, especially with hardwood flooring. It’s also worth mentioning that addressing structural issues like joist sagging upfront saves a lot of headaches later.
In my experience, early diagnosis of potential subfloor problems, such as rot or sagging joists, is crucial. Have others found effective ways to detect these structural issues before laying down the new floor? I’ve heard that combining moisture meters with precise visual inspections can help, but I’d be interested in hearing about specific techniques or tools that others use to catch these problems early.