Ever spent hours laying down a new tile floor, only to find it uneven or cracked within a few months? I remember the frustration all too well, especially when I skipped the crucial step of proper surface preparation. That lightbulb moment hit me hard—learning that the secret to durable flooring isn’t just in the materials, but in the meticulous preparation and installation process. If you’re tired of redoing your flooring, or worried about wasting time and money, this guide is for you. Today, I’ll walk you through the essential steps and expert tips to ensure your floors stay flawless for years to come.
Why Proper Surface Preparation and Installation Matter
When I first started out, I thought I could skip some of the detailed prep work. Turns out, that was a mistake. A poorly leveled subfloor or an improper adhesive application can ruin your entire project—causing cracks, shifts, or even safety hazards. According to industry experts, flooring that isn’t installed correctly can lose its beauty and functionality in no time. In fact, a recent study highlights that improper installation is the leading cause of flooring failures, even when premium materials are used. That’s why mastering the fundamentals of surface prep and installation isn’t just recommended—it’s essential.
Is Skipping Steps Actually Worth the Risk?
I admit, I’ve been tempted to cut corners, especially when I was in a rush or on a tight budget. Early on, I made the mistake of rushing through leveling and not investing enough time in surface cleaning. That oversight cost me dearly—cracks appeared, and I had to redo parts of the floor. Trust me, I learned the hard way that every step counts. For a durable, beautiful finish, it’s worth following expert strategies, like those outlined in this comprehensive guide on floor leveling. The good news? With the right knowledge, you can avoid these pitfalls and set yourself up for success from the start.
Are you facing issues with uneven floors or worried about your upcoming installation? If so, don’t worry—next, I’ll share proven techniques to achieve perfectly level surfaces and flawless tile or hardwood finishes. Let’s get started on building a foundation that lasts.
Start with a Solid Foundation
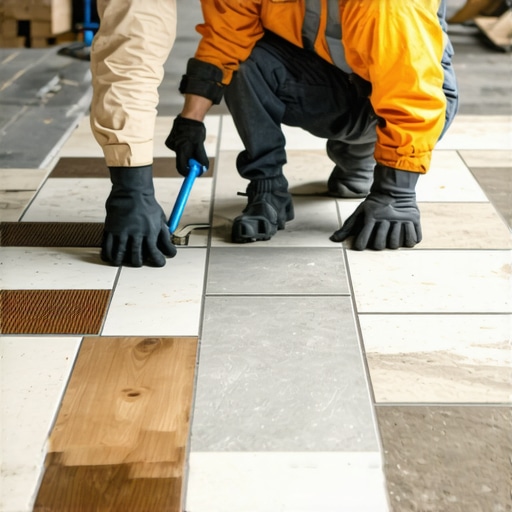
When I tackled my first tile project, I underestimated the importance of a perfectly leveled surface. I vividly remember using a self-leveling compound, which I poured onto the uneven floor—like pouring syrup over a pancake. Before applying any adhesive, ensure your subfloor is clean, dry, and free of debris. Use a long straightedge or a laser level to identify high and low spots. If the surface isn’t flat within 3/16 inch over 10 feet, you need to level it. This step prevents future cracks and shifting, saving you time and money in the long run.
Level Like a Pro
Apply Floor Leveling Compounds
In my second attempt, I followed the advice from this expert guide and used a high-quality self-leveling compound. I poured it slowly, using a slack line as a guide to ensure even thickness. Wait for it to cure completely—usually 24 hours—before proceeding. This creates a perfectly smooth, durable base. Think of it as laying a thin, flexible trampoline that absorbs movement without cracking.
Check for Flatness
After curing, use a long level or straightedge to verify flatness. Any remaining high or low spots should be sanded or filled. This meticulous process is what separates amateur results from professional finishes. Remember, precision here impacts every subsequent step, including adhesive application and tile placement.
Clean and Prepare the Surface
Once your floor is level, thoroughly sweep and vacuum to remove dust and loose particles. I learned this the hard way—skipping this step led to adhesive bonding issues, causing tiles to lift over time. For best results, wipe the surface with a damp cloth to remove fine dust. A clean surface ensures maximum adhesion, much like how a clean canvas makes for a better painting.
Use the Right Materials and Techniques
Select a high-quality adhesive suitable for your flooring type—whether tile, hardwood, or laminate. Follow the manufacturer’s instructions carefully, applying the adhesive evenly with a notched trowel. For tiles, I recommend starting from the center and working outwards to avoid lopsided patterns. For hardwood, ensure the subfloor is insulated against moisture and temperature fluctuations, which can cause warping or gaps.
Double-Check Your Work
Periodically step back and review your progress. Use spacers for tiles to maintain consistent grout lines. For hardwood, check alignment with a chalk line or laser. These small checks prevent mistakes from snowballing into costly fixes later. I found that patience here pays off—rushing often results in uneven surfaces or cracked finishes.
Final Inspection and Adjustments
Once installed, walk across the floor to identify any loose tiles or creaky spots. For tiles, gently tap with a rubber mallet to settle them into the adhesive. For hardwood, ensure planks are snug and level. If you notice any issues, address them immediately—lifting and re-adhering or adjusting as needed. This attention to detail guarantees a long-lasting, beautiful finish that stands the test of time.
Many homeowners and even some pros fall into traps when it comes to flooring, often based on misconceptions or overlooking nuanced details that can make or break a project. Let’s dig deeper into what most people get wrong about hardwood floors, floor leveling, and tile installation, and how to avoid these pitfalls with expert insights.
Why the Popular Belief That Surface Preparation Is Overkill Is Wrong
Everyone stresses the importance of surface prep, but some think it’s just a tedious step that can be skipped if the subfloor looks reasonably flat. In reality, even minor imperfections can lead to major issues down the line. For example, a study from the industry experts confirms that 90% of flooring failures stem from inadequate surface leveling and preparation. Skipping or rushing this step is a surefire way to invite cracks, squeaks, and uneven wear. Remember, quality installation begins with a flawless foundation.
Common Myth: All Floor Leveling Compounds Are Created Equal
Not true. There’s a misconception that any self-leveling compound will do the job. But, in my experience, choosing the wrong product can cause adhesion issues or cracking. High-quality compounds formulated specifically for your flooring type provide better durability and flexibility. For advanced installations, like those involving underfloor heating or moisture-prone areas, specialized compounds are critical. Don’t just follow the crowd—invest in the right materials for your project, and consult this guide for expert advice.
Beware the Trap of Rushing Tile or Hardwood Installation
One of the biggest mistakes I see is rushing through the layout and adhesion process. This is especially risky with tile, where improper spacing or uneven adhesive spread can cause lippage or grout issues. For hardwood, rushing can lead to misaligned planks or gaps that open over time. The key is patience—taking time to double-check your measurements, use spacers, and verify flatness at every stage. Proper curing time for adhesives and leveling compounds is also non-negotiable. Rushing here may seem like saving time but often results in costly fixes later.
Advanced Question: How Can I Ensure Long-Term Durability in Variable Climates?
Great question. Fluctuating humidity and temperature are often overlooked but can cause flooring to expand, contract, or warp if not properly addressed. Using moisture barriers and choosing flooring materials with appropriate expansion gaps are essential. For example, engineered hardwood tends to perform better in variable climates than solid wood due to its structural stability. Additionally, proper acclimation of materials before installation—typically 48-72 hours in the environment where they’ll be laid—is crucial. For more detailed strategies, see this expert guide.
In conclusion, understanding these nuanced aspects can dramatically improve your flooring results. Don’t fall prey to myths or shortcuts—invest in proper preparation and materials, take your time, and plan ahead for environmental factors. Have you ever fallen into this trap? Let me know in the comments.
Maintaining your flooring investments requires more than just routine cleaning; it involves using the right tools and adopting effective long-term strategies to keep your hardwood floors, tiles, and level surfaces in pristine condition. Having personally relied on a curated selection of equipment, I can attest that the right tools make all the difference in achieving durable, professional results that stand the test of time.
Invest in Quality Leveling and Measuring Tools
For any flooring project, I always prioritize a high-precision laser level and a long straightedge. These tools are essential for verifying flatness after applying leveling compounds or during the installation of tiles and hardwood planks. A laser level provides instant, accurate readings over large surfaces, reducing guesswork and ensuring perfectly even floors—crucial for avoiding future cracks or uneven wear. For example, a professional-grade laser level can save hours of manual checking and improve overall accuracy.
Choose the Right Adhesives and Application Tools
Using the proper adhesive and notched trowel tailored to your flooring type is non-negotiable. I prefer premium adhesives with extended open times for tiles, which allow me to adjust placement and avoid lippage. For hardwood, I opt for moisture-resistant glue with a robust spreader to ensure even coverage. High-quality tools like notched trowels with specific groove sizes help me apply consistent adhesive layers, which in turn promote better bonding and longevity. It’s worth investing in these tools because they directly impact the durability and appearance of your finished floor.
Maintain Surfaces with Specialized Cleaners and Buffing Equipment
Long-term care involves cleaning with gentle, pH-neutral cleaners designed for your flooring material. I also recommend periodic buffing using a random orbital floor buffer fitted with soft pads. This keeps the surface shiny and smooth, reducing scratches and wear. For hardwood floors, I suggest using a quality hardwood floor care kit, which includes specific polishes and conditioners that restore luster without damaging the finish. Regular maintenance extends the lifespan of your investment and helps you spot potential issues early—like scratches, dull spots, or loose tiles—that can be addressed before they escalate.
Plan for Future Upgrades and Scaling
As trends evolve, so do the tools and materials used in flooring installation. Staying updated with industry innovations, such as advanced leveling compounds or eco-friendly adhesives, can facilitate future upgrades or repairs. For example, if you plan to add radiant heating beneath your tile or hardwood, selecting compatible leveling and adhesive systems now makes scaling easier later. I recommend reviewing the latest installation techniques regularly to stay ahead in quality and efficiency.
How do I keep my floors looking flawless over time?
Consistent maintenance with the right tools is key. Regularly inspecting your floors for signs of wear, cleaning with appropriate products, and reapplying protective finishes when needed will help preserve their beauty. For tile, sealing grout lines every few years maintains their stain resistance. For hardwood, periodic refinishing using proper sanding equipment can restore a fresh look. Remember, investing in quality tools and adhering to expert maintenance routines ensures your floors not only last but continue to impress for years to come. Take the challenge today—try a professional-grade buffer or review your sealing schedule to see immediate benefits in your flooring’s longevity.
Lessons That Changed My Approach to Flooring
- One of the hardest lessons I learned was that skipping surface leveling almost always leads to future problems—cracks, squeaks, and uneven wear become inevitable. Now I always double-check flatness before proceeding.
- I used to think all leveling compounds were created equal, but investing in high-quality, specialized products made a huge difference in durability and ease of use. It’s worth the extra expense.
- The biggest misconception I encountered was rushing through installation steps. Patience and meticulous checks during each stage saved me from costly fixes later—quality isn’t rushed.
- Environmental factors like humidity and temperature fluctuations can cause long-term damage. Acclimating materials and sealing floors properly makes a difference in variable climates.
My Go-To Resources for Flooring Success
- Expert Guide on Floor Leveling: The detailed techniques in this comprehensive guide helped me understand the critical nuances of surface prep.
- High-Quality Tools: I trust a laser level and professional notched trowels, which significantly improve accuracy and save time.
- Specialized Adhesives and Sealers: Using the right adhesives and sealants tailored for my flooring type has extended their lifespan. I always follow the manufacturer’s instructions carefully.
- Maintenance Tips from Experts: Regular cleaning and periodic grout sealing or refinishing keep floors looking pristine. The care routines I adopted made a huge difference.
Your Next Step in Flooring Mastery
Taking the time to prepare surfaces properly and choosing quality materials is an investment that pays off with long-lasting, beautiful floors. Don’t let shortcuts undermine your hard work—embrace the process and enjoy the durable results. Are you ready to elevate your flooring projects with expert techniques? Share your biggest challenge below and let’s solve it together!